Friday, 28 July 2017

beautiful blue bird


  • hunkydory birdie blossoms luxury card collections: beautiful blue bird (& a sentiment from the 'home sweet home' collection)
  • silver mirri card
  • DL, 6x4", 6x6" & 8x8" white card blanks

For the largest square card, I cut the patterned card down and layered on silver mirri to fill the card front. I then positioned the image and sentiment toppers onto the front, using foam to add dimension.
I used the remaining cardstock to create this DL card. I simply covered the front with the patterned cardstock and added the three smaller toppers in the middle.
For the smaller square card, I matt and layered the front with the silver mirri card and a section of the half a sheet of patterned cardstock. The image and sentiment toppers completed the front.

For the 6x4" card, I added the remaining strip of patterned card onto the front with a mirri edge to the top and bottom. I used the last image topper from the set, glued down on foam, alongside a sentiment from the 'home sweet home' collection.
Mx

Wednesday, 26 July 2017

birdie blossoms

  • hunkydory birdie blossoms luxury card collections: home sweet home
  • Hunkydory essential book of 2016 sentiments
  • silver mirri cardstock
  • A5, 5x7" & 5x5" square card blanks

For the first 5x7" card, I cut the patterned cardstock to fit the card front with a silver mirri border. I simply added the topper to the centre, using foam for dimension, as it has both the image and sentiment in one.
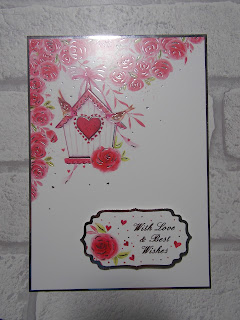
I used the other half of the cardstock to create the second 5x7" card. Again, I mat and layered the cardstock and mirri for the card front. I completed this with a sentiment from the collection in the bottom corner to balance the image in the top corner.

For the A5 card, I used the other half sheet of patterned cardstock to cover the front. As it felt a bit too fussy all over, I gutted the centre of the floral design to use on another card. This was covered with a matt and layer of mirri and white cardstock, sized to frame the image topper. I then added the topper, central on the panel and finished with a little sentiment topper in the bottom corner.

Using the floral cardstock taken from the centre of the card above, I was able to create a panel across a 5" square card, edged with mirri card. I added the remaining topper from the collection and finished with a coordinating sentiment I found in the essential book.  
Mx

Tuesday, 11 July 2017

shop shop shop


  • Hunkydory for the girls luxury card collection 'shop shop shop'
  • Silver mirri card
  • A5 card blanks 
For the first card, I trimmed down one of the patterned cardstock pieces to fit the front of the card with a matt of mirri card. I then carefully positioned the large topper and the floral elements onto foam to complete the front of the card.
For the second card, I trimmed and matted the cardstock onto the front of the card with the mirri card. I added the image topper, then placed the sentiment toppers in the corner to finish it off.
Mx

Sunday, 9 July 2017

birds...


I used a Hunkydory toppers and cardstock collection to create these three lovely cards. Unfortunately, I didn't make a note of which set it is and just can't work it out, but I thought I would share them with you all anyway.
This 8" square card was layered with a matt of gold mirri card and the patterned cardstock trimmed to fit. I added the image topper with the layers of decoupage to create dimension on the flowers and birds. I finished the design with a coordinating sentiment in the bottom corner.

 For this 6x6" card, I matted a section of the other patterned paper onto the kraft card blank. I simply added the image topper and overlapped the sentiment topper using different depths of foam to create layers and dimension. 
For this card, I used a 5x7" kraft card blank which I edged with wink of stella to create a shimmery border. I then trimmed half the cardstock with the image on and matted flat onto the card front. I used a memorybox die to cut and stack 2 layers of kraft cardstock for the sentiment. I glued the layers together and added wink of stella to create a glittery finish, before gluing into place to complete the card. I thought the die gave the card a different look and fit well to add a big sentiment onto the pretty image, as the sentiment toppers don't always work for everycard.
Mx