Showing posts with label pretty. Show all posts

Saturday, 25 June 2022

christening day


  • LOTV: baby christening
  • SU!: inspired events
  • First edition papers ‘blank canvas’
  • Memento ‘tuxedo black’ ink pad
  • Neenah classic crest cardstock
  • Copics: R01,32. RV42. YR30. B41. BG70. YG93. E30,35,53,55,57. W00,1,3.
  • Sakura jelly roll ‘clear star’ glitter pen
  • Pink ribbon. 
To make this card, I cut a 5” square mat and stamped my image and sentiments in place. I coloured my image using copics, then added details to the sentiment and flowers using a glitter pen. 
I wrapped ribbon around the top of the panel and tied the ribbon into a bow. I then layered this panel onto a piece of pink paper.
I used the pink paper to cover the front of my 7” square card blank before adding a mat of cream patterned paper. I used foam tape to attach the finished panel to the centre of the card.
I think this is a nice christening card... it uses quite a traditional image, made clean and fresh by using the coral and keeping the design simple.
Mx

Friday, 19 July 2019

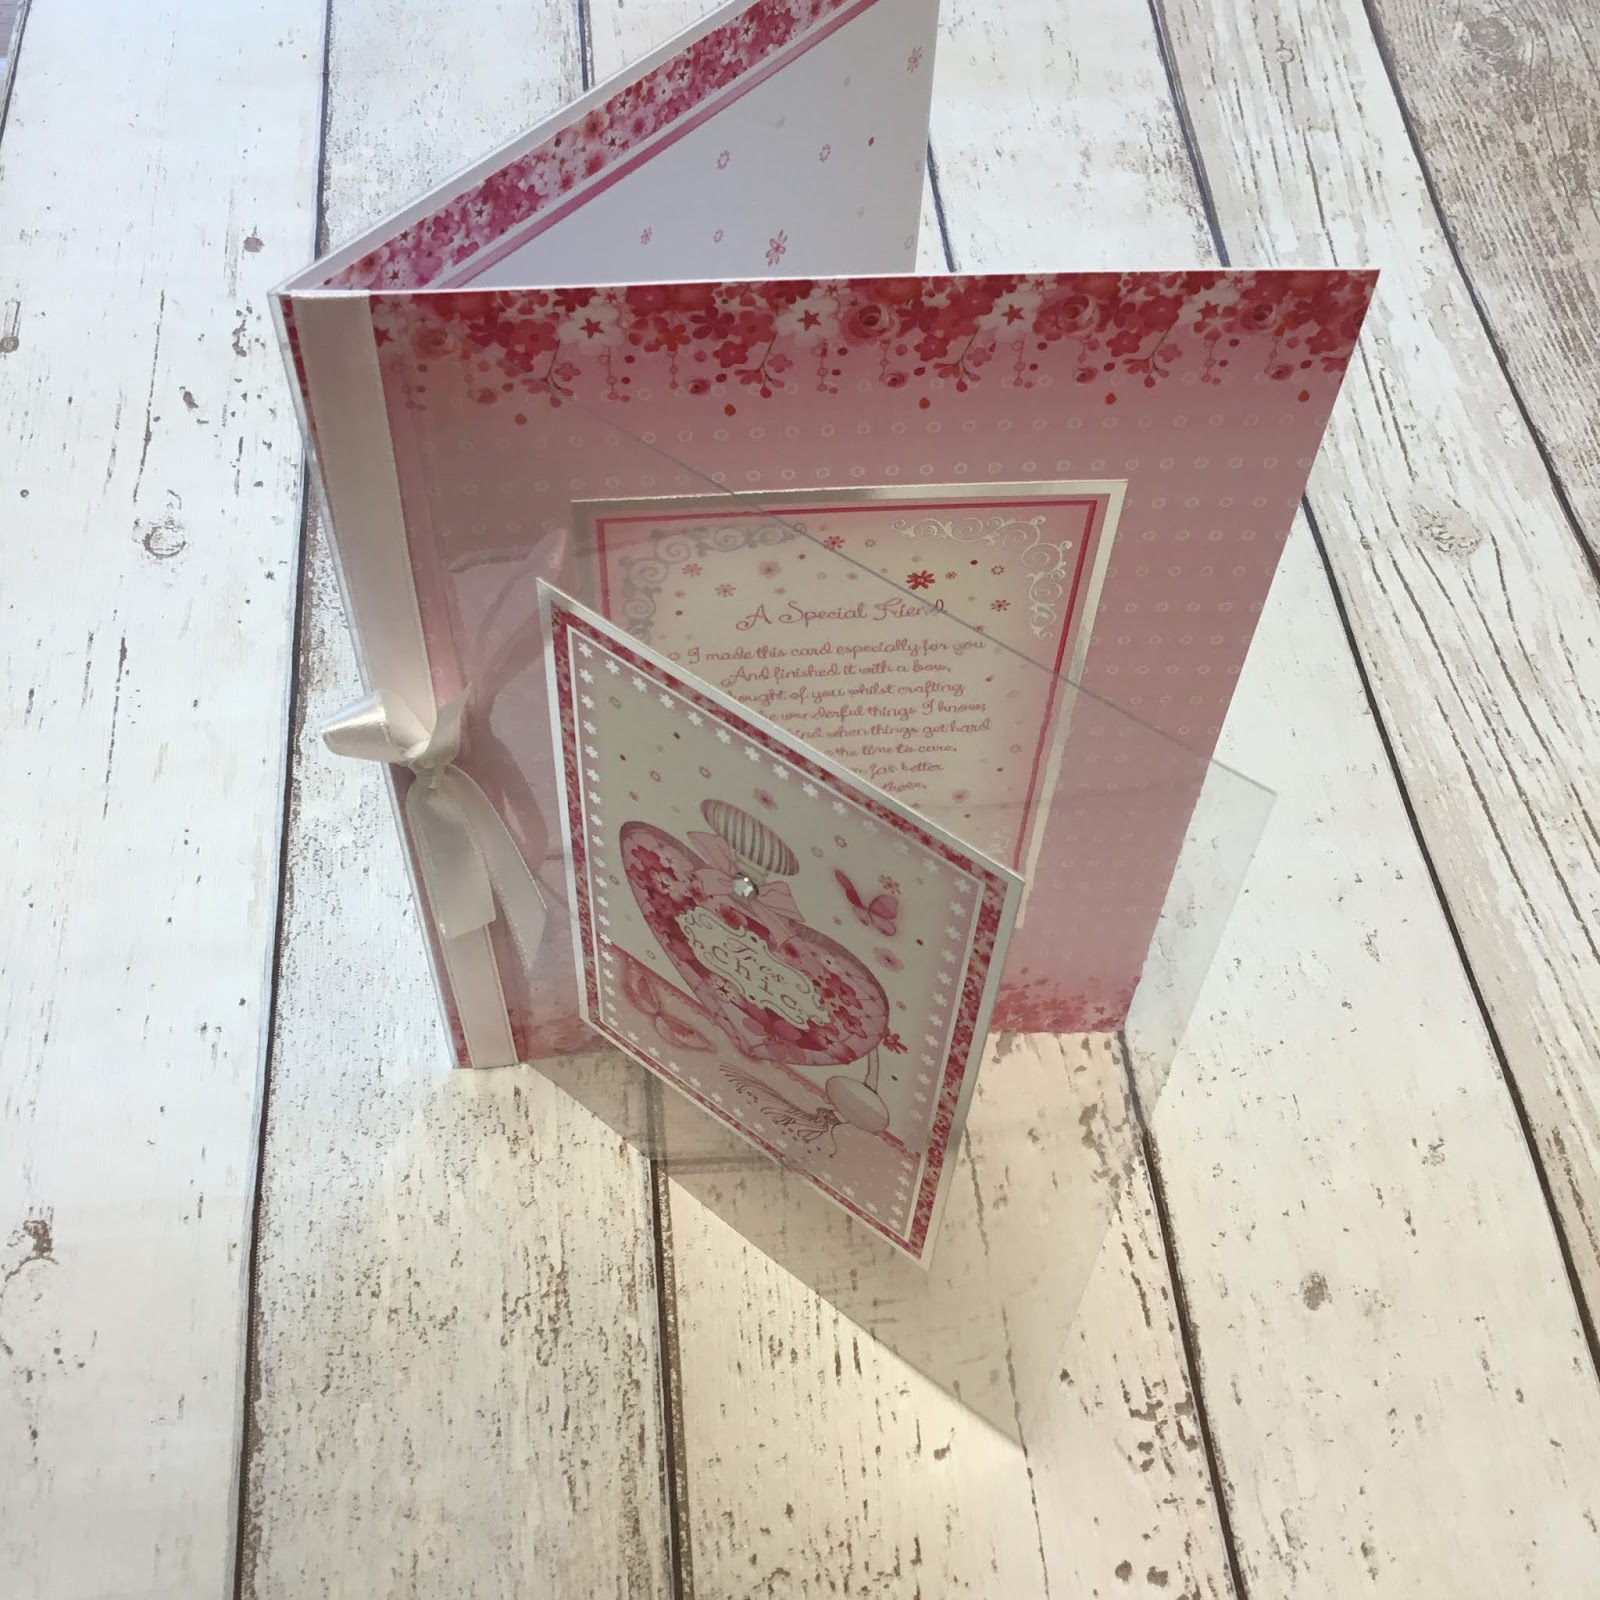
Chic 60th


So I wanted to make a special card for a friends 60th birthday. I instantly thought of using the hunkydory window to the heart postcard collection. I used the a special friend toppers, matching paper and insert. 
 
 
I folded an a5 cardblank and covered the front with patterned paper. I scored a piece of a4 acetate in the centre, then on one side scored a second line 2.5cm away. I creased the folds, added a couple bits of tape in the folded strip and glued it to my card blank. I wrapped some white ribbon around the card front and acetate to cover the glue, then tied in a bow. 
 
 
I trimmed the picture side of the insert to fit the inside of the card. I stamped my 60th sentiment and added some glitter pen to add sparkle. I trimmed the greeting side of insert to be the same size as the toppers.
 
 
I glued the first topper in position on the front of the card blank. I positioned another on top of the acetate in line with the one on the card front. I then used the insert greeting paper to cover the glue on the reverse of the acetate. As a final touch, I added a stick on gem to the perfume bottle.
 
Mx


Monday, 12 November 2018

sweet baby


  • LOTV- sweet baby stamp set
  • Lawn fawn- large rectangle stitched stackables
  • LOTV & nit wit- country meadow paper pad
  • Neenah classic crest cardstock 
  • copics- E21,50,51,93. C00,0,1,2. R85,83,81. RV91. Y15,13,11. YR30
  • Wink of Stella ‘clear’ glitter brush pen
I printed my custom sentiment made on the computer, onto cardstock leaving space for the image. I stamped the image above the sentiment and die cut into a panel. I coloured with copics and added sparkle to the dots. I then diecut some patterned paper using the larger die which fits neatly onto the card blank. I simply layered these together flat and glued onto the card front to finish.
Mx

Monday, 13 August 2018

thankyou stars

  • SU!- so very much
  • Archival ‘jet black’ ink pad
  • Watercolour cardstock 
  • Tim holt distress ink pads/reinkers 
  • Pixie powders
  • Silver star sequin/ embellishments
To create my main panel, I brushed water on to a piece of water colour card. I squished the ink pad onto a palette and added some water. I used a big brush to pick up the colour and touch it to the wet cardstock. I added a small tap of coordinating pixie powders over the top to add shimmer. I left this to dry, removing excess water if necessary. You could use mica powders and reinkers to do this technique if you preferred. 
  
Once fully dry, I stamped the large sentiment stamp slightly off centre, then added the smaller phrase to the bottom corner. I cut the panel down to size and matt and layered onto some black cardstock. I glued this onto the front of my card blank.

The final touch was to add small star embellishments to the card, I think this helps balance the design and completes the sketch. I like how this card uses distress ink to create quite a soft and pretty finish.
 
 
Mx

I would like to enter:

Saturday, 3 February 2018

Bundles of blossoms


  • My favourite things- bundles of blossoms background
  • Mama elephant- birthday script creative cuts
  • Stampin up!- endless birthday wishes
  • Distress embossing ink pad
  • Wow! Embossing powder
  • Indigo blu- lucious pigment powders 'purple, raspberry,coral & green'
  • Archival 'watering can' ink pad
  • White, black, grey and watercolour cardstock
  • 4x6" white card blank
 
I stamped and embossed the floral background onto some watercolour cardstock. I used the pigment powders and water to create the pearl wash of colour, making sure to wipe any colour off the embossed lines. Once dry, I trimmed the piece to fit the front of my card blank. I cut a thin strip of white card and stamped the 'wishes' sentiment. I glued this to a wider piece of grey card. I die cut the word 'birthday' from both white and black card. I layered the white onto the black, off set slightly to create a shadow. I glued this into position above the 'wishes' to complete my sentiment. I added this to the card flat, however, you could use foam for dimension.
Mx
 
I would like to enter the following challenges:

Thursday, 1 February 2018

mason jar of flowers


  • Stamping Bella: mason jar of flowers
  • Lawn fawn: cross stitches rectangle stackable 
  • Paper smooches: friend word die
  • Memento 'tuxedo black' ink pad
  • Neenah classic crest card
  • Copic: R81, 83& 85. RV00. BG0000, 70. C00, 1 & 2. Y15, 17 & 38. YG03 & 25
  • Gold mirri card
  • Yellow and gold bakers twine
  • Kraft 4x6" card blank
 
I die cut a panel of white cardstock using the cross stitch die for detail. I stamped the floral image in the bottom corner and coloured with copic markers. I die cut the word friend from gold mirri card and glued this on to the panel. I glued my panel to the card blank, and tied some bakers twine around the top tied in a bow to finish.
Mx

Wednesday, 17 January 2018

Lovely sympathy


  • Concord & 9th- hello lovely
  • Avery elle- with sympathy die
  • Memento 'desert sand' ink pad
  • Zig clean color real brush markers: 043,046,052,028,220,222,230.
  • Phil Martin's watercolour cardstock
  • Pink texture cardstock
  • 4x6" card blank

For the card front, I cut a piece of watercolour cardstock the same size as the card front. I stamped the floral image to create a band going across positioned up towards the top of the card. I coloured the image with light colours and added more water for a softer look. Once dry, I glued the watercolour panel onto the card blank. I chose a plain cardstock which coordinated with the flower colours to die cut the sentiment from. I glued the sentiment in place beneath the floral band to complete the card. I think the soft colours create a nice subtle, feminine look to suit a sympathy card.


Mx
 

Wednesday, 3 January 2018

All our dreams


  • Lili of the valley- all our dreams
  • Lawn fawn- small stitched circle stackables, large stitched rectangle stackables, stitched borders
  • Forever friends (docrafts) Kraft notes 12" paper pads
  • Neenahclassic crest cardstock
  • Memento'tuxedo black'ink pad
  • Copics- skin:E50,51,21,93. leaf:YG61.G21,24. Pink:R85,83,81,0. Bunny:E41,42.
  • Wink of stella 'clear' glitter brush pen
I cut 2 strips of lilac paper and glued these to down each edge of the card front. I then cut a strip of checked paper, using the stitched borders to add detail. I glued this down the centre of the card to complete the background. For the topper, I cut a mat of cardstock, stamped the image onto it and coloured using copics. For added detail, I brushed glitter onto the hearts. I glued the topper down flat onto the card. Using another piece of cardstock, I stamped then die cut the sentiment. This completed the sketch, glued down with foam for dimension.

Mx

Challenge I would like to enter:


Tuesday, 14 November 2017

pretty poinsettia


  • Hunkydory Christmas classics luxury card collection: pretty poinsettia
  • Hunkydory essential book of Christmas sentiments
  • gold mirri card
  • red & gold ribbon
  • 8x8" & 6x4" portrait and landscape kraft card blanks
 I used the main topper from the collection for the large square card. I mat and layered the printed cardstock onto gold mirri for the card front. I then added some of the decoupage layers onto the topper to create dimension. To complete the card, I simply glued the topper onto the card front and added the coordinating insert to the inside.
inside
For the 6x4" cards, I made a feature of the decorative corners on the other sheet of cardstock from the collection. I cut the cardstock to fit the card front. I then added some of the remaining decoupage layers to build up the floral border across the card. I finished with the sentiment tag and a little ribbon bow.
I repeated the same design, using the corner of the cardstock, this time sitting on a landscape card. For this card, I used an essential book sentiment, glued down with foam pads in the space above the decoupage. I trimmed the insert down to mirror the design on the card front and glued this inside to complete the card.
inside
Mx

Sunday, 5 November 2017

Champagne chic

  • Hunkydory especially for her luxury card collection: champagne chic
  • Lawn fawn custom craft dies: happy birthday border & Finley's 123's
  • Avery elle custom steel dies: a tag for all die
  • gold trimmed pink organza ribbon
  • Gold mirri card
  • A5 & landscape 5x7" white card blanks
For the first A5 card, I used the lady in the little black dress topper with the black frame and coordinating cardstock to create my design. I cut the cardstock down to fit the front with a mat of gold mirri card. I then positioned the topper image and glued this flat. I added the frame and sentiment, raised up on foam pads. I finished the card with the coordinating insert, trimmed to fit inside.
inside
I used the remaining rose cardstock as a background for the pink lady. I cut a mat of gold mirri to cover the card and trimmed the rose cardstock as a layer, but didn't glue this down. I die cut the happy birthday sentiment from gold mirri card. I then laid everything in position and wrapped the ribbon around the cardstock in place and secured at the back. I then glued the cardstock onto the card front. I glued the sentiment and image topper in place. and finished with a ribbon bow.
Using the other cardstock from the collection, I created another A5 card. I cut the mat and layer of gold mirri and patterned cardstocks to fit the front. I then diecut the '50' and birthday sentiment from gold mirri. I arranged these onto the card along with the two ladies topper and rose frame. Once happy with the design, I glued the die cuts and image down flat and raised the frame up on foam pads. For the inside, I trimmed the coordinating insert down to fit neatly.
inside
 For this 5x7" card, I made a feature of the printed image on the remaining cardstock. I trimmed the top border from the cardstock, layered onto mirri and glued to the inside of the card. I then cut away the card front to reveal the panel inside. I cut the image section down to fit the card front, on a mat of gold mirri card. To complete, I glued the friend sentiment from the collection in the space beside the ladies, using foam for dimension.
inside
Mx

Sunday, 10 September 2017

babies companion


  • LOTV- babies companion stamps
  • LOTV & nitwit- always & forever paper pad
  • Lawn fawn- small stitched circle stackables
  • Paper smooches- 'congratulations' word die
  • Neenah classic crest cardstock
  • Memento 'tuxedo black'ink pad
  • Copics- E30,31,34,35,37. R0000. R81,83,85. YG61. E40,41. C00,0,2. 0.
  • Wink of stella 'clear' glitter
  • 6"x6" white cardblank
I followed the sketch layout to create this pretty card for a baby girl. I chose the paper and trimmed it down to create the border. I cut strips of silver paper to edge this top and bottom, before gluing flat to the card front. I stamped, coloured and die cut the image to coordinate. For the sentiment, I die cut the word, coloured it with copics and added glitter pen to make it sparkle. I glued the topper and sentiment into position to complete the card.
I would like to enter the following challenges:
Simon Monday says 'stamp it'

Mx

Thursday, 24 August 2017

chatty chic

  • hunkydory especially for her luxury card collection: chatty chic!
  • hunkydory especially for her little book
  • gold mirri card
  • 3 6x6" & an A5 card blank
For the A5 card, I covered my card front with half a sheet of patterned cardstock. I then positioned the topper pieces with the central panel glued flat and the frame raised on foam pads. I added a sentiment topper onto the border of the background, to complete the front. I trimmed an insert down to fit inside and coordinate with the front of the card.


inside

I trimmed the remaining paper down to remove the pink border, leaving a floral trim along the base of the 6" square card front. I then cut a page from the little book down to create a square topper. I matt and layered the topper onto gold mirri and glued down on an angle. I positioned a sentiment topper in the bottom corner of the card front and added an insert to finish.


inside

With the other sheet of cardstock from the collection, I created another 6" square card. For this, I covered the card front with gold mirri cardstock. I then layered on the trimmed down patterned cardstock so the image filled the front. I simply finished with a sentiment topper on foam in the top corner and an insert inside.
inside
I created this final card using the remaining cardstock, insert and topper. I added the image section of the insert to the inside of the card blank. I then placed the border, (trimmed from the patterned cardstock) along the outer edge of the inside of the card. I cut away a section from the front of the card blank to reveal the panel inside. I covered the remainder of the card front with the patterned cardstock. I carefully positioned the topper and frame in the centre of the card, just overhanging the front edge, ensuring no glue spilt over onto the inside.


inside
Mx

Sunday, 13 August 2017

pretty peacocks

  • hunkydory especially for her luxury card collection: 'pretty peacock'
  • hunkydory little book of especially for her
  • teal & silver mirri card
  • a sheet of hunkydory cardstock I had spare from another set
  • my favourite things: stitched rectangle scallop edge frames die set
  • 7x7", 5x7" & 3 A5 card blanks

For this 7" square card, I cut the background to fit the card blank with a matt of teal mirri card, trimming off the top border. I then positioned the topper in the centre of the top section. I placed the message on the border beneath the topper. I completed the card with a trimmed down matching insert, which I will later stamp with a sentiment.
 
inside
 
For the 5x7" card, I used the remaining cardstock to matt directly onto the card blank. I then die cut a frame from teal mirri card. I trimmed down a page from the little book to sit inside the frame and glued these onto the card. I cut down the insert to decorate the inside with an image and sentiment.
 
inside
 
For the first A5 card, I used half a sheet of cardstock and positioned an image and sentiment topper on using foam. Again, I added a section of insert inside ready to add a message onto. 

inside
 
For this A5 card, I trimmed the image from the remainder of the card above to use as a topper. I framed this with die cut teal mirri card. I used more mirri card to matt onto the card blank before adding a sheet of coordinating cardstock. I glued down the topper and completed the design with a sentiment border across the bottom.  The insert used the same image along with a message to finish off the inside of the card.
 
inside
 
The last A5 card used the rest of the coordinating cardstock along with a page from the little book. I simply matted each onto silver mirri and glued to the card blank. I completed the inside with an insert which echoed the borders on the topper image.
 
inside
 I love the pretty images in this collection, so I was pleased to make five good sized cards to make the most of it by adding a few extra bits from my stash.
 
I would like to enter the following challenge:
 
Mx

Thursday, 10 August 2017

yellow roses

  • DCWV fresh floral stack 12x12" paper pad
  • sentimentally yours 'elegant milestone birthdays' stamp
  • do crafts papermania stamp set (mum stamp...lost the packaging so I cant be certain)
  • archival 'sepia' ink pad
  • 7x7" kraft card blank
I chose this paper as the focal point for the card. I fussy cut the flowers and leaves from the background to fit the card front, making sure they remained connected as one piece. I took the remaining paper for the background and trimmed this to size as a matt on the card front. I then stamped the paper with the two sentiments, carefully positioned to sit together with the floral paper cut piece. Once the pieces were ready, I glued the paper flat onto the card blank, then added the flowers using foam pads to create dimension. It's fiddly work to fussy cut an image like this, but I think the results feel special enough to be a worthwhile celebration for a special someone's big birthday!
Mx

Friday, 28 July 2017

beautiful blue bird


  • hunkydory birdie blossoms luxury card collections: beautiful blue bird (& a sentiment from the 'home sweet home' collection)
  • silver mirri card
  • DL, 6x4", 6x6" & 8x8" white card blanks

For the largest square card, I cut the patterned card down and layered on silver mirri to fill the card front. I then positioned the image and sentiment toppers onto the front, using foam to add dimension.
I used the remaining cardstock to create this DL card. I simply covered the front with the patterned cardstock and added the three smaller toppers in the middle.
For the smaller square card, I matt and layered the front with the silver mirri card and a section of the half a sheet of patterned cardstock. The image and sentiment toppers completed the front.

For the 6x4" card, I added the remaining strip of patterned card onto the front with a mirri edge to the top and bottom. I used the last image topper from the set, glued down on foam, alongside a sentiment from the 'home sweet home' collection.
Mx