Showing posts with label colouring. Show all posts

Saturday, 25 June 2022

christening day


  • LOTV: baby christening
  • SU!: inspired events
  • First edition papers ‘blank canvas’
  • Memento ‘tuxedo black’ ink pad
  • Neenah classic crest cardstock
  • Copics: R01,32. RV42. YR30. B41. BG70. YG93. E30,35,53,55,57. W00,1,3.
  • Sakura jelly roll ‘clear star’ glitter pen
  • Pink ribbon. 
To make this card, I cut a 5” square mat and stamped my image and sentiments in place. I coloured my image using copics, then added details to the sentiment and flowers using a glitter pen. 
I wrapped ribbon around the top of the panel and tied the ribbon into a bow. I then layered this panel onto a piece of pink paper.
I used the pink paper to cover the front of my 7” square card blank before adding a mat of cream patterned paper. I used foam tape to attach the finished panel to the centre of the card.
I think this is a nice christening card... it uses quite a traditional image, made clean and fresh by using the coral and keeping the design simple.
Mx

Sunday, 16 May 2021

Fiona loves flowers


Stamping Bella- uptown girl Fiona loves flowers

Stampin up!- birthday blooms

Copic sketch markers- E21,42,43,44,50&93. R85. BV0000,000,00,11. V22. RV34. R81. YG03,25. Y13,15,18. B00. BG53. T0,1,3. 0. 

Memento ink pad- tuxedo black 

Copic friendly card stock. Lilac Pearl card blank. 


I stamped my image and sentiment on to a piece of card stock, which had been trimmed to fit my card front  leaving a small border. I coloured the image, then glued it on to the card blank. This makes a really simple card, that really lets the colouring be the main focus of the card. The Pearl card stock adds a nice shimmer to frame the image. The birthday sentiment could easily be changed to a thank you too.

Mx

Sunday, 9 May 2021

Summer afternoon


Stampin up!- summer afternoon & guy greetings 

Archival ink pad-jet black

Zig clean color real brush markers- 41, 43, 67,68,20.

Water colour cardstock, Kraft card blank, water & paint brush. 


I cut a piece of cardstock just abit smaller than the card front. I stamped my image and sentiment in black. I added bits of colour with the markers then blended out with a small brush and water. I added more colour by putting a bit of marker on a plastic sheet, then picking up the colour with the brush. Once happy I glued my panel to my card blank.

Mx

Perennial birthday


Stampin up!- perennial birthday & family party

Stampin up!ink pad- melon mambo, Bermuda bay, cucumber crush, crushed curry, pumpkin pie

Archival ink pad- jet black

Lawn fawn- stitched borders die

White card stock, paint brush & water


Make a card blank and stamp the flowers with black ink. Use the ink pads and a bit of water to colour the flowers. Stamp the greeting on to a strip of cardstock. Use the stitched die along the top and bottom to add detail. Glue greeting panel on to floral card blank.

Mx

Tuesday, 13 April 2021

Mason jar of flowers


Stamping Bella-mason jar of flowers 
Stampin up- bloom with hope stamp set & scallop edge punch
Copics- v25,bv11,o1, y35, yr14, yg13,23, b000, bg11, 32, c2,1,00.
Wink of Stella clear glitter brush marker, lilac pattern paper,  6x4” card blank + copic friendly cardstock.

To make this simple card, I covered the front of a card blank with paper. I cut a strip of white cardstock and stamped my image and sentiment. I coloured using copic sketch markers and added sparkle to the bow for detail. I used a border punch to shape the edges before I glued it to the card. 

Mx

Tuesday, 18 February 2020

mice time to celebrate.


  • My favourite things- it’s a mice time to celebrate (stamps & dies)
  • Lawn fawn- happy birthday border lawn cuts
  • Prima- free spirit paper 
  • WeR memory keepers- love 2 craft papers
  • Copies- C00,1,2,4. R000,00,20,21,81. RV34. BV00,11. B00. BG53. YG11,21,41.
  • Memento dye ink pad-tuxedo black 
  • Wink of Stella brush pen- clear
  • 6” square card blank


I picked a main patterned paper to act as a background. I added a strip of dark polka dots, layered with a yellow pattern. I also used the dark paper to die cut my greeting. I layered all these and glued onto the card blank. I then stamped, coloured and die cut the cute mice images. I used 1mm foam on one mouse and 2mm foam on the other to create more dimension. I added sparkle to the Pom poms, to finish.

I’m entering the Simon says Wednesday ‘use 2 or more pattern paper’ challenge blog, I’m so glad I did too. I don’t use my patterned papers much but the background paper really makes the card.

Mx

Friday, 1 March 2019

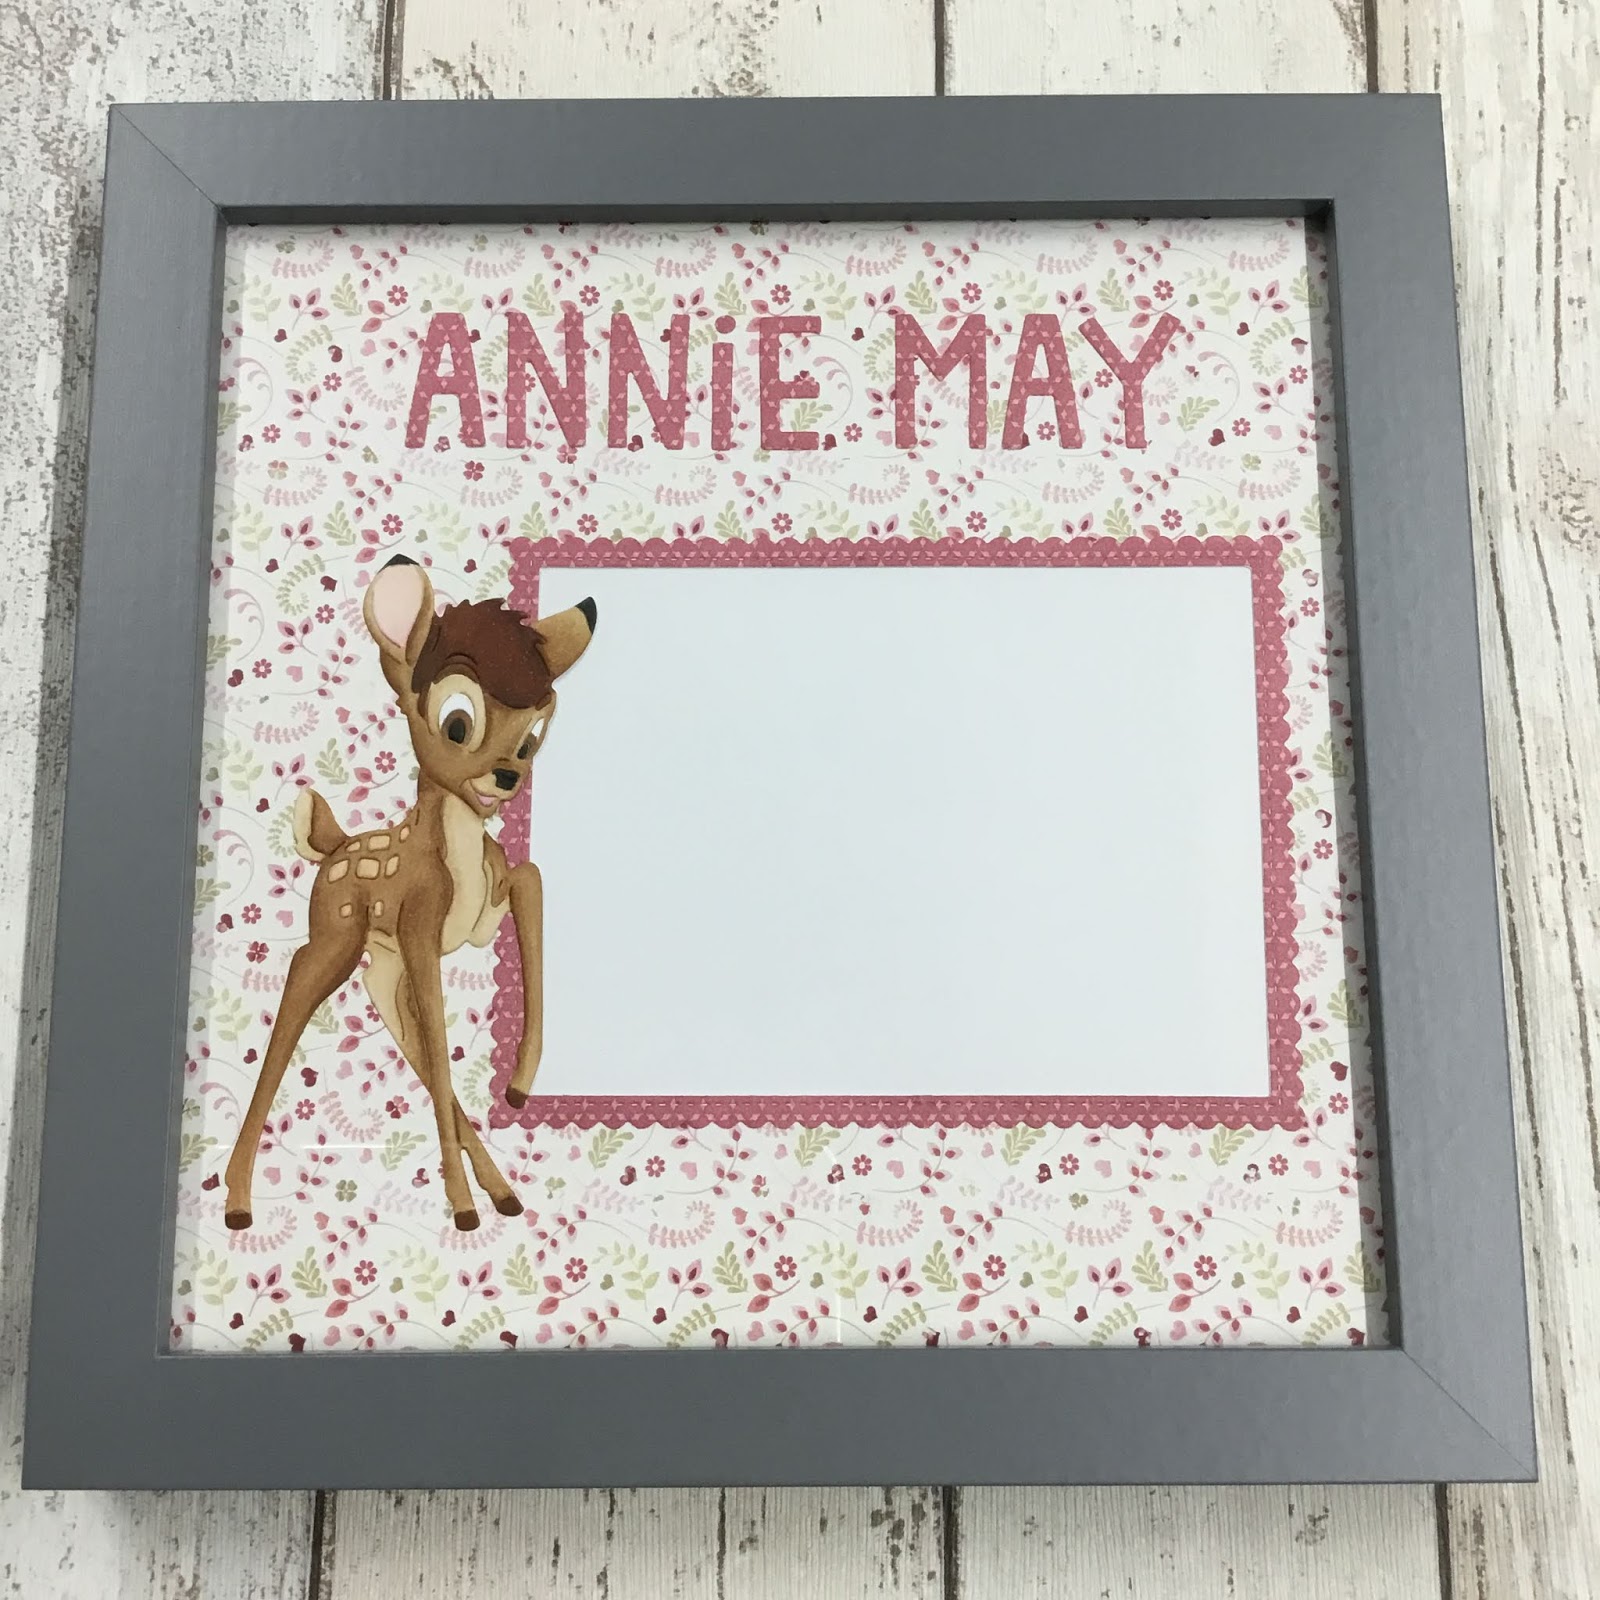
Bambi frame gift


  • Disney bambi metal die
  • Nit wit & LOTV- always & forever paper pad
  • My favourite things- stitch rectangle scallop edge frames
  • Lawn fawn- finley’s ABC’s dies
  • Copic friendly cardstock
  • Copic markers- E30,31,34,35,37,39,57,59. W8,10. R000,81,83.
  • Grey 8” square frame (mine was from wilko)
To make this frame gift, I selected two pieces of coordinating paper. I chose one 8x8 piece for the background and the other to die cut from for embellishments. I diecut the frame and letters to spell the name from the patterned paper. I also diecut my bambi image from white card and added tape to the back, whilst all the pieces where still in the metal die, to hold the sections together. I then removed the bambi from the die and added back in any pieces that had fallen out. I used copic markers to colour the image, using a picture online as reference. 
I decided on the best layout and glued all of the pieces onto the background paper. I used a craft knife to remove any paper showing through the die-cut frame to create an aperture for a photo to sit behind.
I slotted this finished piece into the frame and added a sheet of white card behind, to make it look nice for gifting. I prefer to leave it for the child’s parents to decide which picture they want to display rather than selecting one you like.
Mx

Thursday, 21 February 2019

Scooter boy


  • LOTV- scooter boy stamp
  • We R memory keepers- anthologie 6 x 6 paper pad
  • Lawn fawn custom craft dies- large dotted square & large dotted rectangle stackables 
  • Copics- C4, 5, 6, 7, 8. W00, 1, 3. E21, 35, 41, 50, 51, 55, 57, 93. R17, 27, 29. B95, 97, 99. YG00, 01, 21. G20. 0. 
  • Neenah classic crest card stock 
  • Red card stock 
  • 6” square cardblank

I was asked to make a great grandson card for a little boy turning 6. I created a custom sentiment on the computer to fit inside the rectangle die, printed it onto Neenah card stock and cut it out. For the image I stamped, die cut and coloured the scooter boy. I covered the cardblank with the patterned paper and die cut a panel of a coordinating red card. To complete the card, I simply arranged the pieces onto the cardblank, overlapping each other, with just the sentiment raised on foam pads for a bit of dimension. 

Mx


Monday, 4 February 2019

bess the butterfly


  • Stamping Bella: tiny townie Bess the butterfly (stamp & die)
  • Mama elephant: Madison Avenue creative cuts die
  • Stampin up!: curly cute
  • Make it colour blending cardstock
  • Copics:E50,51,21,93. E42,43,44. Y15. BG10,53. BV0000,000,00,11. V25. RV00. C5,6,7,8.
  • Wink of Stella ‘clear’ sparkle brush marker
  • Tim holtz ‘dusty concord’ distress ink pad
  • Pattern Paper (from craftwork cards, don’t know the name)
To make this card I simply die cut my frame from copic friendly cardstock. I used the centre to stamp and colour my image, then cut it out using the matching die. 
I cut out a piece of pattern paper, which had the sentiment printed on. I inked my card blank with the purple ink then glue the paper to the centre. I added the white frame. I glued the image in place using foam for dimension. Final touch was a bit of sparkle to the wings.
Mx

Thursday, 20 December 2018

twins !


  • LOTV- twice as nice
  • SU!- inspired events
  • Lawn fawn- finley’s ABC dies, dotted circle stackable 
  • Neenah classic crest cardstock 
  • Copics- C00,0,1,3,4,5,6. E21,50,51,93. RV91. R81,83,85.
  • First edition paper- sweet nothings paper pad
  • Pink glitter paper
  • Wink of Stella ‘clear’ glitter brush marker


  • To make this card, I stamped my image and sentiment onto cardstock. I coloured the image with copics and die cut into a panel. I also die cut the letters to spell out 'twins' from glitter paper to complete the sentiment. I cut a mat of patterned paper to fit the card blank, leaving a small white border and glued into position. I then added the panel with the letters beneath and finished with a touch of sparkle on the image.
    Mx

    Monday, 12 November 2018

    sweet baby


    • LOTV- sweet baby stamp set
    • Lawn fawn- large rectangle stitched stackables
    • LOTV & nit wit- country meadow paper pad
    • Neenah classic crest cardstock 
    • copics- E21,50,51,93. C00,0,1,2. R85,83,81. RV91. Y15,13,11. YR30
    • Wink of Stella ‘clear’ glitter brush pen
    I printed my custom sentiment made on the computer, onto cardstock leaving space for the image. I stamped the image above the sentiment and die cut into a panel. I coloured with copics and added sparkle to the dots. I then diecut some patterned paper using the larger die which fits neatly onto the card blank. I simply layered these together flat and glued onto the card front to finish.
    Mx

    Tuesday, 7 August 2018

    thankyou sunshine!

    • Altenew- hello sunshine
    • Avery Elle- tag for all die
    • Lawn fawn- large dotted rectangle stackable 
    • Neenah classic crest cardstock 
    • Copics- R81, 83, 85. RV91. V01, 12, 15. Y08, 15, 17, 18, 38. YG03, 05, 23, 25. G02, 12. 0.
    • Memento ‘tuxedo black’ ink pad
    • Brilliance ‘star lite silver’ ink pad
    • Silver Miri & black cardstock
    • Metallic silver thread

    I used the floral image stamps to create my background. I die cut this using a largest rectangle die. I coloured my images with copics. I also used a silver ink pad and the tiny image to fill in some of the spaces between the flowers. 
    I looped the silver thread and placed it in the corner of my card panel. I die cut the ‘thankyou’ first from black cardstock and glued it in place, (this also holds the thread in place). I then die cut the words from silver Miri cardstock and glued this on top, slightly off set to create a shadow. 
    Since I am posting this card I wanted to keep it quite flat,but felt it benefited from the slight dimension of the words and thread.
    Mx

    Challenge I would like to enter:

    Wednesday, 25 July 2018

    Donut treats


    • Mama elephant: donut treats stamps & dies
    • Stampin up!: hello you thinlits dies
    • Craftwork cards: guilty pleasures paper pad(sprinkles)
    • DCWV: fresh florals (dots, i think only had a scrap left)
    • Neenah classic crest cardstock
    • Memento ‘tuxedo black’ ink pad
    • Copics: mice-W00,W1,R01. donuts-E41,E31,E55. frosting & hats- Y08,Y11,Y15. V01,V12. R81,R83,R85. BG34,BG23. box- BG10,BG11.
    • zig wink of stella 'clear' sparkle brush pen
    I covered the front of my card blank in the pink dotty paper. I cut a mat of sprinkle cardstock as a layer. I diecut the ‘thanks’ from the centre top. I glued this onto the card.
    I stamped coloured and diecut the mice and donut images. I played about til i had an arrangement i was happy with. Then glued all the pieces down using both glue and foam to add dimension. 
    The final touch was to add sparkle to all of the donut frosting.

     
    To decorate the inside of the card, i added a coordinating sentiment from the stamp set in the centre. I also stamped, coloured and die cut a small image, and glued this to the bottom corner of the card.
     
     
    Mx

    I would like to enter the following challenges (linked below):


    Wednesday, 27 June 2018

    sew lovely

     
    • lawn fawn: sew lovely stamp set, zig zag rectangle stackables
    • SU!: bloomin' marvellous stamp set, soft suede & early espresso ink pads and oval, scallop oval & banner punches
    • at you spica glitter pens
    • white card and small paper scraps
    
     I die cut two pieces of card using the zig zag stackables for interest. On the first piece I stamped spools of thread all over to create a background. I used glitter pens to add colour and detail. On the second piece I stamped a button in the bottom corner and highlighted with the coloured glitter, leaving space to write.
    I stamped my sentiment and cut it out using the oval punch. I used a scallop oval punch and a piece of coloured card to make a mat. I found coordinating patterned papers and punched into banners. I layered all of these together and positioned onto my spool background. To complete my note cards/ postcards, I glued the panels together back to back.
    I think these are simple but a cute alternative to a card, although it would easily be recreated as a card front and insert. These are sewing themed (see more below) but you could use this idea for all themes by changing the stamps used.
    Mx 
    the back with button detail and space to write the message


    Monday, 28 May 2018

    writing notes


    • Stampin up!- writing notes & colour me happy stamp sets
    • Lawn fawn 'blue jay'& 'lobster' ink pads
    • Memento ‘tuxedo black’ ink pad
    • Copics- R32. RV42. BG13,32. BG0000.01.02. B00. Y02,15,18. E23. C0.
    • Sakura glaze pen #849
    • Wink of Stella ‘clear’ glitter brush pen
    I first cut a piece of card to cover the front of my card blank. I stamped this with the writing notes background stamp, using two colours to give the full note paper look. To do this, I carefully just inked up the lines I wanted red, stamped then cleaned my stamp and repeated with the blue. I used the Misti to help make sure it all lined up. If you didn’t have a Misti, it would be easier to just carefully apply both colours of ink to your stamp then stamp all at once.
    I then stamped my bird image and sentiment in position on the card and coloured these using copics. I added glitter to the ‘thank’ and glaze pen to the ‘you’ and the birds eye. I think this just adds a bit of detail to a simple card.
    Mx

    I would like to enter the following challenges:
    Simon ‘Monday’ Says... inspired by a song (bluebird by Sara bareillies)

    Tuesday, 15 May 2018

    Sweet pea


    • Stamping Bella- sweet pea garden girl
    • SU!- made for you
    • Lawn fawn- grassy border
    • Memento ‘tuxedo black’ ink pad
    • Neenah classic crest cardstock 
    • Copics- E50,51,21,93.55,57,59. YG25,33,21. BV000,00. V22. W00,1.
    • Tim holtz ‘broken China & ‘ distress ink pad
    • White card blank
    I stamped, coloured and die cut my garden girl image. I diecut the grass to create a mask. I used the first half to mask the sky and inked the green. Then used the other half to mask the green and ink the sky. I did this very basic just to add some colour, but you could make additional masks to create more dimension (maybe add clouds for example). I stamped my sentiment in the corner of the inked background and added my image using foam pads to match the sketch.
    Mx

    I would like to enter:

    Sunday, 13 May 2018

    new baby


    • SU!- two by two
    • SU!- festive impressions embossing folder
    • Lawn fawn- large dotted square stackables 
    • Kraft & white cardstock
    • Neenah classic creast cardstock
    • Memento ‘tuxedo black’ ink pad
    • Copics- E31,35,37,41,55. B000,00,02,04. BG02. V04,12. R000,14,24. YR15,31. Y15,18,32,38. N2,4.
    • Tim holtz ‘fossilised Amber & wild honey’ distress oxide ink pad
    To make this card I firstly created my background. I cut a piece of white cardstock and used distress oxide ink to make an ombré effect. I used a embossing folder to add texture and pattern. I glued this onto a kraft card blank.
    I Used a piece of Neenah card to stamp and colour my image. I then die cut this, I also die cut a piece of kraft cardstock and layered this at an angle to match the sketch. I glued both pieces onto the card blank to finish. 
    Mx

    I would like to enter:

    Sunday, 22 April 2018

    Birthday bus


    • Avery Elle- birthday bus
    • My favourite things- big birthday die
    • Lawn fawn- large dotted rectangle stackable
    • Memento ‘tuxedo black’ ink pad & dual marker
    • Neenah classic crest
    • Copic- C00,C1,C3,C4,C6,C8. W00,W1,W3,W5. E53, E55,E57,E70,E71,E74,E77,E93. RV42,R43,R32. Y32,YR21. BG70.
    • Watercolour cardstock
    • Tim holtz ‘squeezed lemonade, worn lipstick’ distress ink pads
    • Cosmic shimmer ;burnt orange, straw yellow, scarlet mist’ pixie powders
    • Wink of stella ’clear’ glitter brush marker
    • White embroidery floss
    I made my background using inkpads, pixie powders and water. Once dried, I die cut into a panel with the largest rectangle. I then die cut the birthday into the panel, making sure to keep all the cut pieces. I glued the panel and the inside letter pieces onto my white card blank. On another sheet of cardstock, I stamped my images and coloured using copics. I fussy cut all the pieces and glued the little white smoke puffs flat. I added foam tape to the bus for dimension. To attach the balloons, I first tied 2 strands of embroidery floss onto the balloon with a little knot. I then added foam tape to stick it in position and used a few dots of glue to keep the string in place where I wanted. The final touch was a bit of glitter to the hats and balloons.

    Thursday, 19 April 2018

    Fairy birthday


    • My favourite things- big birthday die
    • Lawn fawn- large dotted rectangle stackable
    • LOTV- fairy a5 stamp set 
    • Memento ‘tuxedo black’ ink pad & dual marker
    • Neenah classic crest 
    • Copic- C1. E50,51,93. RV42,R43,R32. Y32,YR21. BG70.
    • Watercolour cardstock
    • Tim holtz ‘squeezed lemonade, worn lipstick’ distress ink pads
    • Cosmic shimmer ;burnt orange, straw yellow, scarlet mist’ pixie powders
    • Wink of stella’clear’ glitter brush marker
    • Cosmic shimmer ‘crystal stars’ glitter jewels
     
    I made a water colour background and die cut the happy birthday letters from it. I die cut a panel of white cardstock and positioned the letters, then glued them down flat. I stamped my fairy image to fit in the top corner on to the panel. I coloured the image and added sparkle to the wings. I glued the finished panel to a card blank. The final touch was to glue on some crystal stars for a bit of extra sparkle.

    Mx
    I would like to enter:


    Monday, 26 March 2018

    Butterfly kisses


    • Mama elephant- butterfly kisses
    • Lawn fawn- thank you borders
    • Watercolour cardstock
    • Archival 'jet black'ink pad
    • Zig clean Colorado real brush markers (052,023,021,045,041,068)
    • Tim holtz 'worn lipstick & tumbled glass' distress ink pad
    • Wink of Stella 'clear' glitter brush marker
    • 4x6" card blank
    I stamped and watercoloured my floral and butterfly images. I cut these out using the coordinating dies. 
    I die cut the sentiment twice from black and a third time using cardstock that I coloured using the pink ink pad. (You could also use the watercolor marker instead). I glued these on top of each other to add dimension. 
    I used the sketch as inspiration to add a bit of blue ink to the card blank, creating a soft circle. I glued all the elements on to the card blank following the sketch. I used foam on the outer edges of the butterfly wings and glued flat in the centre to add extra dimension. To finish the card I addded a bit of sparkle detail to the wings, sentiment and flower centers.