Showing posts with label children. Show all posts

Friday, 1 March 2019

Bambi frame gift


  • Disney bambi metal die
  • Nit wit & LOTV- always & forever paper pad
  • My favourite things- stitch rectangle scallop edge frames
  • Lawn fawn- finley’s ABC’s dies
  • Copic friendly cardstock
  • Copic markers- E30,31,34,35,37,39,57,59. W8,10. R000,81,83.
  • Grey 8” square frame (mine was from wilko)
To make this frame gift, I selected two pieces of coordinating paper. I chose one 8x8 piece for the background and the other to die cut from for embellishments. I diecut the frame and letters to spell the name from the patterned paper. I also diecut my bambi image from white card and added tape to the back, whilst all the pieces where still in the metal die, to hold the sections together. I then removed the bambi from the die and added back in any pieces that had fallen out. I used copic markers to colour the image, using a picture online as reference. 
I decided on the best layout and glued all of the pieces onto the background paper. I used a craft knife to remove any paper showing through the die-cut frame to create an aperture for a photo to sit behind.
I slotted this finished piece into the frame and added a sheet of white card behind, to make it look nice for gifting. I prefer to leave it for the child’s parents to decide which picture they want to display rather than selecting one you like.
Mx

Thursday, 21 February 2019

Scooter boy


  • LOTV- scooter boy stamp
  • We R memory keepers- anthologie 6 x 6 paper pad
  • Lawn fawn custom craft dies- large dotted square & large dotted rectangle stackables 
  • Copics- C4, 5, 6, 7, 8. W00, 1, 3. E21, 35, 41, 50, 51, 55, 57, 93. R17, 27, 29. B95, 97, 99. YG00, 01, 21. G20. 0. 
  • Neenah classic crest card stock 
  • Red card stock 
  • 6” square cardblank

I was asked to make a great grandson card for a little boy turning 6. I created a custom sentiment on the computer to fit inside the rectangle die, printed it onto Neenah card stock and cut it out. For the image I stamped, die cut and coloured the scooter boy. I covered the cardblank with the patterned paper and die cut a panel of a coordinating red card. To complete the card, I simply arranged the pieces onto the cardblank, overlapping each other, with just the sentiment raised on foam pads for a bit of dimension. 

Mx


Sunday, 13 May 2018

new baby


  • SU!- two by two
  • SU!- festive impressions embossing folder
  • Lawn fawn- large dotted square stackables 
  • Kraft & white cardstock
  • Neenah classic creast cardstock
  • Memento ‘tuxedo black’ ink pad
  • Copics- E31,35,37,41,55. B000,00,02,04. BG02. V04,12. R000,14,24. YR15,31. Y15,18,32,38. N2,4.
  • Tim holtz ‘fossilised Amber & wild honey’ distress oxide ink pad
To make this card I firstly created my background. I cut a piece of white cardstock and used distress oxide ink to make an ombré effect. I used a embossing folder to add texture and pattern. I glued this onto a kraft card blank.
I Used a piece of Neenah card to stamp and colour my image. I then die cut this, I also die cut a piece of kraft cardstock and layered this at an angle to match the sketch. I glued both pieces onto the card blank to finish. 
Mx

I would like to enter:

Sunday, 14 January 2018

For my mum

  • LOTV-I'm here for you
  • Memento 'tuxedo black' ink pad
  • Neenah classic crest cardstock
  • Copics- skin:E50,51,21,93. Hair:E55,57,59. Dog:E43,44,47. Clothes:R20,21,22,24,46. Yg21. BG53,10. Y17. Stairs:C00,1,3.
  • SU!- teeny tiny sentiments
  • Patterned paper (from my scrap box so not sure which brand/ collection) 

I chose to make a 5" square card and found strips of patterned paper that would fit the sketch. I cut the main panel from colouring cardstock and stamped my image. I coloured the image using copics makers that best fitted the paper colours. I then stamped my sentiment and layered on to some more of the patterned paper. I glued all the paper pieces down to complete the card sketch, (although I did flip it so the sentiment better fitted my image.)

Mx

Joining in with:


Tuesday, 2 January 2018

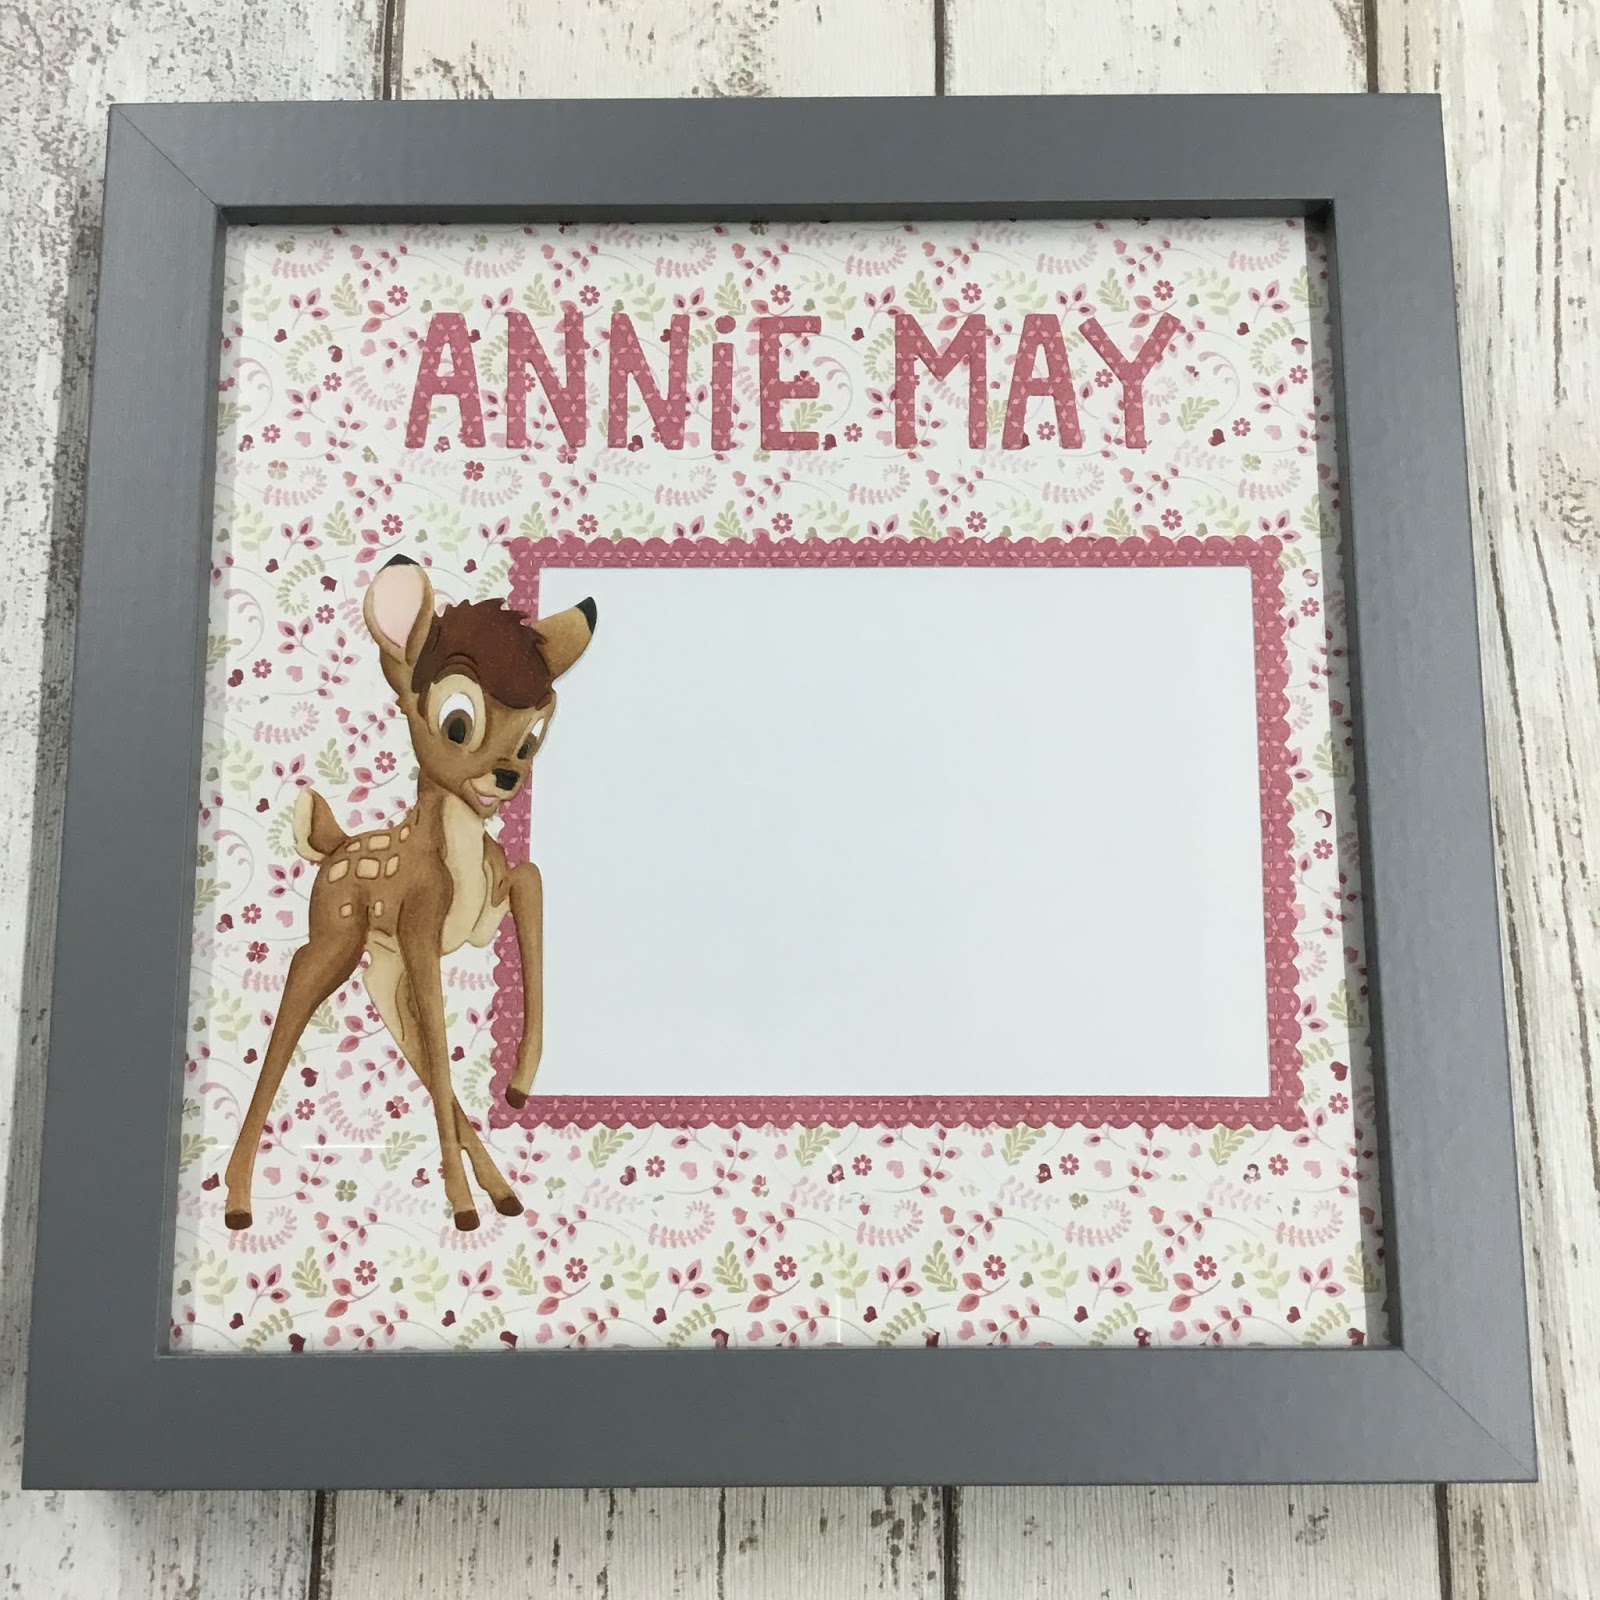
Bambi for baby...


  • Disney Bambi metal die
  • My favourite things- stitched rectangle scallop edge frame
  • Lawn fawn-Finley's ABCs
  • Forever friends (docrafts) Kraft notes 12" paper pad
  • Neenahclassic crest cardstock
  • Copics- E30,31,34,35,37,39,57,59. W8,10. R83,81,000.
  • Grey 8" square frame
First I cut check paper to fill the background of the frame.
I then die cut letters from coordinating lilac paper, to spell out the baby's name. To position the letters, I started in the centre and worked outwards to space them evenly before gluing down. To create a frame for the photo, I found the right size scallop frame die and cut from lilac paper. This was then glued in place beneath the name. For a cute focal point, I die cut the Bambi image from white card stock, with tape on the back to stop all the pieces falling out. I coloured him using copics before I glued into position, slightly overlapping the diecut frame. Using a craft knife, I cut around the inside of the frame to remove the check paper and create an aperture for a photo. I cut a piece of white cardstock to fit the frame. I layered this behind my decorated piece as a plain backing for the aperture to make it look nicer to gift. 
Once the new parents receive their frame, they can simply open the back and pop their chosen picture of their new baby girl into place. Of course you could change the colour scheme as a gift for a baby boy too!! 

Mx

Friday, 15 December 2017

It's beginning to look a lot like Christmas

  • Hunkydory snowy season luxury card collection: It's beginning to look a lot like Christmas
  • Hunkydory little book of snowy scenes
  • Hunkydory essential book of Christmas sentiments
  • Hunkydory cardstock (offcuts from the other collections)
  • Hunkydory adorable scorable cardstock
  • silver mirri card
  • mama elephant union square creative cuts die
  • sizzix scallop square framelits die
  • white ribbon & bakers twine
  • A5, 7x7", 5x7"  6x6", 5x5" & 6x4" white card blanks

For the 7" square card, I mat and layered the card front with silver mirri card and the cardstock with the border feature. I added the tree topper to the main section of the cardstock and angled the essential book sentiment tag on top. The tag was raised on foam and embellished with a knot of ribbon. I cut the insert down so the inside coordinated with the background card on the front.
inside
I designed this A5 card using the large snow globe topper with some  other cardstock I found, to allow the image to stand out. I chose the adorable scorable cardstock to match the off cut of swirls cardstock, (from another collection) which I though complimented the colours in the topper. I cut the panels of cardstock to fit the card front, edging the swirls border with silver mirri to create a neat join. I positioned the image and sentiment toppers onto the card, using foam pads for dimension.
For this little 6x4" card, I made a feature of the printed image on the cardstock from this collection. I simply trimmed the cardstock to size, so it would fill the card front. I then wrapped the bakers twine around and secured at the back, before gluing down. I tied the twine in a bow and finished with the essential book sentiment placed off centre across the twine. I added the matching insert, cut to fit inside.
inside

I made this 5x7" card with the remaining printed scene cardstock in this collection. I found a little book image where the scene on the page matched the background cardstock. I simply matted the page onto silver mirri card to create a topper. I glued this to the card front, which I had covered with the cardstock. Again, I trimmed the coordinating insert down to fit inside the card, this time featuring the printed sentiment.
inside
I also created this cute little 5" square card using a little book page and the remaining cardstock from this set. I covered the card front with the snowflake cardstock. I die cut a frame from silver mirri card, then cut the little book page to sit neatly inside. I glued these onto the card flat, making a card which is perfect for posting! I finished the inside with the printed sentiment section of the insert, die cut to create a scalloped edge square to compliment the front.
inside
With this final topper, I felt that the colours of the little girls outfit didn't really suit the cardstock in the collection. I therefore made this 6x6" card using some patterned cardstock I had remaining from a previous hunky-dory Christmas set. I mat and layered the cardstock onto silver mirri for the card front. I then positioned the image and sentiment toppers on, using foam pads for dimension.
Mx

Wednesday, 6 December 2017

Toyshop Window

  • Hunkydory Christmas Classics Luxury Card Collection: Toyshop Window
  • Hunkydory second little book of Christmas
  • Hunkydory essential book of Christmas sentiments
  • A5, 5x7" & 6x6" white card blanks
For the first A5 card, I covered the card front with the cardstock. I then positioned the image topper and frame on foam pads, centred in the top panel. I added the sentiment which coordinated with the frame beneath to complete the front. I cut the insert down to fit inside with the printed sentiment.
inside
Using the other half of the cardstock, I created a 5x7" card. I covered the card front with the cardstock, trimmed down to fit. I then added the image topper to the centre of the top section and positioned an essential book sentiment on the printed border. I cut the remaining insert down, so the inside of the card matched the background of the card front.
inside
I used the matching little book to create a topper for this A5 card. I cut the cardstock to fit the card front. For the topper, I glued the frame to the little book page then trimmed away the excess image from behind the outer edge of the frame. I glued this to the card front with a sentiment from the collection, overlapping at the base. I cut the insert down to fit neatly inside, complete with the printed message.
inside
For the square card, I cut down the remaining cardstock to fit the card front, with the wreaths down one side. I then glued the topper and an essential book sentiment to the main panel of the card front. I added the insert to the inside of the card to finish the collection.
inside
Mx

Monday, 4 December 2017

Santa Claus is Coming to Town

  • Hunkydory Christmas classics Luxury card collection: Santa Claus is Coming to Town
  • Hunkydory second little book of Christmas
  • Hunkydory essential book of Christmas sentiments
  • cardstock from various other Hunkydory collections
  • silver mirri card
  • A5, DL, 5x7", 6x4" & 6x6" white card blanks
For this DL card, I made a feature of the printed Santa image on one sheet of cardstock. I simply covered the card front with the cardstock and finished with a little sentiment from the collection. I added the coordinating section of insert to the inside of the card.
inside
I used the remaining cardstock to cover this A5 card. I matted the little book page onto silver mirri card to create a topper and finished with an essential book sentiment. I trimmed the insert down to cover the inside of the card and add the message.
inside
I took the second sheet of cardstock from the collection and created this A5 card. I cut the cardstock to fit the card front, with the border across the base. I trimmed down the other coordinating little book image to fit neatly in the frame. I glued the image and frame to the centre of the top panel of cardstock. I found a message from the essential book to compliment the design and positioned this on the printed border. I added the insert to the inside of the card.
inside
I positioned the border vertically on this square card to ground the large sentiment. I cut the cardstock to fill the card front. I then added the sentiment topper overlapping the border edge. Beside the sentiment, I glued the Santa image topper. I trimmed the insert down to centre the message inside the card.
inside
For this 5x7" landscape card, I pieced together an offcut of red cardstock from this collection alongside a neutral piece from another collection. I cut the cardstock to fit the card front, with a border strip covering the join. I added the little topper, edged with the same print as the border strip, off centre on the card. I completed the design with an essential book sentiment.
I used another of the small toppers from the collection, along with various offcuts of cardstock to create this 6x4" card. I pieced together the card front with a green strip of card from this set, edged with the coordinating red cardstock and border left over from another set. I positioned the essential book sentiment across the border at the top of the card and placed the long, thin Santa topper beneath on the green section.
Following the same design concept of using up remaining pieces of cardstock, I was able to make this 6" square card. The join between the cardstocks was edged with a fine green and gold ribbon this time, secured behind the cardstock panels before they were glued to the card front. I cut down a little book page to fill the frame, left over from this collection, to create the topper. I finished the card with the remaining sentiment, centred on the bottom border.
I found another piece of the cream cardstock used above, large enough to cover a 6x4" landscape card blank. I used a border strip to break up the plainer cardstock with a splash of colour. The topper chosen from the essential book sat across this border. I then angled the topper image onto the matching frame to create the focal point on the card.
Mx
Wednesday, 15 November 2017

Christmas is coming...

  • Hunkydory Christmas classics luxury card collection: Christmas is coming...
  • Hunkydory second little book of Christmas
  • Hunkydory essential book of Christmas sentiments
  • gold mirri card
  • gold ribbon
  • A5, DL, 6x6" & 6x4" portrait and landscape white card blanks

For this A5 card, I used a little book image to create a nice big topper. I simply matted the page onto gold mirri and covered the card front with the cardstock. I then glued the topper in the centre with an essential book sentiment beneath, raised up on foam pads. I trimmed the coordinating insert down to finish the inside.
inside

With the 6" square card, I cut off the top border and turned the remaining cardstock around so the border ran vertical. I mat and layered this onto gold mirri to fill the card front. I then arranged the topper and coordinating tag from the collection onto the card. I glued the topper flat, raised the tag on foam and finished with a gold ribbon bow. The remainder of the insert sheet was trimmed down, so the inside of the card matched the backing paper on the front.
inside
 
Using the other sheet of cardstock, I created this DL card to make a feature of the printed image. I simply cut the cardstock down to fill the card front and finished with the coordinating 'north pole' sentiment glued down with foam pads. I trimmed the sentiment section of the insert down to fit inside.
inside

I switched the vertical stripes of the cardstock to horizontal to work with the oval topper in the collection. I simply cut the cardstock to fit the 6x4" card front. I then added the image and sentiment toppers into place, again using foam for dimension.

For the final card, I pieced the front with the striped card and the cut off border from the first sheet. I edged the border with gold mirri card to create a neat finish. I then positioned the little train topper alongside a sentiment from the essential book to complete the card.

Mx

Wednesday, 25 October 2017

star of wonder

  • Hunkydory cute Christmas luxury card collection: star of wonder
  • Hunkydory essential book of Christmas sentiments
  • Hunkydory adorable scorable cardstock
  • gold mirri card
  • red & white bakers twine
  • 8x8" & 6x4" landscape card blanks
I used the largest topper with the scalloped frame to make this 8" square card. I covered the card blank with the coordinating coloured adorable scorable card. I then mat and layered the yellow cardstock from the collection onto gold mirri card, to create a base for the toppers. I positioned the image and frame central to the mat, with the image raised up on foam pads. I then completed the front using the scalloped sentiment overlapping in the bottom corner, again glued with foam pads. I trimmed down the matching insert to fit the inside of the card.
inside
For the first 6x4" card, I used the oval toppers. I covered the card front with the cardstock featuring the border strip. I then layered the toppers on, slightly overlapping with different depths of foam to create dimension.
I created the second 6x4" card to feature the printed image on the remaining cardstock. I simply matted the cardstock onto gold mirri card, to fit the front of the card blank and finished with an essential book sentiment.
Using the other sheet of patterned cardstock, I created the final card. I trimmed down the section with the characters to fit the card front. I then added two strands of bakers twine and wrapped them underneath the cardstock and secured in position, before gluing to the card blank. I finished the card with a tag sentiment from the essential book, angled on foam pads and embellished with a twine bow.
Mx