Wednesday 27 January 2016

both for baby...

main supplies:
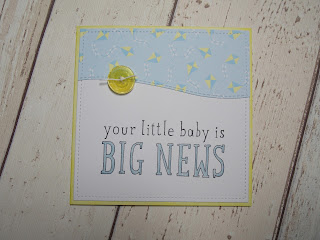
  • SU! big news 
  • craftwork cards Amelia & Jacob papers
  • lawn fawn- stitched square stackables dies
  • mama elephant- stitched landscapes dies
  • 5x5"card blank & white cardstock
  • memento black ink pad
  • wink of stella- clear
  • American crafts white twine
for the baby boy card you will also need:
  • tim holtz 'squeezed lemonade' distress ink pad
  • promarkers- pastel blue& denim blue
  • big yellow button
for the baby girl card you will also need:
  • tim holtz 'spun sugar' distress ink pad
  • promarkers- cocktail pink & pale pink
  • white paper flower & small pink button
 
to make these cards, I inked my card blanks with the coordinating colours. I die cut the stitched square from white cardstock. I added my large sentiment stamp to this, placing it near the bottom. I coloured the open areas in the sentiment to match some paper I had chosen. I added wink of stella over the colouring for a bit of added sparkle. I cut a strip of the patterned paper and die cut with the same stitched square die so this detail would follow right around the edge of the card. I then used a landscape die to create a curve on the bottom edge to follow the sketch. i threaded some twine through the button and tied in a knot. I glued all the layers on to my card blank before finally adding my button. to finish the card, i also stamped a matching 'congratulations' sentiment inside the card.

 
i made a slight change on the girl card, using a white paper flower and a small pink button instead of the large button. i still added the white twine, but tied this in a bow to be more girly.
Mx
 
i would like to enter this card into the

Friday 22 January 2016

heartfelt sympathy

  • SU! heartfelt sympathy
  • archival ink pads- coffee & sepia
  • tim holtz ink pads- brushed corduroy & gathered twigs
  • cream & kraft cardstock

I cut a mat of cream card, to fit a 4x6" card blank. I used a small accent stamp all over the mat to create a background. I cut a panel of kraft card and a slightly smaller cream mat. I stamped my sentiment in the middle of the cream panel. I used a little ink on all the edges to highlight and soften them. I also created a mat for the inside of my card. I simply cut the cream card to size, inked the edges and stamped one accent image in the bottom corner.

I will be sending this card off to America for the lasting hearts card drive. you can find out more at Jennifer McGuireink.com
Mx

Monday 18 January 2016

hoppy anniversary!!


  • W plus 9 wishing you stamp and dies
  • Lawn Fawn stitched stackables square
  • Mama elephant- landscape dies
  • Memento tuxedo black ink pad & copics friendly cardstock
  • Copics (w00,01,02. R00)
  • Archival jet black ink pad
  • wow white embossing powder & tim holtz embossing ink pad
  • Tim holtz distress InkPad (tumbled glass, Brocken China, fafded jeans, chipped sapphire, crushed olive and peeled paint
  • watercolour &black cardstock
  • 5x5" white card blank
I used a stitched square die to cut 2 pieces of watercolour cardstock. I then die cut 1 piece a second time, using a hill die to create a landscape. I coloured both pieces with distress ink pads and used a water sprayer to create some interest. for another little touch I added a small shooting star to the sky, I embossed this to make it bright white. I placed the sentiment on to my clear block, in a slight arch to match the line of the hill. I stamped this using black archival. I stamped, coloured (using copics) and die cut my bunny characters. I used the same sized die as before and a second slightly larger die to create a black frame to complete my card. I glued my layers onto my card using different depths of foam tape to give extra dimension.    
Mx

the challenges I would like to enter are:
 
cas(e) this sketch -#155  (I would like to include the image in my post but unfortunately I am unable to add the picture, so don't forget to click on the link and take a look at all the great examples)
simon says Wednesday- " ombre"


Sunday 10 January 2016

birthday butterflies...

  • 4x6" white card black & white cardstock
  • SU! happy birthday, everyone
  • sizzix tim holtz alterations- butterfly frenzy
  • tim holtz distress ink pad (shaded lilac, worn lipstick & wild honey)
  • archival ink pad- jet black
  • wink of stella- clear
I inked the card blank with the shaded lilac colour. I cut a mat to fit the front of my card and stamped the sentiment. I die cut several butterflies in different sizes and arranged them onto the card to pick which I wanted to use. I used distress ink pads and a blending tool to colour the butterflies, then glued them in place. the final touch was some glitter to accent each butterfly.
Mx

the challenge I would like to enter:
cas(e) this sketch- #154
simon says (Wednesday)- 'something new' (these are both new products I haven't had chance to use yet!!)

Saturday 9 January 2016

friend...

  • 6x4" white card blank and cardstock
  • HOTP- card maker's floral ultimate pack
  • paper smooches- friend word wise dies
  • bakers twine
I chose three coordinating papers, the first I cut just slightly smaller than the front of my card as a mat. the second I cut a 1" strip of paper and rounded the corners. i then glued this in position, to match the sketch layout. I made a hole down the spine of my card blank, in the centre of the paper strip. I threaded my twine through the card to wrap around a few times, then tied a bow. (if you have a top folding card you would not need to do this step, but since I had a side fold card I thought it would give a neater finish). I die cut the word 'friend' three times from white cardstock and once from the third piece of coordinating paper. I used glue to attach all 4 layers together to give the sentiment some dimension.
Mx

I would like to enter my card into this challenge:
freshly made sketches- #218

Thursday 7 January 2016

shirty...

  • 6x4" white card blank
  • some white, silver and blue marbled cardstock
  • hunky-dory little book of manly moments
  • SU! says it all
I decided to create a card using the shirts from the manly moments book. I backed the sheet using some white card for strength, before fussy cutting the shirts. Following the sketch, I then cut the mats and layers. For the central band, I used a scoreboard to create a subtle raised design on the card blank (sorry this doesn't show in the photo!!) I stamped a sentiment onto the blue layer then added the 3 small panels and the shirts using foam for dimension.
Mx

I would like to enter:
sketch Saturday-#393

age is just a number...


  • red cardstock and 5x7"card blank
  • white stamping cardstock and Neenah classic crest for dinosaurs
  • SU! watercolour wash & dinoroar stamp sets
  • sentimentally yours- decadent alphabet & numbers stamps
  • archival 'sky blue' ink pad  & memento 'tuxedo black' ink pad
  • copics (E40,42,81. E40,42,43,44. V28, VB20,23,25,29. B91,93,95,97,99. N0. YG61,63,17,67. YR23,24,18,27.)
  • black sakura glaze pen
I cut a mat of cardstock to fit the front and inside of my card, I shaped this using a corner rounder by xcut. I stamped both mats using the large background stamp and light blue ink. I used some old templates I have to cut a large 50 from red cardstock, then glued this to the centre of my mat. I stamped, coloured and fussy cut my dinosaurs. I added these to the card using foam squares. I decided to use alphabet stamps to write a personalised sentiment inside my card, including a deliberate typo and embellished with another dinosaur. I added glaze pen over the top of my stamped letters and to the eyes of my dinosaurs.
 
Mx

the challenge I would like to enter:
the paper players- #276