Showing posts with label purple. Show all posts

Monday, 4 February 2019

bess the butterfly


  • Stamping Bella: tiny townie Bess the butterfly (stamp & die)
  • Mama elephant: Madison Avenue creative cuts die
  • Stampin up!: curly cute
  • Make it colour blending cardstock
  • Copics:E50,51,21,93. E42,43,44. Y15. BG10,53. BV0000,000,00,11. V25. RV00. C5,6,7,8.
  • Wink of Stella ‘clear’ sparkle brush marker
  • Tim holtz ‘dusty concord’ distress ink pad
  • Pattern Paper (from craftwork cards, don’t know the name)
To make this card I simply die cut my frame from copic friendly cardstock. I used the centre to stamp and colour my image, then cut it out using the matching die. 
I cut out a piece of pattern paper, which had the sentiment printed on. I inked my card blank with the purple ink then glue the paper to the centre. I added the white frame. I glued the image in place using foam for dimension. Final touch was a bit of sparkle to the wings.
Mx

Sunday, 7 January 2018

Baby shower

 
  • Stamping bella-Brynn has a baby shower
  • Lawn fawn-stitched scalloped borders
  • DCWV-fresh floral stack paper
  • Neenahclassic crest cardstock
  • Memento'tuxedo black'ink pad
  • Copic: 0. C2,1,0,00. BV02,01,000,0000. Y18,15,11. R24. Y21. E43,42,34,35,37. E50,51,21,93. W3,1,00.
  • Yellow sparkle cardstock
  • White 5x7" card blank
 
I covered the front of the card with the lilac patterned paper. I then made a border strip from yellow cardstock, using the scallop detail die. I added this to the card front. I stamped and coloured the Brynn image using copics. I matt and layered the image onto yellow cardstock and glued to the card using foam tape for dimension.

 
Mx
 
I would like to enter this card:

Wednesday, 25 October 2017

star of wonder

  • Hunkydory cute Christmas luxury card collection: star of wonder
  • Hunkydory essential book of Christmas sentiments
  • Hunkydory adorable scorable cardstock
  • gold mirri card
  • red & white bakers twine
  • 8x8" & 6x4" landscape card blanks
I used the largest topper with the scalloped frame to make this 8" square card. I covered the card blank with the coordinating coloured adorable scorable card. I then mat and layered the yellow cardstock from the collection onto gold mirri card, to create a base for the toppers. I positioned the image and frame central to the mat, with the image raised up on foam pads. I then completed the front using the scalloped sentiment overlapping in the bottom corner, again glued with foam pads. I trimmed down the matching insert to fit the inside of the card.
inside
For the first 6x4" card, I used the oval toppers. I covered the card front with the cardstock featuring the border strip. I then layered the toppers on, slightly overlapping with different depths of foam to create dimension.
I created the second 6x4" card to feature the printed image on the remaining cardstock. I simply matted the cardstock onto gold mirri card, to fit the front of the card blank and finished with an essential book sentiment.
Using the other sheet of patterned cardstock, I created the final card. I trimmed down the section with the characters to fit the card front. I then added two strands of bakers twine and wrapped them underneath the cardstock and secured in position, before gluing to the card blank. I finished the card with a tag sentiment from the essential book, angled on foam pads and embellished with a twine bow.
Mx

Friday, 26 May 2017

Butterflies


  • SU!- butterflies thinlit die
  • SU!- cottage greetings
  • Wilted violet distress ink pad & aubergine dream pixie powders
  • Peacock feathers distress ink pad & teal wash pixie powders
  • Fossilized amber distress ink pad & straw yellow pixie powders
  • Watercolour cardstock
  • White glitter cardstock
  • 4x6" card blanks

I used a combination of ink and pixie powder on watercolour cardstock to create three different coloured backgrounds. I squished ink onto my palette and diluted with some water. I brushed this onto the cardstock, sprayed with more water and added a sprinkle of powder. I blotted the excess water and paint at the edges, before drying with a heat tool for speed. I then used distress inks to stamp a sentiment onto each background. I also coloured the outer edges of the card blanks to coordinate, using blending foam and the distress ink pads. For the main feature, I die cut butterflies from glitter cardstock. Finally, I layered each of the backgrounds onto the card blanks then glued the butterflies in position.

I would like to enter the following challenge:
Paper players - cas butterfly

Mx

Friday, 14 April 2017

gift wrapped...


  • LOTV- gift wrapped
  • My favourite things- stitched scallop basic edge die
  • Sentimentally yours- elegant milestone birthday
  • Patterned paper- country companions 'for someone special'
  • Memento 'tuxedo black' ink pad
  • Neenah classic crest cardstock
  • Copics- W3,1,00. R000. Y18,17,15,13. V17,15,12,0000. R85,83,81. YG13,11.
  • Sakura- glaze pen #849, clear star glitter pen #700
  • Wink of stella 'clear' glitter brush pen
  • Yellow and gold bakers twine
I die cut my patterned paper to create a decorative edge, then trimmed it down to fit the card blank. I then positioned my sentiment and image stamps beneath according to the sketch. I coloured my image with copics, then used glitter and glaze pens to accent the image and sentiment. Finally, I glued the paper down and added twine tied in a bow. I think it's a lovely image and colour combination for a big Easter time birthday!
 
Mx
 
I would like to enter the following challenges:
Simon Monday says: hip hop
Simon Wednesday says: spring color inspiration
freshly made sketch #283

Wednesday, 14 December 2016

shoe perfect...

 
  • Do crafts artiste acrylic paint - iris & metallic silver
  • Studio paint - charcoal black
  • Tim holtz 'terminology' tissue wrap
  • Anna Marie designs - flowers & embellishments
  • Black satin ribbon
I covered the mdf shoe blanks with tissue wrap. I then coated them with the lilac paint. I drew the line to create the platform area and painted below the line with silver edged. I edged this with a black line of paint, ensuring it lined through on all sides when the pieces were assembled. To complete, I tied bows and created an arrangement of flowers, then used hot glue to secure them in place.


As this was made as a gift, I created a box for it using black cardstock and two sheets of acetate. Once opened, it can be used to display cards and hold photos, or just placed out on display as home décor.
 
Mx
 
challenge I would like to enter:

Friday, 9 December 2016

don't forget the gifts...

 
  • mdf blank
  • ranger studio paint
  • ranger glue n' seal - matt
  • tim holtz tissue wrap
  • golden gel medium - matt finish
  • adhesive backed felt pads

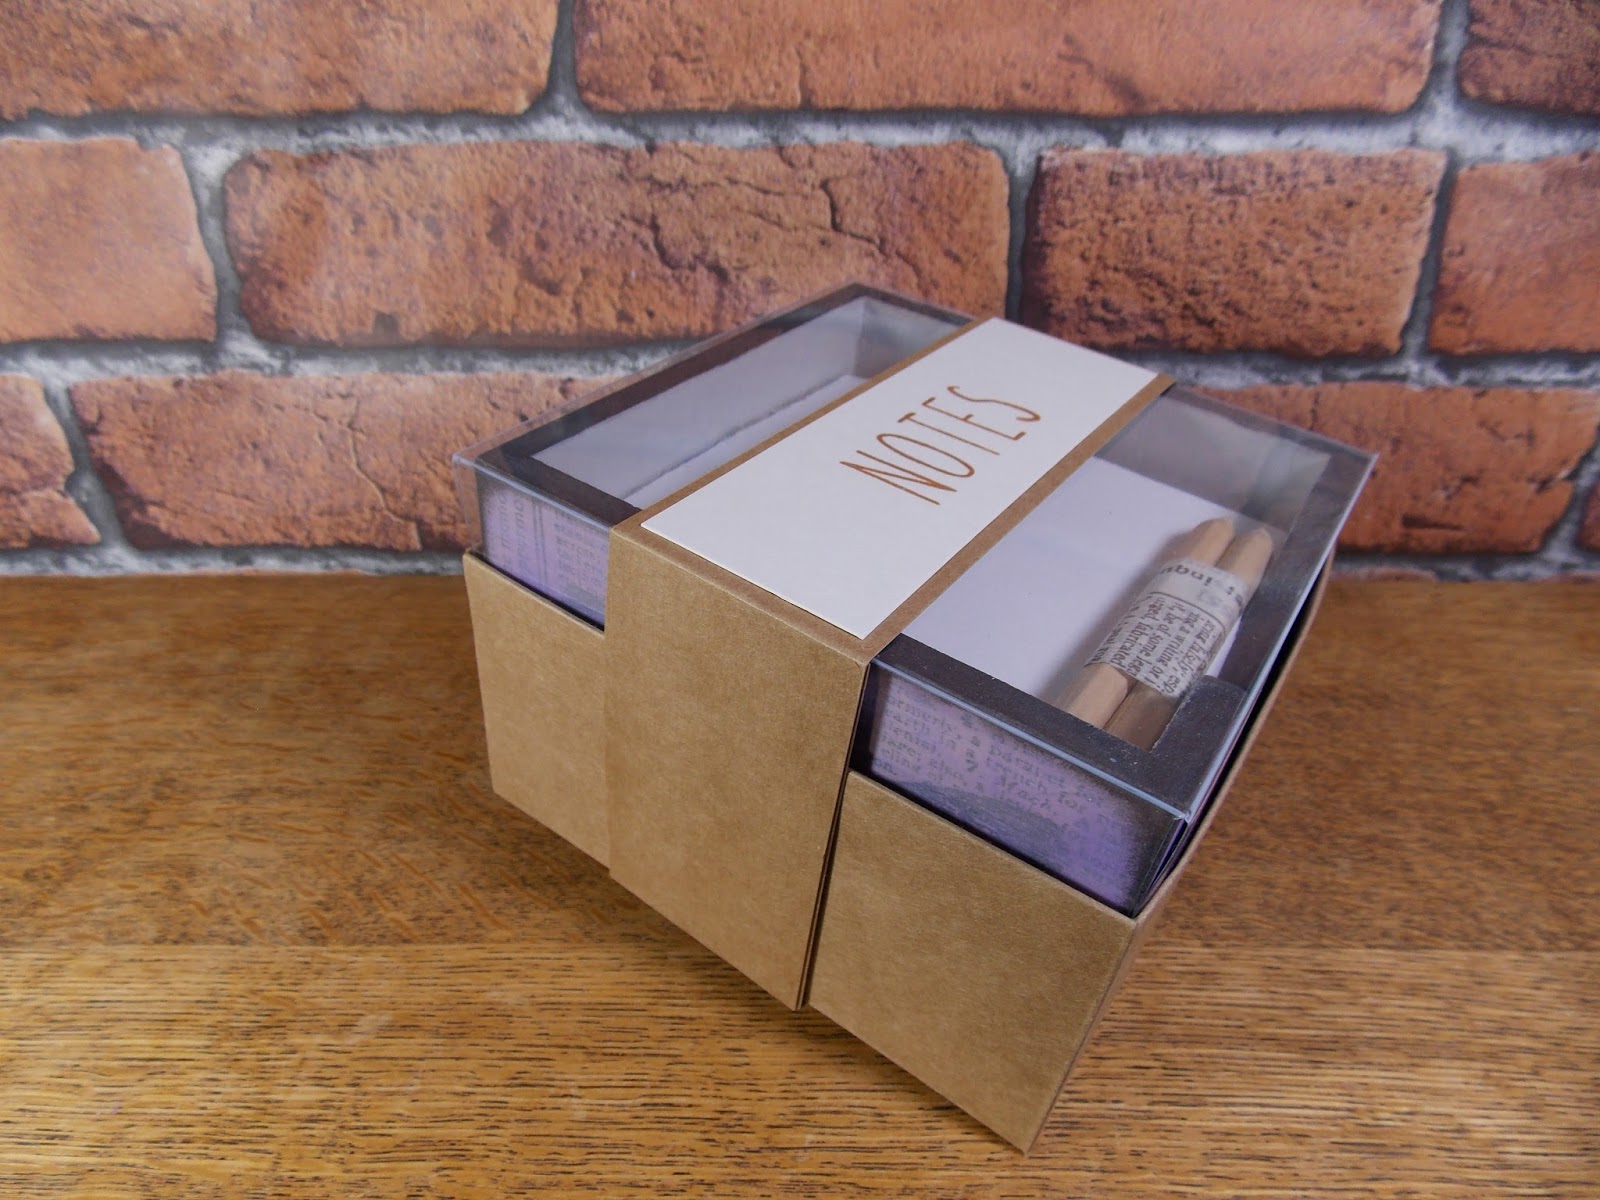
As the memo blocks from last year were a success and appreciated by those who received them as a gift, I decided to make another this year. I painted the inside of the mdf blank with grey. For the outside, I selected pieces of tissue wrap to add a butterfly to each side of the box. I shaped, glued, then sanded the tissue pieces to cover the outside. I then gave the box a coat of paint to soften the print. I used purple to add a wash of the recipients favourite colour. I sponged a small amount of black on the edges. I added a protective seal using the golden gel medium and felt pads on the base to protect work surfaces from scratches. The right size of white memo pad was purchased on ebay to sit inside, along with a couple of small pencils wrapped in the coordinating tissue to finish it off. 


As before, I packaged the memo block in kraft cardstock and acetate, with a hand stamped wrap ready for gifting.

I would like to enter the following challenge:
  
Mx 


Friday, 7 October 2016

Uptown girl...


  • Stamping bella-mason uptown girl opal the optimist 
  • Sentimentally yours- elegant milestone birthday 
  • LOTV- timeless Victorian paper
  • SU!- finishing touches edgelits
  • Neenahclassic crest cardstock 
  • Memento 'tuxedo black' ink pad 
  • Copics- skin E50,51,21,11,93. Hair E44,43,42.Y21. dress C4. V12,15,17. BG32,34. Dress/bottle YG63,67. Bottle/drink E40,81. Glass BG70. Ground C1,00
  • atyou spica glitter pens - clear, sand and black
  • Clear self adhesive gems and paper flowers (unknown brand)
I took inspiration from the sketch and decided to create an alternative shaped card by cutting the front off at an angle. To do this, I measured 1cm in from two corners on the front of my card blank and drew a diagonal pencil line across to help line up my edge die. I die cut along the line to shape the card with a decorative edge. I cut a mat of paper for both the inside and outside of my card blank and glued them down. I stamped and coloured my image with copics and touches of glitter to create the champagne bubbles and sparkly belt. I then stamped my sentiment onto another piece of card and used my paper trimmer to shape them into rectangles. I matted each of these onto the coordinating paper and glued them to my card, making sure the glue was only on the areas touching the card front and not on the overhang. I added paper flowers in matching colours and clear gems to complete the sketch with a touch of decoration and sparkle.
 
Mx

Challenge i would like to enter:

Tuesday, 27 September 2016

butterfly box...


reverse of tag
  • Purple and white cardstock
  • SU! spring flowers embossing folder
  • SU! butterflies thinlits
  • SU! made for you & Christmas wishes stamps
  • Sizzix scalloped circle dies
I love making gift packaging, I think it makes receiving that bit more special. I made a simple gift box and a tag to coordinate and finished it with some bakers twine to secure the tag.
 
I also handmade the gifts for my special friend. I wood block printed a tote bag using a butterfly design block and purple fabric paint. I also painted this mdf heart, click here to find out how I made this!!
 
  
Mx 

friendly butterfly

front


reverse

  • Heart shaped MDF blank
  • tim holtz tissue wrap- terminology
  • Claudine hellmuth studio paints and brushes
  • stampendous- jumbo butterfly trio
  • dreamees sentiment stamp
  • some lilac ribbon
I created this door hanger by covering the mdf shape with the tissue using ranger matt medium. I then painted a layer of cream over the tissue and sponged some lilac paint around the edges. I stamped the sentiment and images with archival ink. I then painted the butterflies in lilac. I relined all of the black lines, with black paint for a crisp bold image. The final touch was some ribbon tied in a bow on either side with a loop to act as the hanger. 
 
Mx
 
I would like to enter the following challenge:


Sunday, 10 January 2016

birthday butterflies...

  • 4x6" white card black & white cardstock
  • SU! happy birthday, everyone
  • sizzix tim holtz alterations- butterfly frenzy
  • tim holtz distress ink pad (shaded lilac, worn lipstick & wild honey)
  • archival ink pad- jet black
  • wink of stella- clear
I inked the card blank with the shaded lilac colour. I cut a mat to fit the front of my card and stamped the sentiment. I die cut several butterflies in different sizes and arranged them onto the card to pick which I wanted to use. I used distress ink pads and a blending tool to colour the butterflies, then glued them in place. the final touch was some glitter to accent each butterfly.
Mx

the challenge I would like to enter:
cas(e) this sketch- #154
simon says (Wednesday)- 'something new' (these are both new products I haven't had chance to use yet!!)

Tuesday, 17 November 2015

you're in my thoughts...

  • 6x4" black card blank
  • SU!- best thoughts
  • memento ink pad (tuxedo black)
  • copic friendly cardstock
  • copic markers- BV 0000,000,02,04. YG 17,13,11
  • wink of stella- clear
today i made a very simple card, not much to do but colour!!  i cut a mat of cardstock and stamped the large flower design almost central. i coloured this with copics. I then stamped the sentiment slightly overlapping the stem, to follow the sketch. i added a tiny bit of sparkle to the words, just to make them stand out more. i don't normally add glitter to a sympathy card but i thought in this case it looked nicer. you could change the sentiment to make this card for another occasion.
 
challenges I would like to enter:
 
Mx

Monday, 12 October 2015

a wonderful cup!!

 
  • SU!- morning cup
  • LOTV- set 93 (someone special)
  • lilac, black & copic friendly cardstock
  • memento ink pad (tuxedo black)
  • copics (BV00,01,02,04)
  • tim holtz distress ink pads (milled lavender)
  • wink of stella (clear)
I made a lilac 6x4" card blank and stamped it using a small teabag stamp to create a background. I made a topper using a mat of white card and stamped my sentiment and cups to match the sketch. I coloured the cups using copics, then added some glitter over the top. I stamped one more cup on a small piece of cardstock, I coloured and glittered this before fussy cutting it out. I glued this over the top of one cup using foam tape for dimension. I mat and layered the topper with some black cardstock before adding to the card blank with foam tape.
Mx
 
challenges I would like to enter:

Saturday, 14 March 2015

butterfly meadow...

 
  •  LOTV butterfly meadow stamp, SU! crazy about you and matching hello you thinlit die
  • memento ink pad, copics and promarkers, black micron pen, sakura glitter pen
  • purple carstock (to make card blank & message), craftwork cards digi cardstock
 I made my card blank, and cut digi cardstock to size. I stamped and coloured the lovely bunny image in the bottom corner. I added the die cut and stamped sentiment to the top of my card. the finishing touches were some faux stitching lines and glitter accents.
I also made an insert by simply matting a piece of white cardstock to the inside. i added some faux stitching around the outer edge to match the front of my card and stamped a sentiment in the centre.
 
I am entering the:
 
Mx 

Friday, 6 March 2015

lazy days...

 
  • LOTV 'waterlily' stamp
  • SU! 'express yourself' stamp (sentiment)
  • SU! 'labels collection framlits' and 'bigz alphabet typeset'
  • 8x8 card blank
  • craftwork cards 'digi cardstock' 
  • purple, green and patterned cardstocks
  • Memento ink 'tuxedo black' and 'grape jelly'
  • copics markers
  • stickles glitter
  • white satin ribbon
 
 
I thought this fun image for a big birthday card I wanted to do. I stamped the main image and coloured it with copics. I die cut this out with a larger purple mat to layer behind. I also die cut the numbers from green and patterned card sticking them together offset to create a drop shadow effect. I then cut and matted my patterned paper, added the ribbon tied in a bow and glued onto the card. the image and numbers were stuck down with foam pads for dimension. finally, I added glittered accents to the image for that extra special feel. 
 
Mx

Saturday, 28 February 2015

big blooms...

 
  • 6 x 4 card blank
  • SU! 'flower patch' and sentiment stamp (sorry I got the sentiment 2nd hand with no name label)
  • memento ink pads
I kept this card really simple with the bold flowers as the main feature. I stamped the different flowers and leaves to build up the image and finished it off with a sentiment stamped in the corner.  

'anything goes'
Mx

Thursday, 26 February 2015

floral wreath...

 
  • wild rose studio stamp 'everyday greetings'
  • cardio stamps (floral from various sets)
  • SU! 'potpourri' stamp with matching punch
  • stickles 'frosted lace'
  • memento ink pads
I started with a circle drawn lightly in pencil. I then added floral and foliage stamps to cover the outline using various coloured inks, inspired by the colour Q challenge. I then inked some cardstock, cut it into a banner shape and stamped it with my sentiment. Next was the butterfly, which I coloured, stamped and punched out. I glued the pieces onto my card blank following the paper players sketch and finished with glittered accents around the edge of the matt and the centres of the flowers.
 

colour Q #281

the paper players sketch #233
Mx

Monday, 5 January 2015

lilac blooms...


I cut a mat of card slightly smaller than my card blank and stamped my floral image (so very grateful from SU!) along the bottom edge. I coloured the image using promarkers. To follow the sketch, I stamped a sentiment (express yourself from SU!) a little above the image . I also added several rows of twine with a bow tied beneath the message. I kept the colour palette simple on this card by using only 2 colours which match with my bakers twine (American crafts). I added extra detail by glittering the edges of my mat with a sakura pen. To finish the card I glued the mat to the front of my 6x4" card blank using foam pads to give it a bit of dimension.
 
 
I added an insert to add an extra special touch to the card. I cut another mat of card, edged in glitter pen with a single stamped and coloured image in the corner. I will add a sentiment at a later date to customise the card when I'm ready to send it. 


Mx
 

Saturday, 6 December 2014

spread the christmas cheer...

 
Here is another of my chocolate box cards. Just a quick post to say thank you to everyone for their lovely comments on my previous post with the box cards... I'm glad you're enjoying my free template. If you haven't seen it yet, here's the link to save you searching ( http://craftylilmouse.blogspot.co.uk/2014/11/chocolate-box.html )
 
Please share pictures of your makes, as I'd love to see what creative things you have made !!
 
Mx


Tuesday, 28 October 2014

shimmer and silhouettes !!


to make this card i cut a strip of digi card and inked it using tim holtz distress inks, to make a background. i stamped this panel with my floral image and sentiment, using an archival black ink pad. i mat and layered this onto some black and then the 5x7" card blank. i used a scrap of card and stamped some butterflies, again using the black ink pad. i coloured the butterfly with the same shades of tim holtz distress markers. i added more detail with some iridescent watercolour paint from cosmic shimmer. i cut these out using the elegant butterfly punch from stampin' up! and attached them onto my card using foam pads in the centre. for this card i used the papillon potpourri, for my family and just believe stamp sets from stampin' up!
 

 i realise i don't always show the inside of my cards, but thought i would share it this time... i used the purple ink pad to create a coloured cardstock which faded to white space in the centre, i added black ink around the edges to frame the mat a bit more. i stamped and coloured a small butterfly in the bottom corner and added my message sentiments to the centre. i used two stamps to create the verse, one from lili of the valley and the 'happy birthday' from SU! in the stamp set matching the front.

 
Mx