Showing posts with label promarkers. Show all posts

Friday, 2 December 2016

'o' christmas tree...


  • SU!- polar party
  • SU!- petite pairs
  • SU!- oval & scalloped oval punch
  • HOTP patterned paper
  • Memento 'tuxedo black' ink pad
  • Neenahclassic crest cardstock
  • Promarkers- pear green, moss, cocoa, berry red, lipstick red
  • Wink of stella - clear & gold
  • Kraft &white cardstock

Mat a piece of patterned paper onto the card blank. Cut a mat of white cardstock, stamp and colour the image. I added glitter to the image for some sparkle. stamp and punch out the sentiment. layer onto a scalloped punched oval. cut a piece of coordinating paper and trim into a banner shape. glue onto the card blank following the sketch.
Mx


Wednesday, 10 August 2016

Flowering fields...


  • SU!- flowering fields & party pants
  • Memento 'tuxedo black' ink pad 
  • White alcohol marker friendly cardstock 
  • 6x4" landscape kraft cardstock
  • Promarkers- pink lobster, plum preserve, daffodil bloom, island lagoon, summer sun, tequila sunrise, apple cider 
  • Atyou spica pens- pitch black & clear
 
I cut a matt of cardstock to fit my card blank. I stamped my floral images and a sentiment according to the sketch. I coloured the images with promarkers and used clear glitter pen to add some shimmer to the flower petals. I also traced over the sentiment with the black glitter to make it a bit darker aswell as shimmer. I simply attached the matt to the card blank to finish my card.
Mx
 
Challenge i would like to enter:

Thursday, 9 June 2016

summer fields


  • SU!- flowering fields
  • lawn fawn- stitched rectangle stackables, thank you border
  • memento- tuxedo black ink pad
  • promarkers
  • alcohol friendly cardstock, black card blank & cardstock
  • wink of stella
 
I die cut a stitched rectangle and stamped my floral images in the centre. I coloured these with promarkers and added some glitter. I die cut a 'thank you' sentiment from black cardstock and glued it across the lower section of the card panel. to finish my card i attached the panel to a black card blank.
Mx

challenges I would like to enter:
cas(e) this sketch-#175

Wednesday, 25 November 2015

baby booties ...


  • SU! 'baby we've grown' & 'express yourself' stamps
  • LOTV 'bear necessities' paper
  • sizzix scallop circle, circle & tickets dies
  • tim holts 'brushed corduroy' distress ink
  • memento ink pad 'tuxedo black'
  • promarkers pastel & denim blue
  • 6x4 landscape card blank
  • white cardstock
  • bakers twine
I cut my mat of paper and the banner. I die cut the shapes for the topper to complete the sketch. I inked all of the edges of the mats with the distress ink. I added a congratulations onto the banner then glued these layers onto the card. I stamped the booties onto the topper and coloured the image. I then stuck this onto the scallop mat and used foam pads to add this to the card. the finishing touch was the bows tied in twine.
 
Mx
 
I'd like to enter this card into the following challenge:

Monday, 23 November 2015

starry trees ...


  • 4x6" white card blank, red cardstock and white marker cardstock.
  • SU!- polar party
  • lawn fawn - starry backdrops
  • memento ink pad (tuxedo black, cantaloupe)
  • promarkers (cocoa, moss, pear green, berry red, tulip yellow, sunflower, ice grey 1)
  • wink of stella - clear
I cut all my mats to follow the sketch. I stamped the focal image and sentiment then coloured it. I added sparkle to the baubles and stars. I stamped the stars in yellow for the band. Finally, I stuck all the layers down.
 
Mx
 
challenges I'd like to enter are:

Monday, 15 June 2015

garden of hope ...

sorry about the picture- the vellum was hard to photograph
  • SU! corner garden stamp
  • SU! bloom with hope stamps
  • promarkers & memento black ink pad
  • super smooth white (digi) card
  • archival black ink pad
  • vellum
  • green cardstock
I made a 6x4" card blank using some olive green cardstock. I cut a mat of digi card to fit the front of the card blank. I stamped the large floral image with memento and coloured it with promarkers. I cut a piece of vellum to 6x5" and folded it at 1" to form a 6x4" wrap as an overlay for the mat. I stamped the sentiment using black archival on the vellum. I taped the fold to the back of the mat then taped the mat on to the card blank. To finish this card I cut another mat of white card for the inside. I stamped this with my sentiment in the centre and taped the mat on to the inside of my card blank.
 
Mx

Friday, 8 May 2015

lazy day...

  • LOTV- lazy afternoon
  • SU!- for my family
  • memento ink pad & copics
  • tim holtz distress ink pads (brown tones)
  • digi cardstock, kraft cardstock & 6x4" card blank
I cut a mat of digi card and stamped my focal image off to the side, I then coloured this with copics. I distressed the entire mat with brown tones, keeping it lighter in the centre and around the image. I stamped and cut a banner for my sentiment and glued on to the card with foam.

Mx

Saturday, 14 March 2015

butterfly meadow...

 
  •  LOTV butterfly meadow stamp, SU! crazy about you and matching hello you thinlit die
  • memento ink pad, copics and promarkers, black micron pen, sakura glitter pen
  • purple carstock (to make card blank & message), craftwork cards digi cardstock
 I made my card blank, and cut digi cardstock to size. I stamped and coloured the lovely bunny image in the bottom corner. I added the die cut and stamped sentiment to the top of my card. the finishing touches were some faux stitching lines and glitter accents.
I also made an insert by simply matting a piece of white cardstock to the inside. i added some faux stitching around the outer edge to match the front of my card and stamped a sentiment in the centre.
 
I am entering the:
 
Mx 

Wednesday, 25 February 2015

two by two...

  • 6 x 4 kraft card blank craftwork cards digi cardstock and yellow pearl linen cardstock
  • SU! 'two by two' stamp
  • memento ink and promarkers
  • a brown button and twine
 
I decided to create a vibrant, gender neutral baby card and thought this Noah's ark stamp would work well with the kraft and yellow colour scheme. Following the sketch, I cut my cardstock on an angle to create my mat and layers. I stamped the image (not inking the sentiment attached) and coloured this with promarkers. I then cleaned the stamp and inked only the sentiment this time. this was cut into a banner shape and layered onto more yellow. I curled the edge for a bit of dimension before gluing down all of my layers onto the card blank. the finishing touch of a button tied with twine was added to complete the sketch.
 
Mx

Friday, 13 February 2015

my magnolia valentines ...

 
I created these two valentines cards using magnolia 'tilda' stamps coloured with promarkers. I have added sizzix die cut letters for the messages and the hearts. I inked the card blanks with tim holts distress ink and stamped the background for added interest. I also used an embossing folder for the circle layer on the love card. I used stickles to add glittered accents to the bee wings and cosmic shimmer pearlescent paint and a silk edged organza bow to the love card. The love envelope and insert was also stamped with the hearts background to match the card.
 
 
Happy Valentines day all,
 
Mx

Sunday, 1 February 2015

coffee kraft...

 
I folded a kraft card blank in half and stamped the splatter background ( French foliage by SU!) in memento (rich cocoa) ink. I then cut a piece of white digi cardstock and stamped positively chevrons from SU! using tim holtz (mustard seed) distress ink, using the remaining ink to create a softer shade between the chevrons. I wrapped twine around this panel tied in a knot on the front. This was then stuck to the card blank using foam pads for dimension.  Finally, I stamped the coffee cup (perfect blend by SU!) using memento ink. I stamped it twice, colouring one brown with copics and adding the message to the other with a cream background using promarkers. I then cut out the images to decoupage the cream sections onto the complete brown cup. I stuck this onto the card to complete the cas(e) this sketch challenge.
 
Mx

Monday, 5 January 2015

lilac blooms...


I cut a mat of card slightly smaller than my card blank and stamped my floral image (so very grateful from SU!) along the bottom edge. I coloured the image using promarkers. To follow the sketch, I stamped a sentiment (express yourself from SU!) a little above the image . I also added several rows of twine with a bow tied beneath the message. I kept the colour palette simple on this card by using only 2 colours which match with my bakers twine (American crafts). I added extra detail by glittering the edges of my mat with a sakura pen. To finish the card I glued the mat to the front of my 6x4" card blank using foam pads to give it a bit of dimension.
 
 
I added an insert to add an extra special touch to the card. I cut another mat of card, edged in glitter pen with a single stamped and coloured image in the corner. I will add a sentiment at a later date to customise the card when I'm ready to send it. 


Mx
 

Thursday, 18 December 2014

flower flourish...

 
to make this card I cut a piece of white card to shape, inked it using spun sugar tim holtz distress ink. I stamped the flourish from everything Eleanor (SU!) over the top in the same colour ink. I stamped 2 flowers from the flower shop stamp set (SU!) and coloured them with promarkers. I added a touch of glitter and punched them out using the pansy punch (SU!). I added this to my card using foam pads for dimension. I used the family sentiment die from tattered lace to die cut mum in white and glue this in place along the bottom edge. I added a final touch of glitter using a sakura pen along the edges of my pink panel.
 
Mx


Tuesday, 18 November 2014

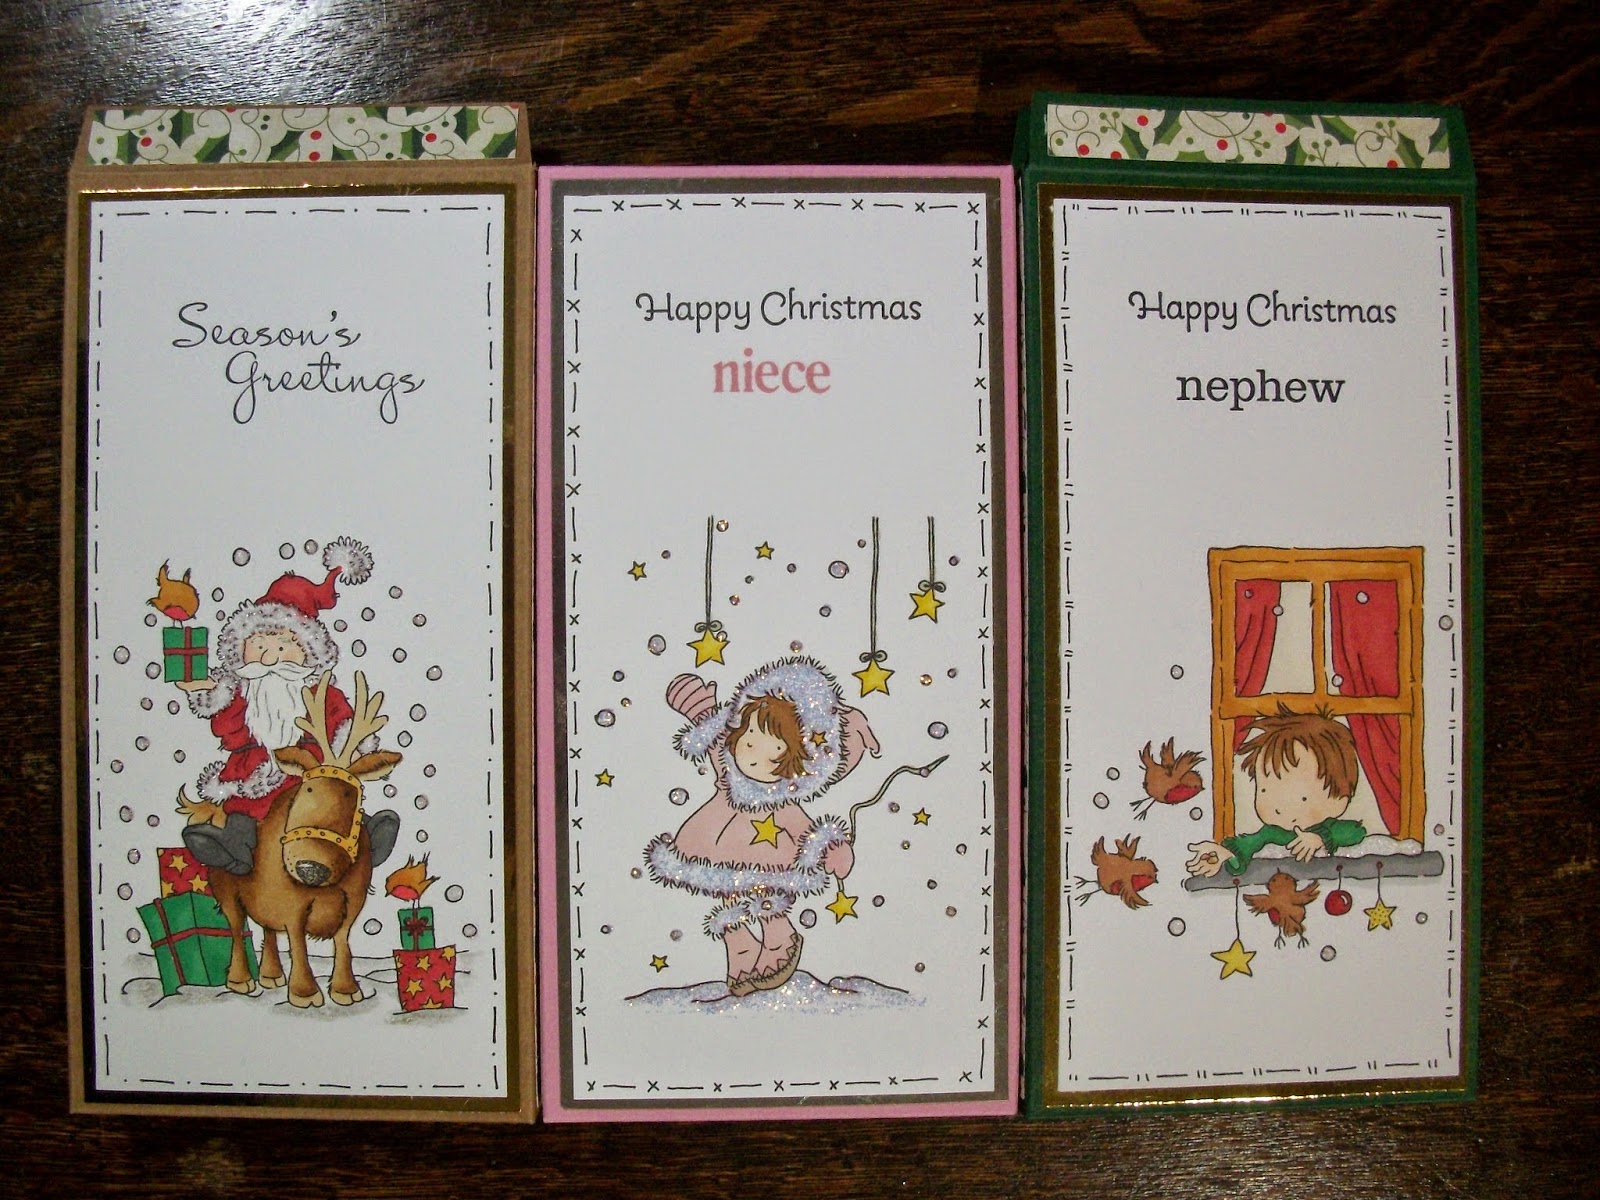
chocolate box


I've made these chocolate box cards to send the kids at christmas. I bought a chocolate bar and measured it to calculate the dimensions of the box. I took an A4 sheet of card and scored the net. folded it and cut it out. I then glued the box together. I then stamped and coloured an image from lili of the valley with a stampin up! sentiment on digi cardstock. I created a freehand border using the sekura micron pen, and added glitter to the images too. I layered mirri card behind the image and added this as a decorative panel to the front of the box. I also found coordinating papers to decorate the sides and top of the box. The chocolate was then sealed inside ready for the kids to open at Christmas.


I think this is a great idea to combine a card and a gift as the flap on the box creates somewhere to write your message and the box holds the gift. you can customise the boxes to have the card open at the front or back (depending on which way up you use the template!!) or make the box to fit a different sized gift. These aren't just for Christmas, change the image and you can send them any time of the year.
 
challenge #20 - Box it up!

'Merry Christmas'

Mx

Wednesday, 29 October 2014

a barrow of wishes...


the main image is from the summer afternoon stamp set from stampin up!, i stamped it with memento and coloured using copics and promarkers. i added a scrap piece of patterned paper to the side of my mat and hid the joint was some twine and a button. the sentiment is an SU! express yourself stamp. i added the topper onto a kraft 5x5" card black, using foam to add dimension.


Mx

Tuesday, 21 October 2014

out of this world !!


for this card I used the terrestrial friends stamp set from kirsty wiseman. I made a background by stamping the star image all over the card using different coloured memento ink pads. I cut a square of digi cardstock and stamped the rocket and planet images where I wanted them. I promarkered the outer edges of the rocket on the card and the planet. I added different coloured stars around the top half of the card. I stamped the rocket a second time onto a left over bit of card, then coloured the image using promarkers. I used this to layer on to the card to add dimension. I mat and layered my square of card onto yellow, then glued all layers together onto the card blank. I stamped a sentiment from the set onto a scrap piece of yellow, cut it to make a banner shape and added it to my card, completing the sketch. I added the finishing touches with a sakura glitter pen.


Mx

Monday, 20 October 2014

twins!!


just a quick one tonight...
I mat and layered digi cardstock and papers (bear necessities pad from lili of the valley), on to a 6x6" card blank. I inked the edges of the paper with tim holtz distress inks (gathered twigs), on one of the layers I used a scallop border punch from stampin' up! to add interest. I stamped my image (twice as nice from lili of the valley) on to digi cardstock using memento ink and coloured using promarkers. I stamped the sentiment to match in the bottom corner to complete the design.


Mx

Saturday, 18 October 2014

mistletoe mice...

 
to make this card I cut a panel of white card just smaller than my 6x6" card blank. I then used the snowflake corner embossing folder from the snowman range to add intrest to the top section of my card. I glued a piece of patterned paper on to the bottom half of the panel and trimmed it to fit. I added a ribbon to hide the join and secured it behind, before sticking the panel on to the card. I stamped my moonbeam meadow kiss image from crafters companion, onto some digi cardstock, using a memento ink pad. I coloured my image using promarkers. I cut this out using a circle die from sizzix and cut another piece of co-ordinating paper (from the frosty Christmas pad from lili of the valley) in to a larger scallop circle, then layered to two together. I stamped the sentiment from the same stamp set on to digi cardstock, then cut it out using an oval punch from stampin' up!. I took the piece of paper I had used to make the mat and cut out a scalloped oval, again with a punch from stampin' up!, to layer with the oval. I added sakura glitter pen around to edge of my circle and oval layer, I added more glitter onto the image where the snow was.


Mx

Thursday, 16 October 2014

shake your booties !!

 
I didn't have a plan for this card so I am happy with how it turned out. I haven't done a shaker card in ages and now I know why... they are a bit messy and so hard to photograph!!
 
for this card I took a kraft card blank, (this is a 5x7 landscape.) I cut a mat out of a piece of kraft card and layered it with a piece of paper, from the lili of the valley country lady 8x8 paper pad. I added a piece of ribbon and tied it in a bow, over to one side, and glued the mat onto the card. I used a paper-piercing template and mat from stampin' up! to add some detail to the edges and a pattern across the bottom. next, I stamped a sentiment from the stampin' up! bring on the cake stamp set, using an archival coffee ink pad onto some co-ordinating paper. I then cut this out using a sizzix circle die. I took a third piece of paper from the pad and cut out a circle, using the size down in my circle set. I then glued acetate to the back of the paper before cutting out a bigger scallop circle (with the circle in the middle) to create a frame. to make the shaker I added foam tape all the way around the edge on the back of the acetate, being extra careful not to leave any gaps.  I put the pattern side down and added a bit of glitter a few sequins and a good amount of pinflair ice diamond to the centre. I stuck the stamped circle onto this, remembering to keep the patterned side down. I then turned it over and glued the shaker element onto my card. I finally stamped a magnolia image (tilda with rubber boots) on to craftwork cards digi cardstock, using memento ink and coloured her with promarkers. I cut her out to add to the side of my shaker, using tape on the overlap and foam on the rest to keep her level with the shaker.
 
Mx
 

Sunday, 12 October 2014

autumn blooms


to make this card I stamped the image (blossom from lili of the valley), on to craftwork cards digi cardstock, using memento in rich cocoa . I coloured this with my promarkers. I used colours to compliment an autumn colour palette, which matched some patterned paper from the all spice 6x6 pad, (my minds eye) that I had chosen. I cut my image into a rectangle and cut the patterned paper to the same size, then layered both of these on to kraft cardstock. I glued some ribbon across the card using small bits of wet glue to hold it down to the card and then added double sided tape in the centre where I knew it would be covered. I glued both toppers down at an angle. I used a scallop oval punch from stampin' up!, to cut a piece of the patterned paper. I  then stamped my sentiment, (for my family set from stampin' up!) on to a piece of scrap white card, then cut it out with the oval punch from stampin' up!. to add a bit more detail to the card, I used a brown fine liner to do small dots in trio's across the background of the card. I also added some stitching to the edge. to finish the card, I used a sakura glitter pen to highlight the image and sentiment.
 
http://ideastoinspire.blogspot.co.uk/p/challenge.html
'anything goes !!'
http://promarkerchallenge.blogspot.co.uk/
 'use your favourite colour combo'
http://ilovepromarkers.blogspot.co.uk/
'autumn colours'
 
Mx