Showing posts with label snowflakes. Show all posts

Saturday, 16 December 2017

Christmas couple


  • Hunkydory Snowy season luxury card collection: Christmas couple
  • Hunkydory adorable scorable cardstock
  • White ribbon
  • A5 white card blanks

  • For the first card, I cut the snowflake cardstock to cover the card front. I then tied a bow in the ribbon and wrapped this around the cardstock, before I glued it to the card to hide the cut ends and keep it all neat. To create space to allow the image topper to stand out, I die cut an oval from a coordinating plain lilac cardstock to sit inside the frame. I glued the image down onto the die-cut panel using low foam pads. I added the sentiment frame, raised on deeper foam to create dimension and edge the lilac panel. I glued this in position on the card front above the ribbon. I cut the insert down with the coordinating couple image and glued this inside to complete the card.
    inside
    To create the second card, I used the lilac cardstock which complimented the snowflake paper and frame to soften the design. I pieced together the card front with the lilac panel at the top and a strip of the snowflake cardstock beneath. I covered the join with the border strip from the collection. I then glued the image and frame central to the top panel and added the sentiment topper to the middle of the snowflake panel, all using foam pads. Again, I finished the card with an insert, trimmed down to fit neatly inside.
    inside
    Mx

    Thursday, 14 December 2017

    A Merry Little Christmas

    • Hunkydory festive elegance luxury card collection: A Merry Little Christmas
    • Hunkydory second little book of Christmas
    • Hunkydory copper mirri cardstock
    • A5 & 8x8" card blanks

    For the 8" square card, I cut the cardstock down to fill the card front. To ground the sentiment, I added the border strip running across the base of the card. I positioned the sentiment to sit overlapping the border edge. For the main feature, I positioned the topper central with the border surrounds at angles to add interest. I trimmed the insert down to fit inside the card to complete.
    inside
    
     I used the second sheet of cardstock to cover the A5 card blanks. I simply arranged the main topper and little sentiment underneath, sitting on the main panel between the printed borders. For the inside, I cut the insert down to fit neatly.
    inside
    
     For the final card, I created a topper using the matching little book page. I cut the borders off the book image and matted onto coordinating mirri card. I then positioned it centrally onto the card blank, covered with the remaining cardstock. I completed the front with the additional sentiment topper from the collection, placed overlapping the bottom of the main topper. Again, I added the insert into the card for that extra finishing touch.
    inside
    
    Mx

    Wednesday, 22 November 2017

    Deer winter wishes

    • Hunkydory snowy season luxury card collection: Deer winter wishes
    • silver mirri card
    • A5, DL, 5x7" & 5x5" white card blanks


    For the A5 card, I mat and layered one half of the cardstock on silver mirri to fill the card front. I then simply added the image topper offset on the card, using foam for dimension. I trimmed down the insert to have the matching image inside with the printed sentiment.
    inside

    I cut the other end of the cardstock down to make this DL card. I mat and layered the tree image onto silver mirri and glued to the card front. I finished with one of the long thin toppers on foam pads. Again, I trimmed the matching insert piece down to fit inside.
    inside

    I used a section of the other printed cardstock in the collection to create this 5x7" card. I carefully cut the cardstock down to fill the card front, with the border running across the bottom of the card. I then added the image central to the main section of the card, with the sentiment overlapping the border edge. I added the coordinating insert to the inside of the card.
    inside

     For the first 6" square card, I made a feature of the decorative borders to enhance this topper. I began with the inside of the card, with a cut off border on the outer edge of the card, alongside a section of the insert. I cut away a reveal, then added the cardstock with the border to cover the remaining card front. I finished with the image and sentiment toppers on foam pads, leaving the gap for the sentiment to overhang the card front.
    inside

    For the final card, I pieced together the offcuts as a background. I covered the join between the cardstock with the coordinating border strip. To complete the card, I added the sentiment topper to one side of the border and centred the image topper on the other section, both raised on foam pads.
    Mx

    Friday, 20 October 2017

    Winterland walk


    • Hunkydory festive elegance luxury card collection:Winterland walk
    • Hunkydory the little book of snowy scenes 
    • Hunkydory essential book of Christmas sentiments
    • 7x7" & 5x7" white and black card blanks

    I created the large square card using the rectangular topper and frame. I trimmed down the cardstock and matted it onto the card front, retaining the border of street lamps on the right. I then added the image topper on flat, with the frame and sentiment raised on foam pads to give the card dimension.
    inside

    For the first 5x7" card, I used the other printed cardstock from the collection and layered on the front of a black card blank. I then added the little square topper flat and raised the frame on foam pads to complete. Since the frame is printed with 'Happy Christmas', I didn't add a separate sentiment.

    inside

    For the second 5x7" card, I used a white landscape card blank covered with sections from each cardstock. I used the trees for the top half and the darker print beneath, edged with the holographic foiling which had originally edged the border section on the sheet. I then positioned the image topper onto the card, along with the sentiment.

    inside

    For the final card, I took the remaining piece of cardstock, printed with snowfall and a moon. I used an image sheet from the little book backed with silver mirri card to create a topper. I layered this on an angle with a little book sentiment to complete the card. The colours in the image compliment the background to work well together, despite coming from different collections.
    Mx

    Tuesday, 17 October 2017

    Merry Christmas, sausage!

    • Hunkydory cute Christmas luxury card collection: Merry Christmas, sausage!
    • 7x7", 6x4" & DL card blanks
    • Gold mirri card
    I created this 7" square card using the largest topper from the set. I mat and layered the patterned cardstock and gold mirri onto the card front. I then positioned the topper on using foam pads, so the scarf border on the topper lined up with the dog on the backing card. I completed the card with the coordinating sentiment from the set, overlapping the topper on deeper foam pads.
    inside
    Using the other piece of patterned cardstock, I created the DL card. I chose the DL format as it fit both borders on, I simply cut the cardstock to fit the card front. I then added the oval topper and large sentiment on foam pads for dimension. I completed the inside with the matching insert trimmed to fit.
    inside
    For the 6x4" card, I cut down the remaining cardstock to fit the front of the card, this time removing both borders. I then layered the bottom border onto the card with foam pads to create dimension. I added the square topper above the border on foam pads to complete.
    inside
    Mx

    Saturday, 14 October 2017

    Let it snow


    • Hunkydory snowy season luxury card collection: Let it snow
    • Hunkydory the little book of snowy scenes
    • Hunkydory essential book of Christmas sentiments
    • A5, 5x7", 7x7" & 6x6" card blanks
    • Silver mirri card
    • Silver ribbon
    I began with the 7" square card, using the largest topper. I cut down the patterned cardstock to fit the card front with a mat of mirri. I kept the embellished corner and positioned it to the base fold of the card. I then used the frame from the other topper and glued this down flat. I added the image topper layered on top of the frame with foam pads to add dimension. I completed the card with a sentiment from the little book, as this was a more fitting shape than the sentiments provided in the collection. The inside was completed with an insert, trimmed to fit.
    inside
     
    I used the off cut from this cardstock to create a 5x7" card. I simply matted the cardstock onto the card, again retaining the corner embellishment. I created a topper by layering a trimmed down a little book image onto silver mirri card. I glued this onto the card with a sentiment from the collection. I added the insert to finish the inside.
    inside
     
    For the A5 card, I cut down the other patterned cardstock to fit the card front. I positioned the topper to sit below the sleigh print, using foam pads for dimension. I used a little book sentiment, positioned beneath on foam pads to complete the card. I took the coordinating insert and trimmed to fit for the inside of the card.
    inside
     
    With the final card, I created a 6" square card combining pieces from each of the patterned cardstock. I used the printed image from the darker cardstock as the main section of the card. I then trimmed down an off cut of the lighter cardstock to create a border, edged with silver ribbon. I added the sentiment tag to sit over the border and finished with a silver ribbon bow.
     
    Mx

    Monday, 12 December 2016

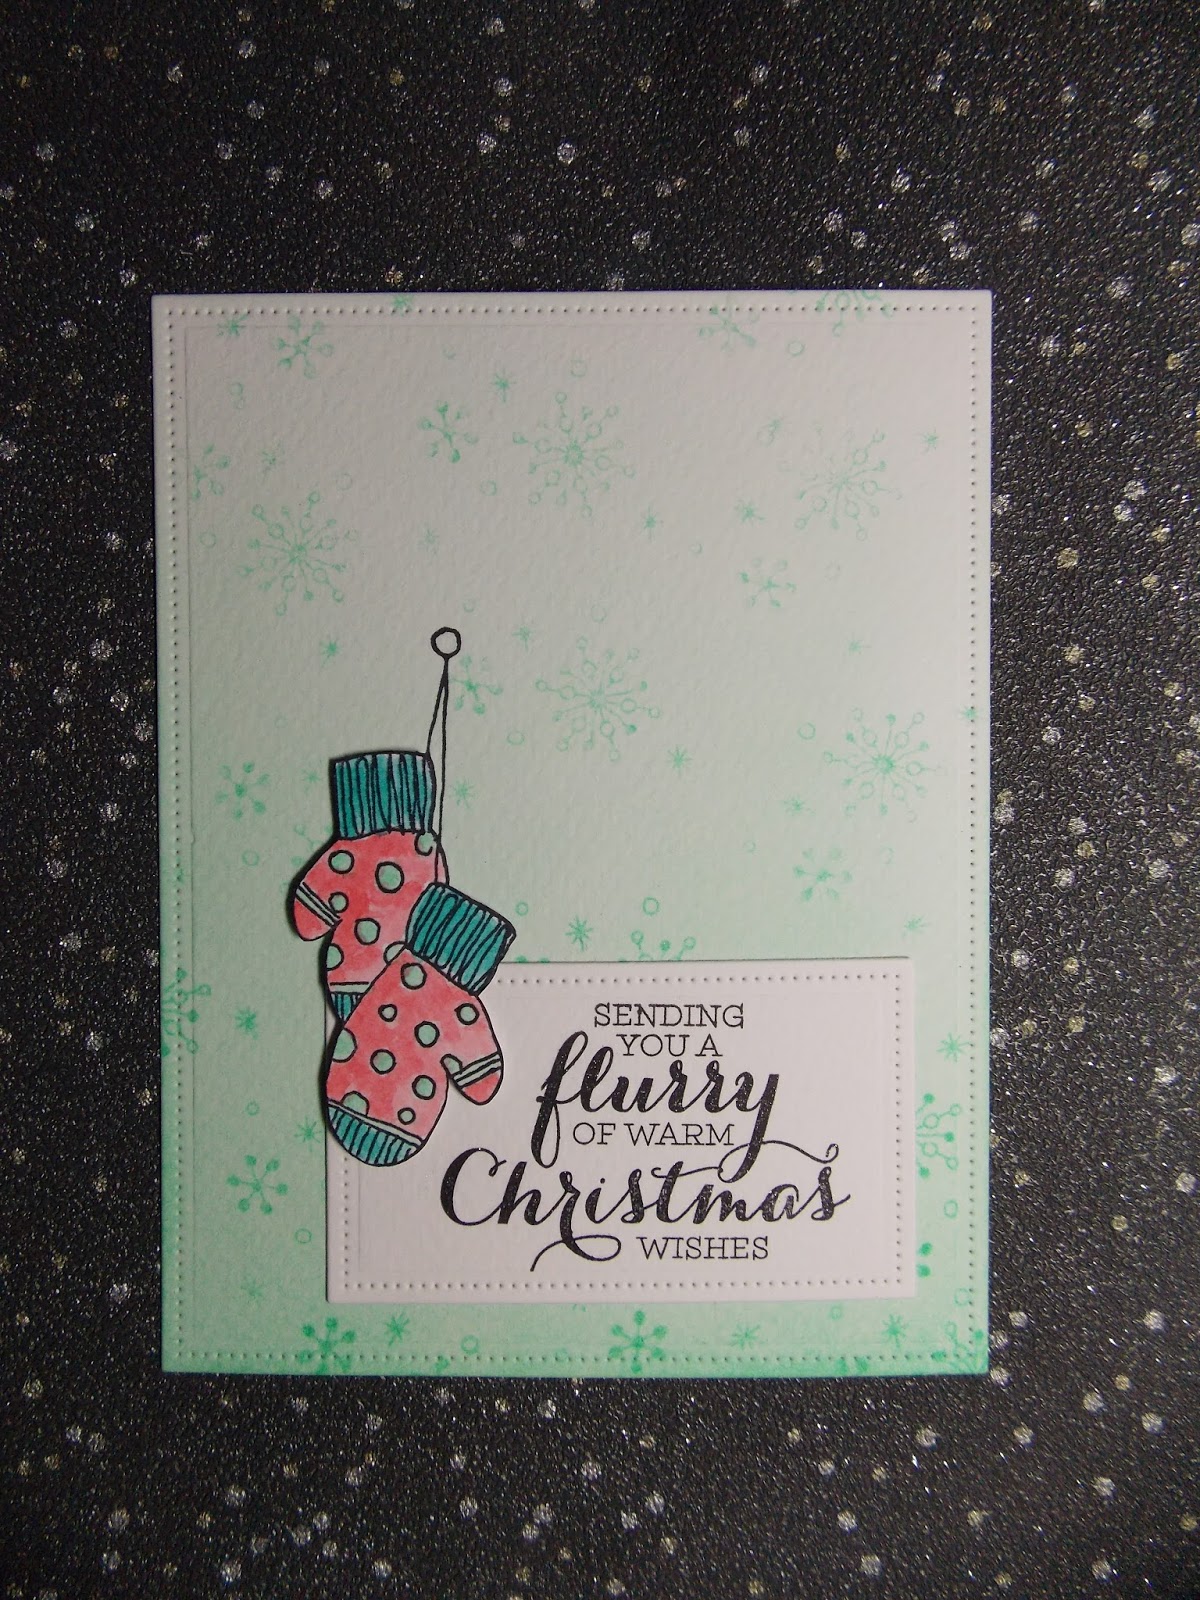
    coral christmas ...


    • Lawn fawn dies- 'dotted rectangles stackables'
    • Tim holtz distress inks- 'cracked pistachio', 'abandoned coral' & 'peacock feathers' 
    • SU! Stamp sets- 'perpetual birthday calendar ' & 'flurry of wishes ' 
    • Paper artsy JOFY stamp- 'jm29'
    • Archival ink pad - 'tuxedo black'
    • Watercolour cardstock 
    • 6x4 card blank 
    • wink of stella glitter pen - 'clear'

    I die-cut a panel of cardstock and inked it with an ombre effect. I stamped little snowflakes all over to complete the background, using 2nd generation towards the top portion for a softer colour. I stamped and die-cut my sentiment. I then stamped my image once onto the background and once onto some spare cardstock. I water-coloured the image using distress inks and fussy cut it out. I used a black brush marker on the cut edges to define them. I then added them onto the card using foam, making sure they lined up with the strings to look as though they were hanging. I added glitter to the flurry & Christmas words to complete.

    Mx
    Challenges I would like to enter:
    freshly made sketches #266
    simon Monday says: let there be snow

    Tuesday, 21 June 2016

    festive flurry


    • SU! - Flurry of wishes & Endless wishes stamp sets
    • SU! Pool party & island indigo ink pads
    • 4x6 white card blank & cardstock
    • sekura clear stardust pen
    I cut a matt to fit my card blank. I inked the card blank and stamped my sentiment onto the matt using the island indigo ink. I then used pool party to stamp the snowflakes around this, following the sketch. I stuck the matt to the card and added a touch of sparkle to complete.
     
    Mx
     
    I'd like to enter the following challenges:
     

    Friday, 24 July 2015

    # selfie


    • 6x6" card blank
    • white digi cardstock
    • tim holtz distress ink pad- tumbled glass
    • archival ink pad- cobalt
    • mama elephant- artic penguins and jolly & merry stamp sets
    • black memento ink pad and copics
    • SU! on film framelit die
    • mama elephant landscape trio dies
    • hunkydory snowfall acetate
    • sakura stardust glitter pen
    to make this card I cut a mat of card to fit onto my card blank, then inked and stamped this with snowflakes to make my background. I stamped my sentiment in the bottom corner and added glitter over the top to accent this. I die cut the frame die out of some white card and glued it in position. I then used the inside edge as a guide and used a craft knife to make an aperture. I then cut 3 squares of white card slightly bigger than the aperture, I very lightly inked the 1st layer, inked the second layer and left the 3rd layer white. I die cut these into sections to create the sky, sea and ice to create scenery. On another piece of card, I used masking techniques to stamp one penguin onto the block of ice and 3 other penguins into huddle together. I coloured these using copics and cut them out. I then positioned my penguins onto the scene and glued all these pieces together. I taped snowfall acetate to the back of my frame then taped the scene in position behind. I glued this to the card blank using foam tape to add dimension.

     
    to make the inside of my card, I cut a mat of cardstock. I stamped my greeting with a skating penguin positioned at the end of the word. I coloured the penguin with some copics and glittered the greeting to finish my card.
     
    challenges:
    Mx