Showing posts with label dots. Show all posts

Tuesday, 18 February 2020

mice time to celebrate.


  • My favourite things- it’s a mice time to celebrate (stamps & dies)
  • Lawn fawn- happy birthday border lawn cuts
  • Prima- free spirit paper 
  • WeR memory keepers- love 2 craft papers
  • Copies- C00,1,2,4. R000,00,20,21,81. RV34. BV00,11. B00. BG53. YG11,21,41.
  • Memento dye ink pad-tuxedo black 
  • Wink of Stella brush pen- clear
  • 6” square card blank


I picked a main patterned paper to act as a background. I added a strip of dark polka dots, layered with a yellow pattern. I also used the dark paper to die cut my greeting. I layered all these and glued onto the card blank. I then stamped, coloured and die cut the cute mice images. I used 1mm foam on one mouse and 2mm foam on the other to create more dimension. I added sparkle to the Pom poms, to finish.

I’m entering the Simon says Wednesday ‘use 2 or more pattern paper’ challenge blog, I’m so glad I did too. I don’t use my patterned papers much but the background paper really makes the card.

Mx

Friday, 23 March 2018

Adrenaline rush part 2


  • Kanban 'adrenaline rush' paper craft toppers
  • DCWV Fresh floral stack 
  • Black & white spot paper (old one from the scrap box)
  • Silver mirri card
  • 7x7" card blank
I created a layout using two of the toppers with a frame from the collection. I then found two different dotty papers to coordinate. I mat and layered the orange spot onto silver mirri card to leave a white border on the card front. I then trimmed the black spot to fit as a band going down the card. With the toppers, I arranged them onto the card front and glued down with varied depths of foam pads to add more dimension to the card. I completed the front with the sentiment in the top corner, overlapping the circle frame to link it into the design. I think this is a nice bold design perfect for a birthday boy!!

Mx

Friday, 9 February 2018

Jasmine loves music


  • LOTV- jasmine music & for her sentiments (set20)
  • Tattered lace- circle dies
  • Lawn fawn- Finley's 123s 
  • Memento 'tuxedo black' ink pad
  • Neenahclassic crest cardstock
  • Copics- skin:E50,51,21. R00. Hair:E43,44,47,49. Pink:R81,83,85. Blue:BG15,23,34. Orange:Y38. YR15. Ground:W00,2.
  • Burgundy cardstock
  • 6x8" white card blank
 
I mat and layered my patterned paper, following the sketch layout. I stamped 'niece' onto the smaller banner, then glued all layers on to my card blank. I stamped and coloured my image and diecut into a circle. I die cut the numbers, once from dot paper and once from card, to layer them to create a shadow. I added this to my card to finish.
 
Mx
I would like to enter:

Wednesday, 3 January 2018

All our dreams


  • Lili of the valley- all our dreams
  • Lawn fawn- small stitched circle stackables, large stitched rectangle stackables, stitched borders
  • Forever friends (docrafts) Kraft notes 12" paper pads
  • Neenahclassic crest cardstock
  • Memento'tuxedo black'ink pad
  • Copics- skin:E50,51,21,93. leaf:YG61.G21,24. Pink:R85,83,81,0. Bunny:E41,42.
  • Wink of stella 'clear' glitter brush pen
I cut 2 strips of lilac paper and glued these to down each edge of the card front. I then cut a strip of checked paper, using the stitched borders to add detail. I glued this down the centre of the card to complete the background. For the topper, I cut a mat of cardstock, stamped the image onto it and coloured using copics. For added detail, I brushed glitter onto the hearts. I glued the topper down flat onto the card. Using another piece of cardstock, I stamped then die cut the sentiment. This completed the sketch, glued down with foam for dimension.

Mx

Challenge I would like to enter:


Friday, 10 November 2017

glorious gifts

  • Hunkydory festive elegance luxury card collection: glorious gifts
  • Hunkydory essential book of Christmas sentiments
  • 8x8", 5x7" & 5x5" white card blanks

To make this card, I cut the borders off the piece of cardstock, then cut the red spot cardstock to size. I glued the first border and the red spot cardstock to the front of my card blank. I then trimmed off the remaining white card from the front to create a reveal. I glued the toppers onto the card front using foam tape for dimension. I then trimmed the insert to size, stamped it with a Christmas sentiment and glued this inside the card. I added the second border to the outer edge to complete the card,(you will be able to see this when the card is closed too).  

inside

I created this easel card using a 5" square card blank. I added an extra score line to the centre of my card front and folded the card front in half.  I cut a piece of cardstock to 5" square and only put adhesive on the bottom half to glue to the card front, creating the easel base. I then covered the panel in patterned cardstock from the collection. I added an image topper to the centre of the card front. I then trimmed the insert to fill the inside of the card. I added the border on foam pads across the inside to create the stopper and completed with a sentiment topper in the bottom corner. 


front

inside

For this card, I used the remaining red spot from a previous card and added the foiled border, cut from a second piece of cardstock. I glued gold mirri onto my 5x7" landscape card blank and matted with the patterned cardstock. I glued the circle topper flat and added the sentiment topper with foam tape for dimension.

For the final card, I used the remaining border alongside the printed image cardstock. I trimmed the pieces to fit on the front of a 5" square card and glued them flat. I positioned a sentiment from the essential book across the border and image to bring the design together.

Mx

Friday, 27 October 2017

owl be home again for christmas


  • Hunkydory cute Christmas luxury card collection: owl be home for Christmas
  • Hunkydory adorable scorable cardstock
  • 6x6" & 5x5" card blanks
I created the 6" square card using a background of red adorable scorable card. I trimmed the printed image from the cardstock down to fit inside the frame. I glued the image down flat then added the frame and sentiment on foam pads to complete the card with some dimension.
For the smaller card, I used the opposite corner of the patterned cardstock with the other image and made a feature of this. I simply trimmed to fit the card front, leaving room down the folded edge for a strip of the contrasting cardstock. I covered the join with the border from the collection and added the sentiment topper to the bottom corner to finish the design.
Mx

Sunday, 25 June 2017

Sabrina loves the spa!!


  • Stampin bella- uptown girl 'Sabrina loves the spa'
  • Paper smooches- 'friend' word die
  • Lawn fawn- scalloped rectangle stackables
  • Memento 'tuxedo black' ink pad
  • Neenah classic crest cardstock
  • Copics- E50,51,21&93. Y12,E31,34,35. R81,83,85. BV000,00,01,02. YG17,21,23,25. Y19. B000, BG70. C00,0,1. W00,1,2,3,4&5. 0
  • Lilac dot pattern paper
  • Funky foam

I covered the card blank with the patterned paper. I then die cut a panel of white Neenah cardstock, using the scalloped rectangle to create the topper. I stamped the image onto the panel, making sure there was room for the 'friend' beneath. I then coloured the image using copics. I positioned the 'friend' die and cut the word out of the panel, making sure I saved the inner parts to complete the letters. I added foam to the back of the panel and glued this onto the card. Finally, I carefully added the pieces to complete the letters. I think die cutting the letters out of the panel creates a fun twist on a simple but effective card design.
 
Mx
 
I would like to enter the following challenges:

Monday, 12 June 2017

Out of space...


  • Kirsty Wiseman - terrestrial friends
  • Neenahclassic crest cardstock
  • Copics-G46,24,21.YG61. R24,27,29. B14,16,18. A selection of Course marker's
  • Watercolour cardstock
  • Tim holtz distress inks- fossilized amber, blue print sketch, candied apple, chipped sapphire, black spot & hickory smoked
  • White paint
  • My favourite things- brush stroke birthday greeting dies
  • Tim holtz polkadot stencil
I cut a piece of watercolour cardstock to create my space background. I inked the cardstock using the brighter colours randomly spread to fully cover the cardstock. I then added the darker ink over the top to again cover the card. For the stars, I watered down some white acrylic paint and flicked this on to create a fine splattering over the ground. Once dry, I trimmed the background down into two panels to fit the card blank. I then stamped, coloured and fussy cut the rocket from Neenah cardstock. I also die cut a sentiment from watercolour cardstock. To soften the white, I added light patches of ink using the blending tool, then used the dotty stencil to produce a crater effect over the top. I glued the background onto the card blank using double sided tape. I then added the sentiment using liquid glue, and finally positioned the rocket on foam pads to complete the sketch.

I would like to enter the following challenges:
case this sketch #225
Simon Wednesday says: make it masculine
Mx

Tuesday, 7 March 2017

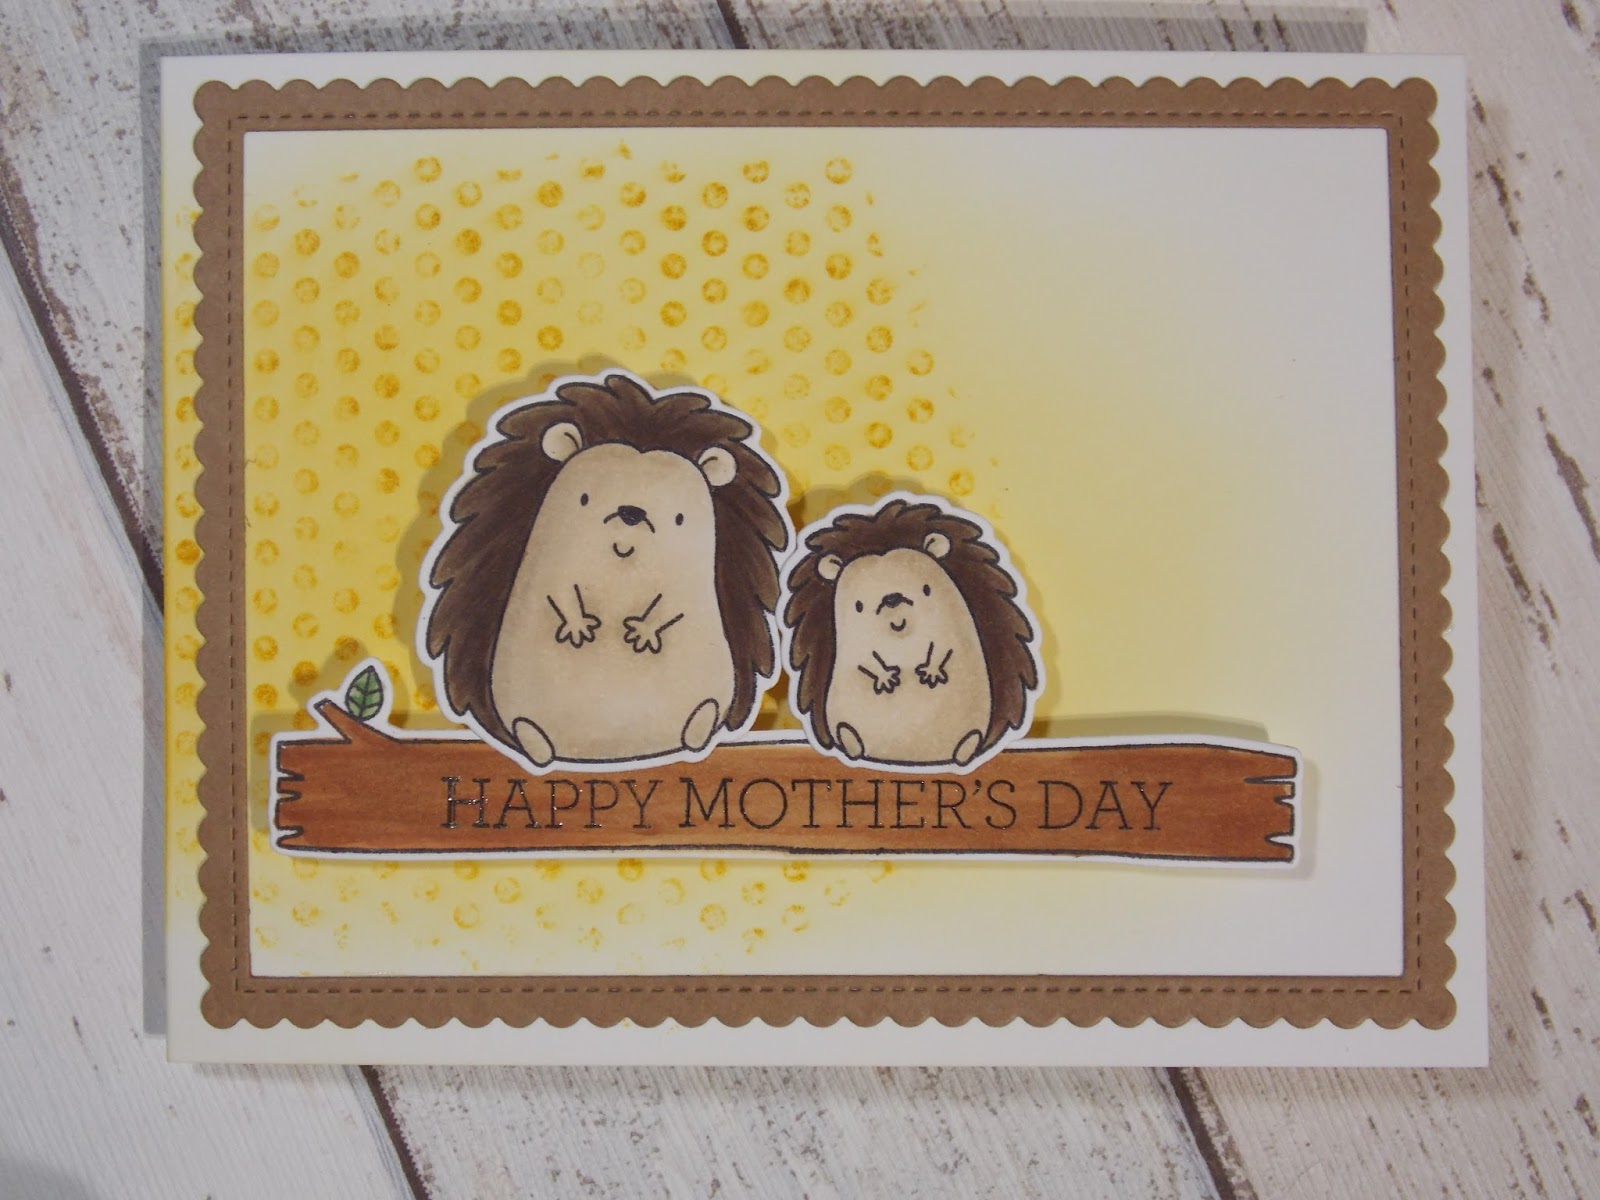
Happy hedgehogs


  • My favourite things- happy hedgehogs (stamps & dies)
  • My favourite things- stitch rectangle scallop edge frame
  • SU!- crazy about you
  • SU!- dots for days
  • Tim holtz 'fossilized amber's distress ink pad
  • Memento'tuxedo black'ink pad
  • Neenahclassic crest cardstock
  • Copics-E41,42,43,44,47,59. E35,37,39. YG63,67.
  • Kraft cardstock
  • Sakura 'clear star' glitter pen
I stamped a portion of the dot background stamp at the folded card edge, then blended some amber ink over the front of the card blank with darker colour concentrated over the dots. I diecut a Kraft card frame and glued this onto the card front. I stamped, coloured and diecut the hedgehogs. To create the extended log, I inked up the stamp but not right to the end and stamped. Next, I masked off most of that log, inked up the stamp again leaving the end, lined it up with open mid section of the log and stamped again. I then coloured the log with copics and diecut. To diecut this, I lined it up and taped in place leaving one end hanging off the edge of the plate and run through the diecut machine. I repeated this for the other side. Using foam tape for dimension, I glued the log and hedgehogs in place. To finish I added glitter pen to the sentiment.
inside
For the inside of the card, I diecut a smaller Kraft frame and glued to the inside. I stamped coloured and diecut a little hedgehog to sit above the sentiment. For the sentiment, I stamped with two colours by first inking the smaller part of the sentiment in yellow, then adding black ink to the larger part of the sentiment, (using the edge of the ink to get it neat and in just the right places). Another option would involve some stamp surgery to carefully cut apart the stamp, which makes it easier to stamp both pieces separately in different coloured inks. Beware though, as you must be careful not to damage your stamp when cutting and need to ensure the sentiment lines up again on the page when stamping!
Mx

Challenge i would like to enter:
Simon 'monday' says - " make your own background"

Thursday, 2 March 2017

Brynn has a baby shower

  • Stamping bella- Brynn has a baby shower
  • Neenahclassic crest cardstock
  • Memento'tuxedo black'ink pad
  • Copics- E50,51,21,93. E34,35,37,57,59. BV0000,000,01,02,04. Y18,15,11. R24. BG70. W00,1,3.
  • Yellow embossed dot & lilac cardstock
To create this card, I covered the card blank with the dotty card. I then cut a matt of white for the stamped image and a layer of lilac card stock. I stamped and coloured the image before adding to the card following the sketch. I added a coordinating banner stamped with a sentiment to complete the card.
 
Mx
 
I would like to enter the following challenge:

Monday, 2 January 2017

Simple birthday...


  • SU! Big news
  • Archival 'colbolt' ink pad
  • Patterned paper
  • Red & white cardstock

 I kept this one really simple using a scrap of patterned paper from my scrap drawer and a nice bold sentiment. I stamped the sentiment and matted it onto red card. I then cut the patterned paper matt and layered with the red card. Following the sketch, I glued both pieces to a white card blank.
 
Mx

Challenge i would like to enter
Freshly made sketches #268

Sunday, 4 December 2016

celebrate with cake


  • SU!- endless birthday wishes 
  • Lawn fawn- large dotted rectangle & circle stackables 
  • Lawn fawn- stitched scalloped borders 
  • SU!- metallics glitter tape 'silver'
  • Memento 'tuxedo black'ink pad 
  • SU!- 'bermuda bay' ink pad
  • Copics- BG49,23,32. R85,83,81. E43,42,41.
  • Sakura 'clear star'glitter pen 
  • White ribbon 
  • White cardstock 
I die cut a panel of cardstock to fit a card blank and stamped my sentiment in black. I then created a background by stamping a dot image all over in blue. I added an edge of blue to the panel using my copic. I then cut some glitter tape to the length of my card, shaped it with a small scalloped edge diecut and glued on to my card. I coloured my ribbon with pink copic pen for a perfect match, then tied it around my panel and secured it with a bow. For the topper, I stamped my cake image and coloured with copics. I diecut this into a circle and edged it with the pink copic. I added my background panel to a card blank, then placed the topper on using foam pads and finished with glitter pen to add sparkle to the candles.
 
Mx
 
challenge I would like to enter:
simon Wednesday says 'anything goes'

Friday, 18 November 2016

classic car...


  • papermania- nostalgia classic cars stamps
  • SU!- for my family
  • my favourite things- line up dots background
  • kraft & black cardstock
  • archival 'jet black' ink pad
  • black funky foam
  • black gems
I masked off an area of my card blank and used the large background stamp to add pattern to my card blank. I also stamped the sentiment straight onto my card blank. I stamped a car image onto some kraft cardstock and matt & layered with some black cardstock. I glued black funky foam to the back of the cardstock, then glued it onto my card to give dimension (you could also use foam tape, or glue it flat). the final touch was 3 self adhesive black gems, to finish the sketch layout. I added a birthday sentiment to the inside of this card, but it could easily be changed to a father's day card too!!
Mx
 
challenges I would like to enter:

Monday, 4 July 2016

roses for a friend...


  • altenew- build -a-rose stamp & dies
  • paper smooches- friend word die
  • lawn fawn- large stitched rectangles
  • SU!- dots for days (background stamp)
  • SU! ink pads- pink pirouette, blushing bride, pear pizzazz & soft sky
  • kraft card blank
I stamped dots to create a decorative panel for my card and die cut this into shape. I then die cut the word friend from the panel and kept the inside pieces for later. I then glued the panel onto the card and carefully added the floating pieces back in place to complete the word.
I stamped the rose and 3 leaves from the stamp set and die cut the images. I had to use 2nd generation stamping to get the right shade of some of the colours. I attached the leaves flat and the rose using foam, according to the sketch.
Mx
 
challenges I would like to enter:

Friday, 29 April 2016

birthday cake!!


  • SU!- big day
  • DCWV- floral fair paper pad
  • memento 'tuxedo black' ink pad, copic friendly cardstock
  • copics- BG 15,49. Y11,13,15. RV00,10,02,21
  • wink of stella- clear
 
I cut a mat of patterned paper to fit my card blank and a banner shape out of a sheet of coordinating dot paper. I then stamped my focal sentiment, cut it out and coloured it using copics. I added this onto a mat of teal before layering it onto my card. I stamped the sentiment again. To add emphasis to the banner, I coloured, fussy cut and layered it onto the card using foam tape. I stamped, coloured and fussy cut the cake image as an accent for my card. I stuck this down with foam tape for added dimension. The final touch was some glitter on the pink areas of my card.
Mx

the challenge I would like to enter is:
sketch Saturday #409
simon says Wednesday 'anything goes'

Wednesday, 27 April 2016

flowers for you!!


  • lawn fawn 'script for you' lawn cut (die)
  • DCWV- floral fair paper stack
  • 6x4" kraft card blank and cardstock
  • tim holtz- brushed corduroy ink pad
  • wink of stella- clear
for this card I chose 4 patterned papers, 1 floral and 3 coordinating dots. I trimmed the floral to fit the card blank, leaving a small border around the edge. I cut the blue paper to 3.5cmx11.5cm, the orange paper at 3.5cmx9.5cm and the final pink layer at 4cmx8cm. I inked around the edges of the layers and glued them down to follow the sketch. I die cut the 'for you' three times and layered them on top of each other for dimension, I glued this onto the card. To finish the card,I added some sparkle to the words to make them stand out.
Mx
 
I would like to enter my card into the following challenge:

Monday, 25 April 2016

friend...

 
  • SU!- whisper white ink pad, distress dots background stamp, bold butterfly framelits & butterflies thinlits
  • paper smooches 'friend word' wise die
  • 6x4" kraft card blank
  • coral and yellow cardstock
  • white funky foam
  • yellow & white bakers twine
  • neat & tangle clear sequins
I stamped my card blank to create a white dotty background. I added some yellow twine towards the bottom of my card. To do this, I wrapped it around the card blank twice and tied a knot. I die cut the word friend twice, once in some coral cardstock and once in funky foam, then glued both of these layers together to create dimension. I glued this sentiment onto the card blank underlined by the twine. I die cut the solid butterfly in a yellow cardstock, then used a detail butterfly die (in the same size) to cut the coral layer. I glued these together just in the centre (leaving the wings loose to add more dimension), then added them to my card design. The final touch was a few sequins as sparkly accents.
 
 I have finally found a liquid glue that is brilliant to use!! I used the tombow mono multi liquid glue to stick down everything on this card.
Mx

I would like to enter this card into the following challenges:
freshly made sketches- #233
simon says Wednesday- 'make it girlie'


Sunday, 27 December 2015

birthday bear...


  • my favourite things- birthday bears (stamps & dies)
  • memento tuxedo black ink pad
  • Neenah classic crest cardstock
  • copics (E29,27,25,23. E43,42. C1,00. R85,83,81.)
  • DCWV fresh floral 12x12" paper stack
  • wink of stella- clear
  • sakura black glaze pen
I cut mat and layers of my patterned paper and white cardstock. I stamped the main mat with the bear and added the balloon in the hand. I coloured the image with copics and used wink of stella to sparkle the balloon and the glaze pen to add a shine to the eye and nose. I stamped the other mat with the sentiment and added some more glitter. I then glued down all the mats and layers onto the card following the sketch.
 
Mx
 
challenge I would like to enter:

Sunday, 29 November 2015

pups with present ...

  • 4x4" white card blank
  • white and red cardstock
  • SU! snowfall embossing folder
  • lotv- pups with present
  • memento, white marker friendly cardstock
  • copics (E43,44,47,49,55,57,59. C00,0,2. R24,27,29. G17,29.)
  • stickles- star dust 
  • sakura glaze pen- clear

I cut and embossed a piece of white cardstock with snowfall. I mat and layered on to some red cardstock, before sticking this to my card blank. I cut some white cardstock to fit the bottom third of my embossed mat and trimmed the top to create a wavy snow bank. I stamped, coloured and fussy cut my dog images. I glued the dogs into position to form a snowy scene. I added some glitter to the snow and glazed the dogs noses. I kept this small card quite simple and have chosen to add my sentiment to the inside. 
Mx
 
the challenges I would like to enter:

Sunday, 26 July 2015

kitted out for christmas !!


  • craftwork cards festive chalkboard kit
  • double sided tape and foam pads
I took a patterned card blank and cut a section off the front. I then cut and glued a piece of another paper onto the inside of the card blank so it could be seen when the card was closed. I cut out one of the frames and layered it over the sentiment using foam pads for dimension.
 
Using nice card kits can be a great way to make lots of simple but effective cards. When you like to send Christmas cards to a lot of people, I think a kit like this is the ideal way to craft... it's still a good idea to get started early in the year to give yourself time to play and be creative with them!!

Id like to enter this card into the following challenge:
Mx