Sunday 26 July 2015

kitted out for christmas !!


  • craftwork cards festive chalkboard kit
  • double sided tape and foam pads
I took a patterned card blank and cut a section off the front. I then cut and glued a piece of another paper onto the inside of the card blank so it could be seen when the card was closed. I cut out one of the frames and layered it over the sentiment using foam pads for dimension.
 
Using nice card kits can be a great way to make lots of simple but effective cards. When you like to send Christmas cards to a lot of people, I think a kit like this is the ideal way to craft... it's still a good idea to get started early in the year to give yourself time to play and be creative with them!!

Id like to enter this card into the following challenge:
Mx

Friday 24 July 2015

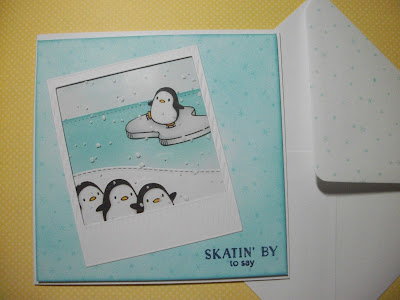
# selfie


  • 6x6" card blank
  • white digi cardstock
  • tim holtz distress ink pad- tumbled glass
  • archival ink pad- cobalt
  • mama elephant- artic penguins and jolly & merry stamp sets
  • black memento ink pad and copics
  • SU! on film framelit die
  • mama elephant landscape trio dies
  • hunkydory snowfall acetate
  • sakura stardust glitter pen
to make this card I cut a mat of card to fit onto my card blank, then inked and stamped this with snowflakes to make my background. I stamped my sentiment in the bottom corner and added glitter over the top to accent this. I die cut the frame die out of some white card and glued it in position. I then used the inside edge as a guide and used a craft knife to make an aperture. I then cut 3 squares of white card slightly bigger than the aperture, I very lightly inked the 1st layer, inked the second layer and left the 3rd layer white. I die cut these into sections to create the sky, sea and ice to create scenery. On another piece of card, I used masking techniques to stamp one penguin onto the block of ice and 3 other penguins into huddle together. I coloured these using copics and cut them out. I then positioned my penguins onto the scene and glued all these pieces together. I taped snowfall acetate to the back of my frame then taped the scene in position behind. I glued this to the card blank using foam tape to add dimension.

 
to make the inside of my card, I cut a mat of cardstock. I stamped my greeting with a skating penguin positioned at the end of the word. I coloured the penguin with some copics and glittered the greeting to finish my card.
 
challenges:
Mx

Monday 20 July 2015

hanging the decorations ...

  • SU! ornaments keepsakes & endless wishes
  • archival ink pads- olive, leaf green & jet black
  • sakura micron pen
  • copic atyous spica- black glitter pen
  • 4x4" card blank
  • black sparkle cardstock
I started by inking the card blank in green. I then added a matt of sparkle black card and cut a top layer of craftwork cards digi cardstock. I stamped the bauble in the centre then second generation stamped another beside it. I added a third bauble stamped in a different green ink. I completed the sketch with the message stamped across the mat and added some glitter over this with my glitter pen. To finish off, I drew on the strands with bows freehand using my sakura micron pen and secured the layers to the card.

Id like to enter this card into the following challenge:
Mx

Wednesday 8 July 2015

sending sympathy ...


  • 'adorning accents' SU! Edgelits
  • 'love and sympathy' SU! stamp set
  • 'milled lavender 'Tim Holtz distress ink pads
  • 'watering can' Archival ink pad
  • 'dragonfly garden' cardio stamp
  • 6x4 white card blank
  • craftwork cards digi cardstock

I used my distress ink to colour the white card blank. I then created the background by stamping the card blank with the dragonfly garden image. For the mat, I stamped the flower in the distress ink, then layered the verse stamp on top using archival ink. I trimmed the mat down and used the edgelit to add a decorative border to the bottom edge. I finished this by lightly inking the edges and stuck it onto the card. I made this one simple and pretty to keep the focus on the lovely words in the sentiment.

Id like to enter this card into the challenges below:
Mx

Sunday 5 July 2015

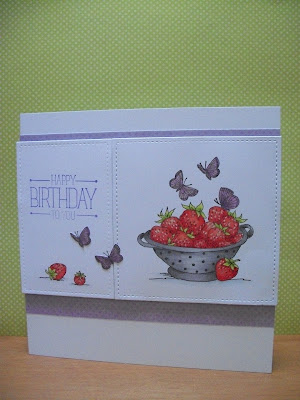
summer strawberries...


  • 'strawberries' stamp from LOTV
  • 'because you care' stamp set from SU!
  • 'fresh floral stack' from DCWV
  • 'stitched stackables' dies from lawn fawn
  • archival ink 'deep purple'
  • memento ink 'tuxedo black'
  • copics: R12, R14, R17, YG 21, YG23, YG25, V12, V15, V17,C00, C001, N1, N2, N3, N4, N5
  • wink of stella glitter brush tip pen, uni ball white pen and sekura micron pen
  • craftwork cards digi cardstock
  • 6x6 white card blank
For this card, I have stamped part of the strawberries stamp to fit inside the square die. I then stamped the strawberries from the foreground of the image onto another piece of card.
I added the sentiment above this, (as I didn't have lilac ink, I second generation stamped to create a softer tone of the deep purple ink). I also stamped the butterflies again onto an offcut of card. I coloured all of the images with copics. I then die cut the two main images into panels using a stitched edge dies. I cut
the spotty paper to matt and layer onto my card blank. I then added the two panels on foam pads for dimension. I fussy cut the extra butterflies and placed them on the card as embellishments. I used my sekura micron pen to add their antennae. The final touch was some glitter on the butterflies and white highlights on the strawberries.

Challenges I'd like to enter:

Mx

Friday 3 July 2015

puppy love...


  • stamps from LOTV -'puppy love'
  • memento ink pad
  • copics
  • Neenah solar white cardstock
  • lawn fawn stitched stackables -circles
  • SU! puches - oval & scallop oval
  • sakura glitter pen -clear star
  • craftwork cards 6x6" yellow dotty printed card blank
 
I stamped my chosen image from LOTV and coloured it with copics, then die cut the image in to a circle. I used the same coloured markers to colour some strips of card. I glued these strips on to my  card blank, then used foam tape to attach my circle over the top. I stamped my sentiment on to some white cardstock and used a punch to cut this into an oval. I used the yellow copic to colour some cardstock, before punching this with a scalloped oval. I layered both of the oval shapes together and used foam tape to glue this onto my card. I added detail with a glitter pen around the circle, oval and dots on her dress.
 
 
challenges I would like to enter:
Mx