Tuesday 29 December 2015

monochrome home ...

  • First edition paper man made 12x12" paper pad
  • black card stock
  • SU! little letters thinlits dies
  • SU! mini brads (silver)
I cut mats from the different papers and layered onto black card following the sketch. I die cut the sentiment from the top mat and inlayed each letter using the coordinating patterned paper. I added three brads in the corner before layering onto the card using foam pads.
 
Mx
 
I would like to enter this card into the following challenge:

Sunday 27 December 2015

bright birthday


  • Archival ink
  • tim holtz ink pad - salty ocean, shaded lilac, barn door, spiced marmalade, squeezed lemonade, mowed lawn
  • SU! - 'crazy about you' stamps and 'hello you' thinlits
  • sekura black micron pen
 
I decided to add a splash of colour to this simple sketch by inking a card blank and some cardstock with rainbow colours using tim holtz distress ink pads. I die cut the 'happy' sentiment from the inked cardstock and added it to a white mat, stamped with the 'birthday' sentiment. For added detail, I created a hand drawn stitch border around the mat and glued this onto the inked card blank.
Mx
 
I would like to enter the following challenge:

birthday bear...


  • my favourite things- birthday bears (stamps & dies)
  • memento tuxedo black ink pad
  • Neenah classic crest cardstock
  • copics (E29,27,25,23. E43,42. C1,00. R85,83,81.)
  • DCWV fresh floral 12x12" paper stack
  • wink of stella- clear
  • sakura black glaze pen
I cut mat and layers of my patterned paper and white cardstock. I stamped the main mat with the bear and added the balloon in the hand. I coloured the image with copics and used wink of stella to sparkle the balloon and the glaze pen to add a shine to the eye and nose. I stamped the other mat with the sentiment and added some more glitter. I then glued down all the mats and layers onto the card following the sketch.
 
Mx
 
challenge I would like to enter:

Friday 18 December 2015

you lift me up ...


  • w plus 9 stamps & dies- party animal & unforgettable
  • papermania- happy days 6x6" paper pad
  • memento tuxedo black ink pad
  • copic friendly card
  • copics
  • sakura micron & white pen
  • wink of stella- clear
  • 6x4" white card blank & black cardstock
I cut a matt of blue patterned paper and stamped my sentiment at the bottom. I then drew on some clouds using a white gel pen. I layered this with some black cardstock, then glued it on to my card blank. I stamped and die cut my images. I coloured the elephant with copics and I paper pieced the balloon with a scrap of matching paper. I added my these to my card using foam tape for dimension. the final touch was some glitter on the balloon.
 Mx


I would like to enter the following challenges:

Monday 14 December 2015

puppy dog kisses!!


  • my favourite things- top dog (stamps and dies)
  • LOTV sentiment stamps
  • DCWV fresh floral stack
  • SU! scallop boarder punch
  • memento and copic friendly cardstock
  • copics (E42,43,44,47. R83,85.)
  • wink of stella- clear
  • 6x4" pink pearl card blank

I cut the mats of paper and used a punch to create the border following the sketch. I stamped, coloured and die cut the dog image. I stamped a sentiment onto the top matt. I then die cut the hearts and added these to the card, finishing them off with a touch of glitter. 

I'd like to enter this card into the following challenge:
freshly made sketch #216

Mx

Sunday 6 December 2015

flowers for you !!


inside

  • 4X6" black card blank
  • white stamping cardstock
  • sizzix circle and scalloped circle dies
  • SU! mum's love
  • archival ink pad: jet black, watering can, carnation red, rose madder, venetian orange, chrome yellow.
  • wink of stella- clear
  • SU! sassy salutations (for inside)
I 2-step stamped the flowers on a mat of cardstock and glued this to the card blank. I stamped my greeting and die cut it into a circle, then matted this on to a scallop circle. I added glitter to the 'for you'. finally I added this topper to my card using foam, (you could just glue this straight down to keep it flat for posting!!)
 
for the inside of my card I cut a piece of cardstock to fit and stamped a flower in the bottom corner. I stamped my sentiment and added a final touch of glitter over the sentiment.
Mx
 
challenges I would like to enter are:

Sunday 29 November 2015

pups with present ...

  • 4x4" white card blank
  • white and red cardstock
  • SU! snowfall embossing folder
  • lotv- pups with present
  • memento, white marker friendly cardstock
  • copics (E43,44,47,49,55,57,59. C00,0,2. R24,27,29. G17,29.)
  • stickles- star dust 
  • sakura glaze pen- clear

I cut and embossed a piece of white cardstock with snowfall. I mat and layered on to some red cardstock, before sticking this to my card blank. I cut some white cardstock to fit the bottom third of my embossed mat and trimmed the top to create a wavy snow bank. I stamped, coloured and fussy cut my dog images. I glued the dogs into position to form a snowy scene. I added some glitter to the snow and glazed the dogs noses. I kept this small card quite simple and have chosen to add my sentiment to the inside. 
Mx
 
the challenges I would like to enter:

Saturday 28 November 2015

thankful pup...


  • SU! watercolour wishes printed 4x4"card blank
  • SU!- express yourself
  • mama elephant- playful pups (stamps and dies)
  • copics and appropriate cardstock 
  • neat & tangled- spring mix sequins
  • wink of stella- clear
I stamped the sentiment onto a piece of pink card, then cut this into a banner and covered it with clear glitter pen. I stamped coloured and die cut the dog image. I added the dog using foam then glazed the nose. I glued on a few sequins for sparkle to complete the sketch. I think this makes a cute and simple thank you card which could be adapted to suit any occasion.

Mx

challenges I would like to enter:
freshly made sketches #214
simon says 'anything goes'

12 favs of christmas ...

The ABC Christmas challenge blog are looking for a new DT and I'd thought I'd give it a go !! I love Christmas and normally start making in July, so what better excuse to get prepared early than with inspiration from this blog. They have asked us to pick our favourite Christmas project, but I had so many different things to choose from that I just couldn't decide on one... so here are my top 12 !! the captions are linked to the original post to see how to make these and any products used...
'puddings'


'# selfie'


' a bottle tag'


'merry and bright cards'


'matchbox gift wrap'

'super santa'
' a pretty gift box'

If you have been inspired to create a Christmas project of your own, why not head over to the ABC Christmas blog and enter their latest challenge by following this link
 
Mx

Wednesday 25 November 2015

baby booties ...


  • SU! 'baby we've grown' & 'express yourself' stamps
  • LOTV 'bear necessities' paper
  • sizzix scallop circle, circle & tickets dies
  • tim holts 'brushed corduroy' distress ink
  • memento ink pad 'tuxedo black'
  • promarkers pastel & denim blue
  • 6x4 landscape card blank
  • white cardstock
  • bakers twine
I cut my mat of paper and the banner. I die cut the shapes for the topper to complete the sketch. I inked all of the edges of the mats with the distress ink. I added a congratulations onto the banner then glued these layers onto the card. I stamped the booties onto the topper and coloured the image. I then stuck this onto the scallop mat and used foam pads to add this to the card. the finishing touch was the bows tied in twine.
 
Mx
 
I'd like to enter this card into the following challenge:

Monday 23 November 2015

christmas with friends ...


  • 7x7" white card blank, red and green cardstock, copic friendly cardstock
  • crafters companion (Christmas in moonbeam meadow) - Rudolph and friends
  • SU! warmth and wonder stamps & softly falling embossing folder
  • memento ink pad (tuxedo black)
  • copics (E81,53,55,57,59. E43,44,47,49,81. R24,27,29. G7,14. Y13,15. C00,0,01,02.)
  • tattered lace essentials circle dies
  • ribbon
  • wink of stella- clear
  • ranger glossy accents

I cut my base layers, then embossed the white mat before sticking this to the green one. I glued the ribbon on and secured it to the back of the green card before matting onto the card blank. I die-cut the circle mats and stamped the white one with my image and sentiment. I coloured the image and added glitter and gloss. I added this layer onto the card using foam for dimension.
Mx
 
 challenges I would like to enter are:


starry trees ...


  • 4x6" white card blank, red cardstock and white marker cardstock.
  • SU!- polar party
  • lawn fawn - starry backdrops
  • memento ink pad (tuxedo black, cantaloupe)
  • promarkers (cocoa, moss, pear green, berry red, tulip yellow, sunflower, ice grey 1)
  • wink of stella - clear
I cut all my mats to follow the sketch. I stamped the focal image and sentiment then coloured it. I added sparkle to the baubles and stars. I stamped the stars in yellow for the band. Finally, I stuck all the layers down.
 
Mx
 
challenges I'd like to enter are:

Tuesday 17 November 2015

you're in my thoughts...

  • 6x4" black card blank
  • SU!- best thoughts
  • memento ink pad (tuxedo black)
  • copic friendly cardstock
  • copic markers- BV 0000,000,02,04. YG 17,13,11
  • wink of stella- clear
today i made a very simple card, not much to do but colour!!  i cut a mat of cardstock and stamped the large flower design almost central. i coloured this with copics. I then stamped the sentiment slightly overlapping the stem, to follow the sketch. i added a tiny bit of sparkle to the words, just to make them stand out more. i don't normally add glitter to a sympathy card but i thought in this case it looked nicer. you could change the sentiment to make this card for another occasion.
 
challenges I would like to enter:
 
Mx

Sunday 8 November 2015

a simple tree...

 
  • craftwork cards festive chalkboard kit
  • tree punch by SU!
  • ribbon
I took inspiration from the sketch challenge to create the layout for this card. I took a tag from the kit and trimmed it down and cut the square card blank down to a 6x4 to frame the tag nicely. I then used the tree punch to create the central shape in the tag. I tied some stitch detail ribbon through the hole in the tag before sticking it to my card. I finished it off with a seasonal banner sentiment across the front. For an extra special detail, you can add glitter or gems to the tree for that Christmas sparkle.
 
I think this makes for a nice simple card, perfect for when you have a long list of cards to make at Christmas time. Using the punches gives a creative twist on using a card kit to make it your own.
 
Id like to enter this card into the cas(e) this sketch! challenge #148
 
Mx

Monday 12 October 2015

a wonderful cup!!

 
  • SU!- morning cup
  • LOTV- set 93 (someone special)
  • lilac, black & copic friendly cardstock
  • memento ink pad (tuxedo black)
  • copics (BV00,01,02,04)
  • tim holtz distress ink pads (milled lavender)
  • wink of stella (clear)
I made a lilac 6x4" card blank and stamped it using a small teabag stamp to create a background. I made a topper using a mat of white card and stamped my sentiment and cups to match the sketch. I coloured the cups using copics, then added some glitter over the top. I stamped one more cup on a small piece of cardstock, I coloured and glittered this before fussy cutting it out. I glued this over the top of one cup using foam tape for dimension. I mat and layered the topper with some black cardstock before adding to the card blank with foam tape.
Mx
 
challenges I would like to enter:

quick and easy penguins...


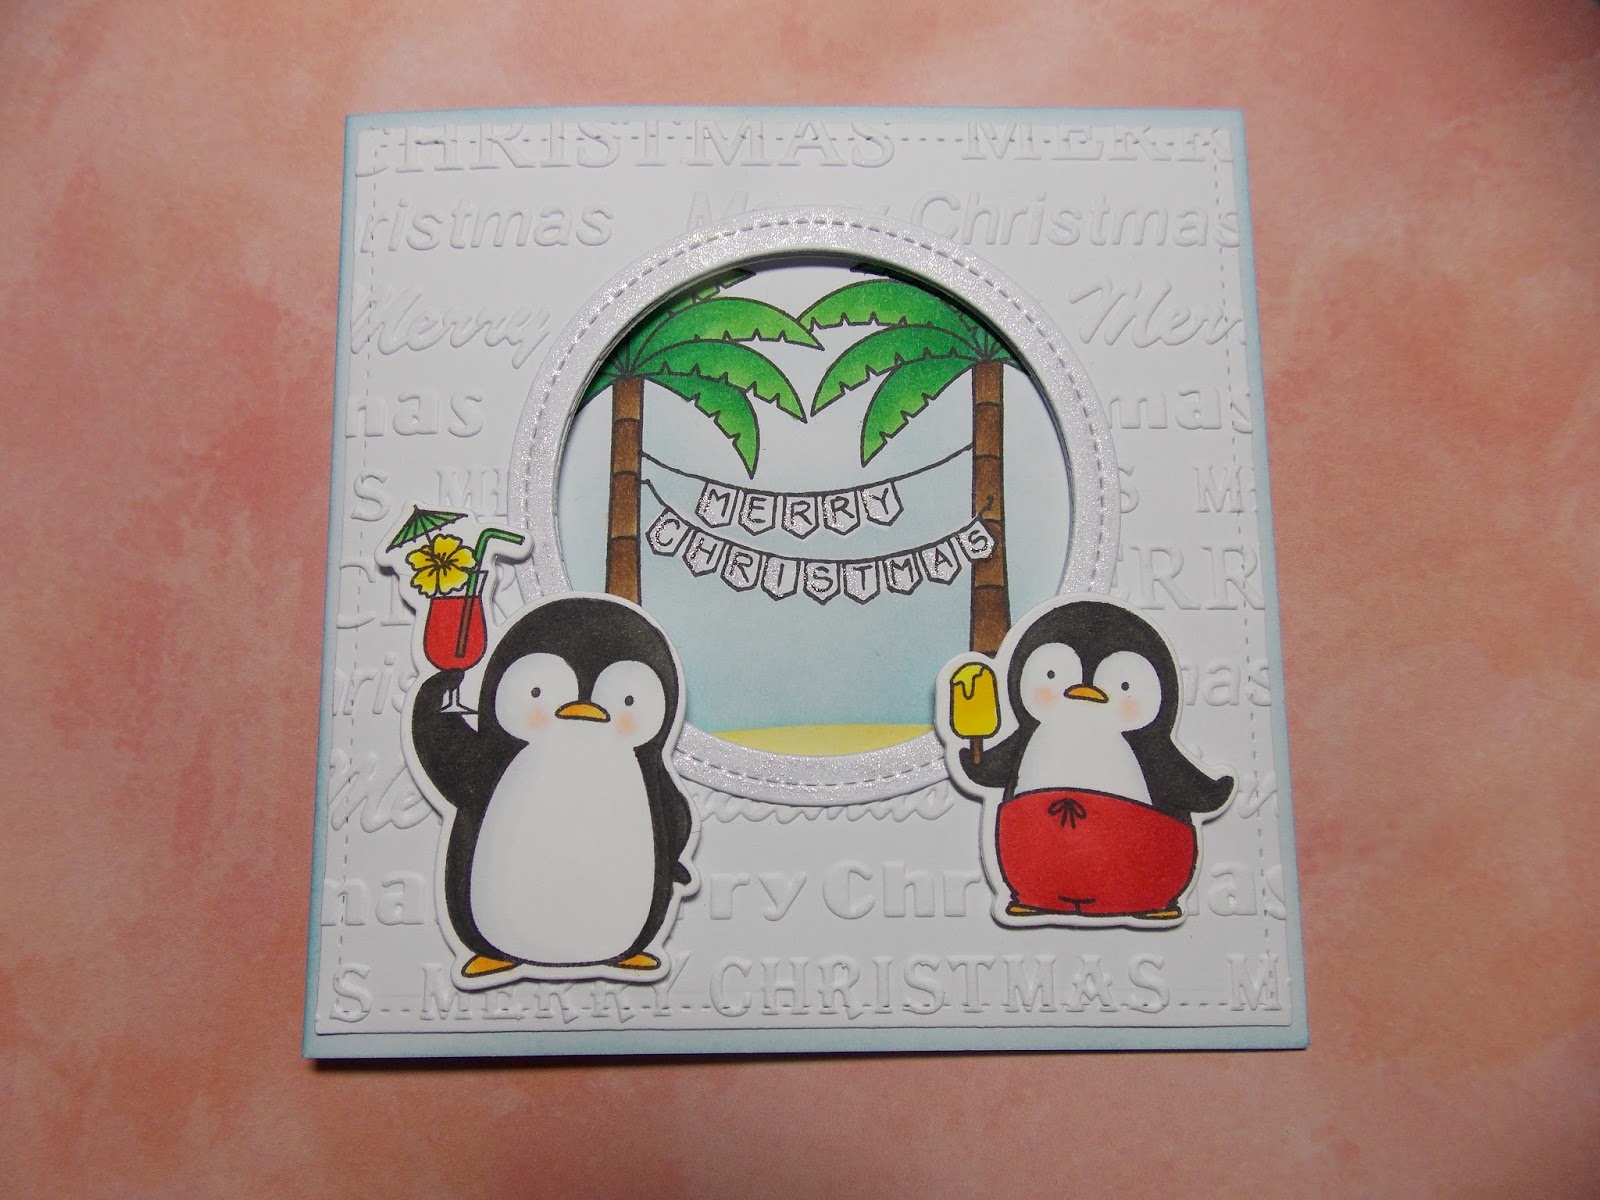
  • mama elephant- artic penguin stamps and dies
  • mama elephant- jolly and merry stamp
  • SU!- joyful Christmas & wondrous wreath
  • lawn fawn statckables- stitched squares
  • mama elephant- stitched landscape dies
  • memento ink pad (tuxedo black) & copic friendly cardstock
  • copics (C00,1,3. W6,7. Y35,38)
  • tim holtz distress ink pad (weathered wood)
  • sakura glitter pen (clear star)
  • printed card blanks from craftwork cards

for the first card I die cut a square and stamped a sentiment in the top corner. I added some small stamps to add twinkle accents using the distress ink pad. I highlighted these elments with some glitter. I stamped, coloured and die cut a penguin and ice burg and glued these on to the corner of my card using foam pads.
 
 
for the second card, I die cut a hill from some white cardstock, to make some snow. I stamped the sentiment on the snow and added glitter to the word 'wonderful'. I stamped, coloured and die cut some penguins to complete the scene.
 
 
these cards are easy to repeat for batch making, as you can prepare multiple penguins and mats quickly. the images are also small which makes them easy to colour. If you don't have patterned card blanks, you could add a matt of paper instead, or create a stamped background if you wanted.
Mx

challenges I would like to enter:
simon wednesday says- 'clean and simple christmas'

Tuesday 6 October 2015

with thanks...


inside

  • SU! So very grateful
  • Hello you thinlits
  • Black and white card stock
  • Memento ink pad and pen
  • Copics
  • Wink of Stella

I made a 5x7" card blank, then mat and layered black cardstock on the front. The top layer is copic friendly white cardstock, which I stamped with the flowers to fill the top section of the card. I used copics to colour these flowers in. I then die cut the sentiment from black cardstock and glued it in place. For the inside, I cut a mat of cardstock, stamped flowers in the corner, then coloured these with copics. I edged the mat with a memento pen to define the edge before sticking the layer down. The final touch was glitter highlights on the flowers using Wink of Stella.

challenges I would like to enter:
Mx

Tuesday 29 September 2015

penguins in paradise!!


inside
  • my favourite things- penguins in paradise stamps and dies
  • lawn fawn- stitched squres and circles dies
  • SU! white Christmas
  • memento ink pad (tuxedo black)
  • copics (E1, C00,0,1, W7,8,9 Y35,38. E59,57,55 G14,05,17. R9,27,24 Y02,08,15)
  • tim holtz distress ink pads (tumbled glass + scattered straw)
  • wink of stella (clear)
i was asked to make a card to send to someone celebrating Christmas abroad and I knew I had the perfect stamp set !!

to make this card I first cut all my layers. I die cut 2 stitched squares to fit my 5" card blank (one for the front one for inside). I then die cut a circle in the centre of the front mat. I then used this to pencil mark the position of the hole to help line up the die to create the same aperture on my card blank. I also die cut a frame using the stitched circles to enhance the aperture. I embossed the front mat with a Christmas wording embossing folder (don't know the name as I have lost the packaging),and glued the frame onto my layer. I inked the card blank blue then stuck down my mat. i stamped, cut and coloured the penguins and glued these onto the front using silicone glue.

For the inside, I created a scene on the second matt which would show through the aperture. I stamped my word banner and made a mask to place over the top. I stamped a palm tree either side and made masks for these too. I created a pair of masks for the landscape, using the 1st half with a yellow ink pad and blending tool to create sand. i then used the coordinating mask protect the sand whilst i created the sky in the same way. i then removed all the masks and copic coloured the trees before adding glitter shadows to the banner. 

the final touch was some glitter onto the frame around the aperture... after all Christmas needs glitter whether you're home or abroad !!
 
Mx

Sunday 27 September 2015

falling leaves...

    front 

    inside

  • SU! simply sketched and summer solstice stamp sets (I also used a 2005 sentiment stamp, but don't know the name of the set)
  • archival ink pad- jet black, olive & monarch orange
  • 6x4" black card black and white stamping cardstock
I first cut two white mats to fit my card blank. I used the sketch to map the main parts of my card front. I stamped a sentiment on the front of one mat. I added another sentiment in the centre of the second mat to go inside my card. I inked up my leaf stamp using two colours, I tried not to overlap the colours, so they didn't get muddy. I used the lines on my clear block to help with this technique. I stamped the five main leaves in position on the card front. I then second generation stamped to fill in some gaps. These softer leaves help to give a little more depth to the card. I added a final leaf to finish the other matt and stuck these onto my card blank.

Mx
 
I would like to enter these challenges:
 

a present from santa


  • my favourite things- jingle all the way stamps
  • SU!- holiday home stamp set, banners framelit dies and scallop boarder punch
  • memento- tuxedo black
  • copics
  • craftwork cards coloured card blank and cardstock plus kraft cardstock
  • wink of stella
  • glossy accents
I used the banners dies to create my mats, I stamped the large kraft banner with my sentiment. I placed a small green banner just underneath and punched a scallop edge on a strip of green card to go along the top edge of my card blank. I stamped, coloured and fussy cut my santa image and glued it to my card with foam squares. to finish the card, i added a bit of glitter to the presents bow and a bit of gloss to Santa's belt.
 Mx

I would like to enter this challenge:
 

Thursday 24 September 2015

all wrapped up...


  • A3 kraft cardstock- cut to 30x29cm
  • cream card stock- cut to 14x7cm 
  • coloured bakers twine (150cm)
  • SU! little letters thinlit dies
To make the box, I scored the kraft cardstock and cut the flaps, to create the net below. I then added glue the appropriate areas and stuck them together.

 
 To make the label I cut my cream cardstock to 14x7cm and cut holes in all four corners. I used thinlit dies to cut out my letters to just leave a negative, you could cut the letters out of a coloured cardstock. another alterative would be to stamp on to the label. I added bakers twines through the holes on one short edge, then crossed them underneath, before bringing them up through the holes on the opposite edge. I tied the ends in a bow to keep the label on. I used coloured twine to coordinate with the colour of scarf in the box.
I chose to add the label in this way so the box is kept plain making it easy to reuse.
Mx

Tuesday 22 September 2015

a notable gift...

 
i made this memo block by painting an mdf blank with some cream studio paint. i selected a section of the tissue wrap to cover each side of the box, and glued these down. once the glue had dried, i gave the box another coat of cream paint. this dulls the print of the tissue to give a much softer look, i just used cream to keep it quite neutral but you could add a wash of colour. i used a small amount of brown to the edges using a sponge, to give a distressed look and make it feel more vintage. i used the golden gel medium to seal and give a protective coat. i added felt to the underneath to make sure the memo block didn't scratch any work surfaces. i bought  white memo pad/blocks (the right size to fit inside) from ebay and added a couple of small pencils, to complete the memo block.
i think this makes a great gift as it would be useful to most people, the natural colour also means it will go with most décor.
Mx

Friday 4 September 2015

baby love !!


  • LOTV- 'baby with bunny' & 'rocking horse' stamps
  • SU! 'simply wonderful' sentiment stamp
  • mdf heart shape from the mdf man
  • tim holtz tissue wrap- terminologie
  • Claudine hellmuth studio paints and brushes
  • docrafts artiste- flesh
  • golden gel medium
to make this heart hanging decoration, i first painted it cream. I covered my mdf blank with the tissue wrap, then painted another coat of cream over the top. i used brown paint on a sponge to distress the edges. i stamped my chosen images and used the studio paints to colour them. i use a fine brush to do the black outline and details, to give a neater finish as most of the detail is lost during painting the colours. i threaded a ribbon through the hole at the top and tied a couple of bows to finish.
Mx

Friday 28 August 2015

a balloon for a baby boy...


  • W plus 9- 'unforgettable' stamps and dies
  • tim holtz distress ink pads- broken china, tumbled glass, wild honey, scattered straw
  • W plus 9- 'wishing you' stamps
  • archival ink pad- jet black
  • crafters companions neenah cardstock
  • memento ink pad- tuxedo black
  • copics- B00,01,02. W2,3,4. E11
  • wink of stella- clear
  • 5x5" white card blank
  • craftwork cards digi cardstock (for mats)
  • crafters companion Neenah cardstock (for colouring)
I planned out my card according to the sketch, then cut my mats to size. I used stars from the unforgettable set to make a background layer. I cut the second layer into a banner shape and stamped a sentiment from the wishing you set. I added a little ink to the edges of the mats, to softly highlight them. I stamped, coloured and die cut my elephant and balloon images. I glued all the mats down flat and added the images with foam tape. the finishing touch was some wink of stella glitter on the balloon.
Mx

challenges:
freshly made sketches- #201


baby with a bunny...

  • LOTV- 'baby with bunny' & set26 'simply sophisticated' stamps
  • crafters companion Neenah cardstock
  • memento ink pad- tuxedo black
  • copics- E50,51,21,11,55,57,59. R81,83,85
  • LOTV/nit wit- country meadow 8x8" papers
  • sizzix circle framelit die
  • dove craft- tea party doilies
  • archival ink pad- coffee 
  • stickles- star dust
  • 5x5" kraft card blank
  • SU! 'friendly phrases' sentiment stamp (used inside)
to make this card, I cut a strip of pink paper and glued it to the bottom section of my card blank. I die cut a circle of yellow paper to fit in the centre of a doily, then glued these to the middle of my card. I stamped and coloured the focal image and fussy cut it then stuck it to my card using foam tape. I added a sentiment, and glitter to the edges of my paper layers.
Mx 

challenges:
simon Wednesday- 'anything goes'

Tuesday 25 August 2015

super santa!!

 
  • kraft 6x4" landscape card blank
  • red and kraft cardstock
  • my favourite things- 'jingle all the way' stamps & dies
  • memento ink pad- tuxedo black
  • archival ink pad- carnation red
  • ranger glossy accents
  • copics- E01,21,51, R24,27,29, Y35, C00,0,1,7,8,9
 
I glued a piece of red cardstock at an angle on to my card blank (to follow the sketch), then used scissors to trim the excess off the top. I marked out my mat of kraft card and cut it out slightly larger than I needed. I stamped this piece with my sentiment all over, using my acrylic block to line the words up. I glued the mat down and again trimmed the excess. I stamped one of the santa images and coloured it with copics. I then die cut this and added it to my card using foam tape. the finishing touch was some glossy accents on the belt and boots. I think this makes a super fun Christmas card and it was so easy to do...
Mx
 
challenges I would like to enter:

Tuesday 11 August 2015

fruity!!


I have decorated some tea towel as a gift and felt they needed some packaging.
 I cut 2 pieces of white card to 14x19cm, I used them as a guide to fold the 2 towels neatly and to the same size. I next made a label I cut a 14x4cm piece of cream card, I used coffee archival ink pad and the SU! skinny mini alphabet. then I cut a 35x5cm band of kraft card, this was scored at 15cm, 16.5cm, 31.5 & 33. glue is placed on the left over 2cm flap, the label  is added to one of the long sections and a handmade stamp added to the 2nd. the final thing to do was stack the tea towel, wrap the band around and glue the flap to join the band. I put the finished item into a card bag and sealed it, to keep the tea towels nice and clean.
 
check out how I made these tea towels, on my other blog here...

Mx


Sunday 26 July 2015

kitted out for christmas !!


  • craftwork cards festive chalkboard kit
  • double sided tape and foam pads
I took a patterned card blank and cut a section off the front. I then cut and glued a piece of another paper onto the inside of the card blank so it could be seen when the card was closed. I cut out one of the frames and layered it over the sentiment using foam pads for dimension.
 
Using nice card kits can be a great way to make lots of simple but effective cards. When you like to send Christmas cards to a lot of people, I think a kit like this is the ideal way to craft... it's still a good idea to get started early in the year to give yourself time to play and be creative with them!!

Id like to enter this card into the following challenge:
Mx

Friday 24 July 2015

# selfie


  • 6x6" card blank
  • white digi cardstock
  • tim holtz distress ink pad- tumbled glass
  • archival ink pad- cobalt
  • mama elephant- artic penguins and jolly & merry stamp sets
  • black memento ink pad and copics
  • SU! on film framelit die
  • mama elephant landscape trio dies
  • hunkydory snowfall acetate
  • sakura stardust glitter pen
to make this card I cut a mat of card to fit onto my card blank, then inked and stamped this with snowflakes to make my background. I stamped my sentiment in the bottom corner and added glitter over the top to accent this. I die cut the frame die out of some white card and glued it in position. I then used the inside edge as a guide and used a craft knife to make an aperture. I then cut 3 squares of white card slightly bigger than the aperture, I very lightly inked the 1st layer, inked the second layer and left the 3rd layer white. I die cut these into sections to create the sky, sea and ice to create scenery. On another piece of card, I used masking techniques to stamp one penguin onto the block of ice and 3 other penguins into huddle together. I coloured these using copics and cut them out. I then positioned my penguins onto the scene and glued all these pieces together. I taped snowfall acetate to the back of my frame then taped the scene in position behind. I glued this to the card blank using foam tape to add dimension.

 
to make the inside of my card, I cut a mat of cardstock. I stamped my greeting with a skating penguin positioned at the end of the word. I coloured the penguin with some copics and glittered the greeting to finish my card.
 
challenges:
Mx