Thursday 15 December 2016

christmas couple ...


  • LOTV- topper ( just randomly found one in my Christmas crafting box from a few years ago)
  • LOTV- classic Christmas 8x8" paper
  • HOTP patterned paper
  • 6" square card blank & grey cardstock
  • Wink of stella 'clear' glitter brush pen

I found a nice old topper in my stash and decided to create a super quick and simple card. Following the sketch, I cut pieces of coordinating paper to size. I  matt and layered with grey cardstock and used a corner punch to round the edges, to match the topper. I glued all the pieces onto my card blank and added a bit of glitter pen.
Mx

Challenges I would like to enter:
Sketch Saturday #442
ABC Christmas challenge

Wednesday 14 December 2016

shoe perfect...

 
  • Do crafts artiste acrylic paint - iris & metallic silver
  • Studio paint - charcoal black
  • Tim holtz 'terminology' tissue wrap
  • Anna Marie designs - flowers & embellishments
  • Black satin ribbon
I covered the mdf shoe blanks with tissue wrap. I then coated them with the lilac paint. I drew the line to create the platform area and painted below the line with silver edged. I edged this with a black line of paint, ensuring it lined through on all sides when the pieces were assembled. To complete, I tied bows and created an arrangement of flowers, then used hot glue to secure them in place.


As this was made as a gift, I created a box for it using black cardstock and two sheets of acetate. Once opened, it can be used to display cards and hold photos, or just placed out on display as home décor.
 
Mx
 
challenge I would like to enter:

Santa wishes...


  • SU!- Christmas wishes
  • Archival 'vermillion' ink pad
  • Memento 'tuxedo black' ink pad
  • Copic- E50,51,21. C1,00.
  • Hotp patterned paper
  • Baker's twine

I stamped the image using red and black ink. I then used my copics to colour the face and add shading to the beard. To complete the sketch, I added patterned paper to the front of the card blank and matted the image panel onto some coordinating green paper. I wrapped bakers twine around this panel and glued it onto the card, using foam tape for dimension. I wanted to keep this one really quick and simple since Christmas is almost here and I haven't made enough cards yet!!
 
Mx

Challenges I'd like to enter:
Freshly made sketches #267
ABC Christmas 'y for yikes & z for zoom'

Tuesday 13 December 2016

special skating couple...


  • LOTV stamp - 'ice skating'
  • circa design stamp - 'wd-gr-22'
  • lawn fawn dies- dotted rectangle stackables
  • copics markers- E40,41,42,50,51,21,55,57,59&93. R24,27,46. YG61,63,67. C00,1,3,5,6,7,&8.
  • tim holtz distress ink pad - 'evergreen bough'
  • memento ink pad - tuxedo black
  • Neenah classic crest solar white cardstock
  • wink of stella - clear
  • 6 x 4 card black
I die cut a panel to fit on the front of my card blank. I then stamped the image and sentiment, following the sketch. I also stamped the image onto a post it and fussy cut this to create a mask. I then used the mask to protect the image whilst I added a distress ink background behind the figures. I removed the masks and coloured the image with copics. I finished with wink of stella on the girl's fur trims and the ground for a touch of snowy sparkle. Finally, I added my matt onto my card blank to complete a simple Christmas card perfect for a couple.
 
Mx

Challenges I would like to enter:
simon Wednesday says: 'ice inspiration'
cas(e) this sketch #201
the ribbon girl December challenge - 'anything goes'
LOTV facebook challenge - 'winter'


Monday 12 December 2016

coral christmas ...


  • Lawn fawn dies- 'dotted rectangles stackables'
  • Tim holtz distress inks- 'cracked pistachio', 'abandoned coral' & 'peacock feathers' 
  • SU! Stamp sets- 'perpetual birthday calendar ' & 'flurry of wishes ' 
  • Paper artsy JOFY stamp- 'jm29'
  • Archival ink pad - 'tuxedo black'
  • Watercolour cardstock 
  • 6x4 card blank 
  • wink of stella glitter pen - 'clear'

I die-cut a panel of cardstock and inked it with an ombre effect. I stamped little snowflakes all over to complete the background, using 2nd generation towards the top portion for a softer colour. I stamped and die-cut my sentiment. I then stamped my image once onto the background and once onto some spare cardstock. I water-coloured the image using distress inks and fussy cut it out. I used a black brush marker on the cut edges to define them. I then added them onto the card using foam, making sure they lined up with the strings to look as though they were hanging. I added glitter to the flurry & Christmas words to complete.

Mx
Challenges I would like to enter:
freshly made sketches #266
simon Monday says: let there be snow

Friday 9 December 2016

don't forget the gifts...

 
  • mdf blank
  • ranger studio paint
  • ranger glue n' seal - matt
  • tim holtz tissue wrap
  • golden gel medium - matt finish
  • adhesive backed felt pads

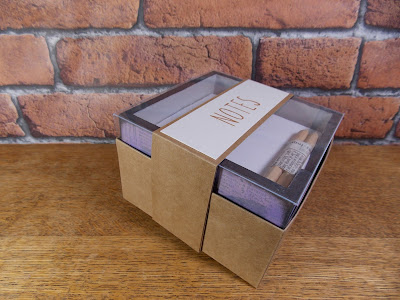
As the memo blocks from last year were a success and appreciated by those who received them as a gift, I decided to make another this year. I painted the inside of the mdf blank with grey. For the outside, I selected pieces of tissue wrap to add a butterfly to each side of the box. I shaped, glued, then sanded the tissue pieces to cover the outside. I then gave the box a coat of paint to soften the print. I used purple to add a wash of the recipients favourite colour. I sponged a small amount of black on the edges. I added a protective seal using the golden gel medium and felt pads on the base to protect work surfaces from scratches. The right size of white memo pad was purchased on ebay to sit inside, along with a couple of small pencils wrapped in the coordinating tissue to finish it off. 


As before, I packaged the memo block in kraft cardstock and acetate, with a hand stamped wrap ready for gifting.

I would like to enter the following challenge:
  
Mx 


Thursday 8 December 2016

letter rack...


  • mdf blank
  • ranger studio paint- traditional tan & stable brown
  • ranger glue n' seal - matt
  • tim holtz tissue wrap
  • golden gel medium -matt finish
  • adhesive backed felt pads
I made this letter rack using an mdf blank coated with some cream paint. I selected tissue wrap to cover the outer faces of the rack. I cut the pieces roughly into shape and glued them into place, sanding the edges once dry for a neat finish. I then coated the box with another layer of cream, to dull the print of the tissue giving a much softer look. I finished the edges using a small amount of brown paint applied with a sponge. This creates a distressed vintage feel to enhance the paper print. To seal the piece, I coated it with the gel medium. I added felt pads to the base to prevent the rack from scratching work surfaces.
 
  • Kraft & cream cardstock
  • SU! skinny mini alphabet stamp set
  • archival ink pad - sepia
  • red lining tape
  • acetate
As this one was made as a gift, I also created customised packaging using Kraft card. I made the box the perfect size to hold the letter rack snugly and provide some protection from knocks. The window of acetate provides a sneaky peek at what's inside, with the lettering on the band to let you know what it is. I think it provides a professional finish, with that extra attention to detail that makes it feel crafted rather than just 'homemade'... as well as making it easier to wrap up for Christmas !!
 
I would like to enter the following challenge:
 
Mx

Sunday 4 December 2016

celebrate with cake


  • SU!- endless birthday wishes 
  • Lawn fawn- large dotted rectangle & circle stackables 
  • Lawn fawn- stitched scalloped borders 
  • SU!- metallics glitter tape 'silver'
  • Memento 'tuxedo black'ink pad 
  • SU!- 'bermuda bay' ink pad
  • Copics- BG49,23,32. R85,83,81. E43,42,41.
  • Sakura 'clear star'glitter pen 
  • White ribbon 
  • White cardstock 
I die cut a panel of cardstock to fit a card blank and stamped my sentiment in black. I then created a background by stamping a dot image all over in blue. I added an edge of blue to the panel using my copic. I then cut some glitter tape to the length of my card, shaped it with a small scalloped edge diecut and glued on to my card. I coloured my ribbon with pink copic pen for a perfect match, then tied it around my panel and secured it with a bow. For the topper, I stamped my cake image and coloured with copics. I diecut this into a circle and edged it with the pink copic. I added my background panel to a card blank, then placed the topper on using foam pads and finished with glitter pen to add sparkle to the candles.
 
Mx
 
challenge I would like to enter:
simon Wednesday says 'anything goes'

Friday 2 December 2016

'o' christmas tree...


  • SU!- polar party
  • SU!- petite pairs
  • SU!- oval & scalloped oval punch
  • HOTP patterned paper
  • Memento 'tuxedo black' ink pad
  • Neenahclassic crest cardstock
  • Promarkers- pear green, moss, cocoa, berry red, lipstick red
  • Wink of stella - clear & gold
  • Kraft &white cardstock

Mat a piece of patterned paper onto the card blank. Cut a mat of white cardstock, stamp and colour the image. I added glitter to the image for some sparkle. stamp and punch out the sentiment. layer onto a scalloped punched oval. cut a piece of coordinating paper and trim into a banner shape. glue onto the card blank following the sketch.
Mx