Showing posts with label cute. Show all posts

Saturday, 25 June 2022

christening day


  • LOTV: baby christening
  • SU!: inspired events
  • First edition papers ‘blank canvas’
  • Memento ‘tuxedo black’ ink pad
  • Neenah classic crest cardstock
  • Copics: R01,32. RV42. YR30. B41. BG70. YG93. E30,35,53,55,57. W00,1,3.
  • Sakura jelly roll ‘clear star’ glitter pen
  • Pink ribbon. 
To make this card, I cut a 5” square mat and stamped my image and sentiments in place. I coloured my image using copics, then added details to the sentiment and flowers using a glitter pen. 
I wrapped ribbon around the top of the panel and tied the ribbon into a bow. I then layered this panel onto a piece of pink paper.
I used the pink paper to cover the front of my 7” square card blank before adding a mat of cream patterned paper. I used foam tape to attach the finished panel to the centre of the card.
I think this is a nice christening card... it uses quite a traditional image, made clean and fresh by using the coral and keeping the design simple.
Mx

Tuesday, 18 February 2020

mice time to celebrate.


  • My favourite things- it’s a mice time to celebrate (stamps & dies)
  • Lawn fawn- happy birthday border lawn cuts
  • Prima- free spirit paper 
  • WeR memory keepers- love 2 craft papers
  • Copies- C00,1,2,4. R000,00,20,21,81. RV34. BV00,11. B00. BG53. YG11,21,41.
  • Memento dye ink pad-tuxedo black 
  • Wink of Stella brush pen- clear
  • 6” square card blank


I picked a main patterned paper to act as a background. I added a strip of dark polka dots, layered with a yellow pattern. I also used the dark paper to die cut my greeting. I layered all these and glued onto the card blank. I then stamped, coloured and die cut the cute mice images. I used 1mm foam on one mouse and 2mm foam on the other to create more dimension. I added sparkle to the Pom poms, to finish.

I’m entering the Simon says Wednesday ‘use 2 or more pattern paper’ challenge blog, I’m so glad I did too. I don’t use my patterned papers much but the background paper really makes the card.

Mx

Friday, 1 March 2019

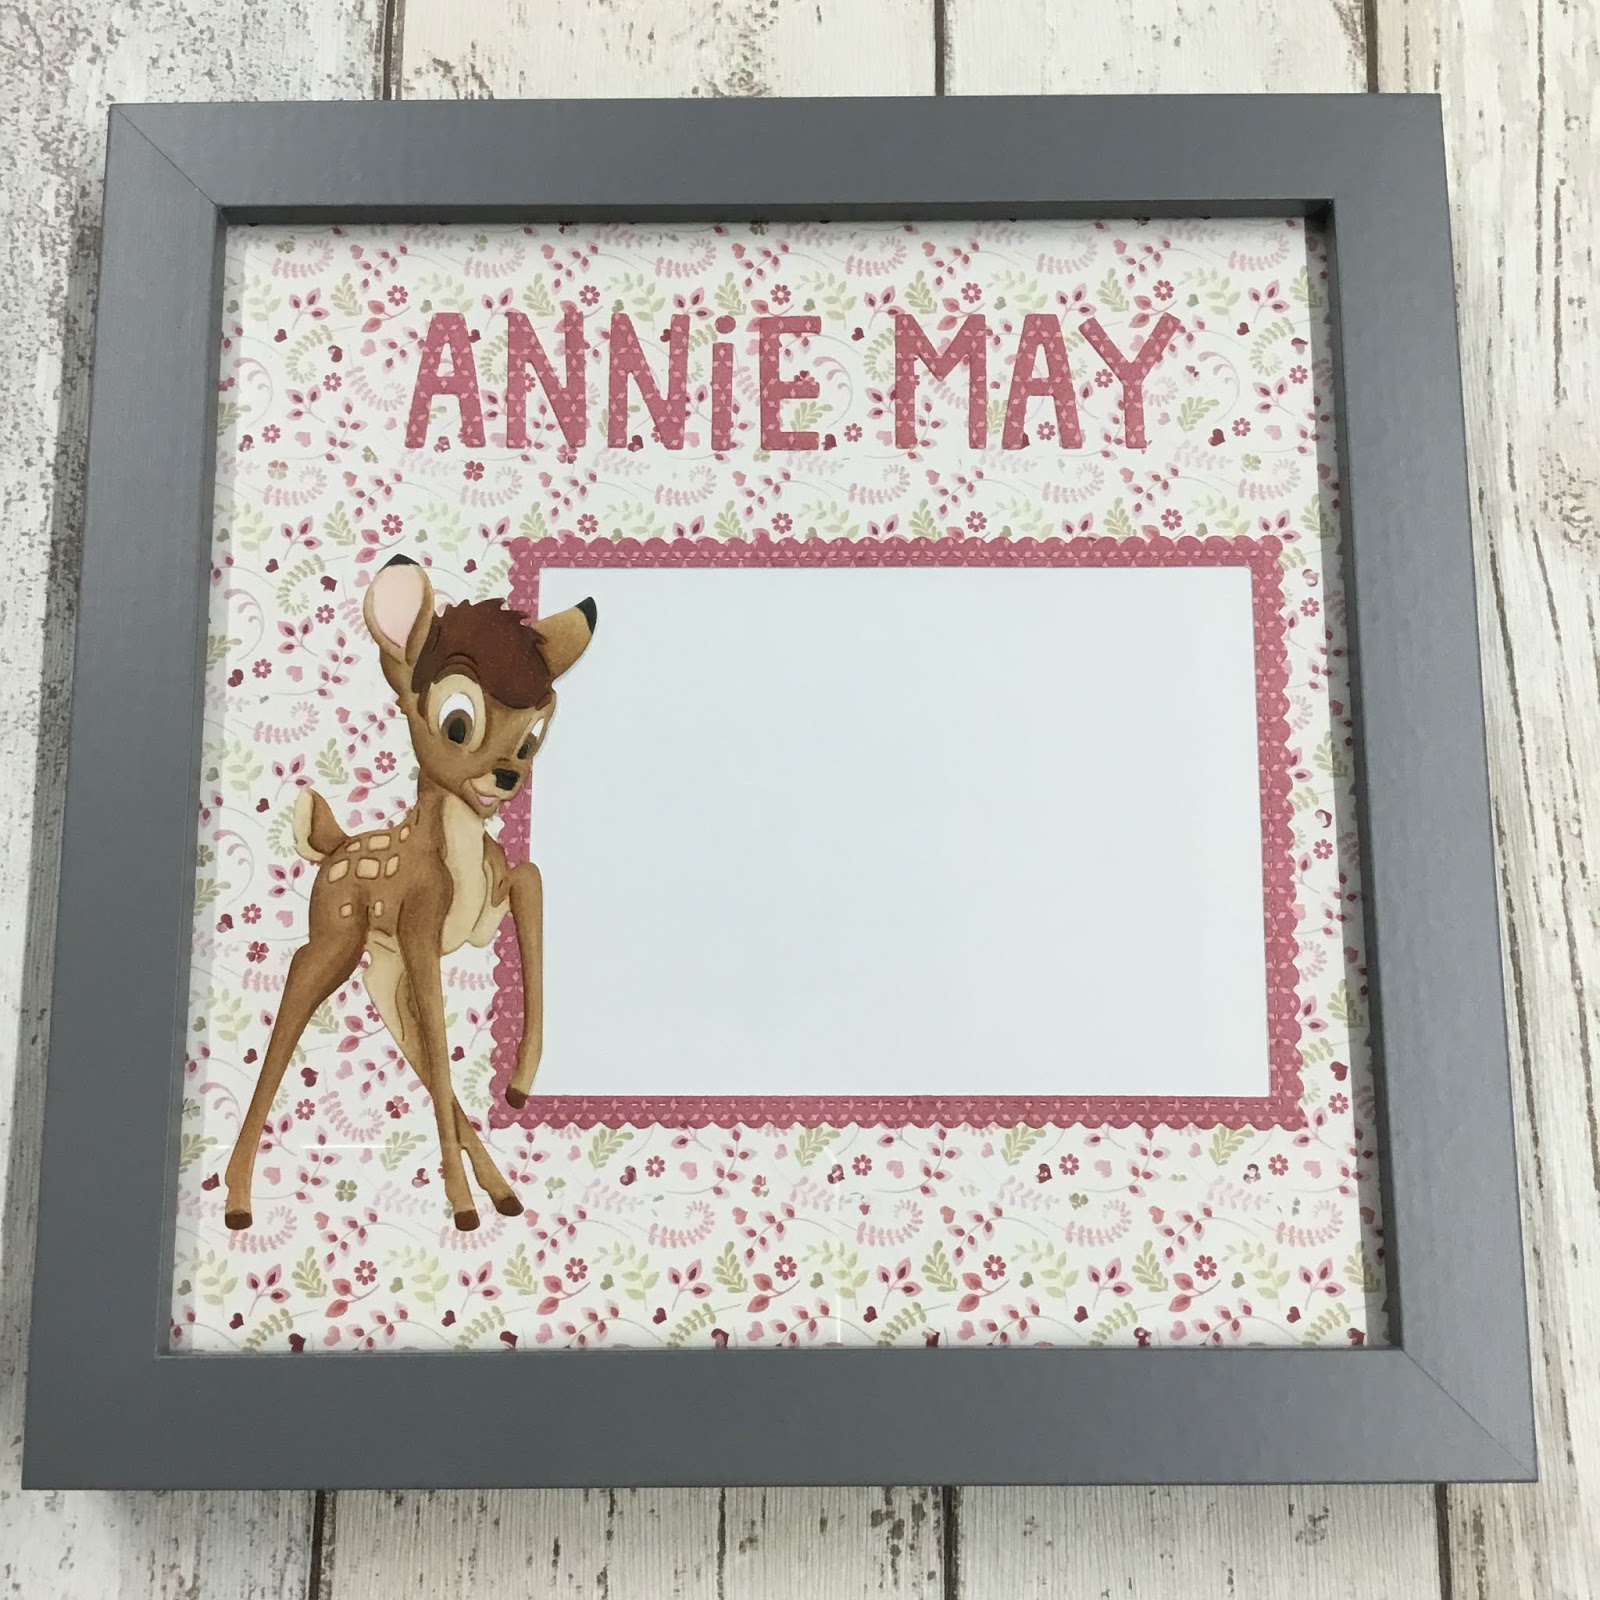
Bambi frame gift


  • Disney bambi metal die
  • Nit wit & LOTV- always & forever paper pad
  • My favourite things- stitch rectangle scallop edge frames
  • Lawn fawn- finley’s ABC’s dies
  • Copic friendly cardstock
  • Copic markers- E30,31,34,35,37,39,57,59. W8,10. R000,81,83.
  • Grey 8” square frame (mine was from wilko)
To make this frame gift, I selected two pieces of coordinating paper. I chose one 8x8 piece for the background and the other to die cut from for embellishments. I diecut the frame and letters to spell the name from the patterned paper. I also diecut my bambi image from white card and added tape to the back, whilst all the pieces where still in the metal die, to hold the sections together. I then removed the bambi from the die and added back in any pieces that had fallen out. I used copic markers to colour the image, using a picture online as reference. 
I decided on the best layout and glued all of the pieces onto the background paper. I used a craft knife to remove any paper showing through the die-cut frame to create an aperture for a photo to sit behind.
I slotted this finished piece into the frame and added a sheet of white card behind, to make it look nice for gifting. I prefer to leave it for the child’s parents to decide which picture they want to display rather than selecting one you like.
Mx

Monday, 4 February 2019

bess the butterfly


  • Stamping Bella: tiny townie Bess the butterfly (stamp & die)
  • Mama elephant: Madison Avenue creative cuts die
  • Stampin up!: curly cute
  • Make it colour blending cardstock
  • Copics:E50,51,21,93. E42,43,44. Y15. BG10,53. BV0000,000,00,11. V25. RV00. C5,6,7,8.
  • Wink of Stella ‘clear’ sparkle brush marker
  • Tim holtz ‘dusty concord’ distress ink pad
  • Pattern Paper (from craftwork cards, don’t know the name)
To make this card I simply die cut my frame from copic friendly cardstock. I used the centre to stamp and colour my image, then cut it out using the matching die. 
I cut out a piece of pattern paper, which had the sentiment printed on. I inked my card blank with the purple ink then glue the paper to the centre. I added the white frame. I glued the image in place using foam for dimension. Final touch was a bit of sparkle to the wings.
Mx

Thursday, 24 January 2019

sending love

 
  • hunky-dory 'gift of love...' foil topper sheet
  • patterned paper (found loose in my stash)
  • 6x4" card blank
This card was so quick and easy to make, it would be perfect for a beginner. The hunkydory foiled toppers always make your cards feel very professional too.
To make this card, I folded my card blank and creased the fold. I cut my patterned cardstock to fit the front of the card, then glued in place using double sided tape.
If you don’t feel confident you can place it perfectly, you can cut the patterned cardstock slightly bigger than your card front and glue in place. Then, turn your card over and using scissors trim to size, using the edge of the card blank as a guide.
After this, I added the toppers and used foam tape/squares to add dimension, to make it feel more special. I chose to raise the frame for this card. You can either glue the frame down, then add the image in flat after. Alternatively, you could place the frame in the centre of your card without any glue, allowing you to position and glue the image topper inside. Once in place, you remove the frame, add your foam tape and glue it down using your centre as the guide.
It really is that simple!
Mx

Saturday, 22 December 2018

for the grandparents


  • LOTV- twice as nice
  • Neenah classic crest cardstock 
  • Copics- C00,0,1,3,4,5,6. E21,50,51,93. RV91. R81,83,85.
  • Lawn fawn- large stitched rectangle stackable 
  • Wink of Stella ‘clear’ glitter brush marker

I was asked to make a grandparents card to say congratulations on the arrival of twins. As I was struggling to find the perfect sentiment, I created a custom one digitally and printed onto cardstock. I then stamped my image above the sentiment and coloured it with copics. I used stitches stackable dies to cut the cardstock and patterned paper into panels. These were simply glued down flat to the card blank. I added a touch of sparkle to the hearts to complete.
Mx

Thursday, 20 December 2018

twins !


  • LOTV- twice as nice
  • SU!- inspired events
  • Lawn fawn- finley’s ABC dies, dotted circle stackable 
  • Neenah classic crest cardstock 
  • Copics- C00,0,1,3,4,5,6. E21,50,51,93. RV91. R81,83,85.
  • First edition paper- sweet nothings paper pad
  • Pink glitter paper
  • Wink of Stella ‘clear’ glitter brush marker


  • To make this card, I stamped my image and sentiment onto cardstock. I coloured the image with copics and die cut into a panel. I also die cut the letters to spell out 'twins' from glitter paper to complete the sentiment. I cut a mat of patterned paper to fit the card blank, leaving a small white border and glued into position. I then added the panel with the letters beneath and finished with a touch of sparkle on the image.
    Mx

    Monday, 28 May 2018

    writing notes


    • Stampin up!- writing notes & colour me happy stamp sets
    • Lawn fawn 'blue jay'& 'lobster' ink pads
    • Memento ‘tuxedo black’ ink pad
    • Copics- R32. RV42. BG13,32. BG0000.01.02. B00. Y02,15,18. E23. C0.
    • Sakura glaze pen #849
    • Wink of Stella ‘clear’ glitter brush pen
    I first cut a piece of card to cover the front of my card blank. I stamped this with the writing notes background stamp, using two colours to give the full note paper look. To do this, I carefully just inked up the lines I wanted red, stamped then cleaned my stamp and repeated with the blue. I used the Misti to help make sure it all lined up. If you didn’t have a Misti, it would be easier to just carefully apply both colours of ink to your stamp then stamp all at once.
    I then stamped my bird image and sentiment in position on the card and coloured these using copics. I added glitter to the ‘thank’ and glaze pen to the ‘you’ and the birds eye. I think this just adds a bit of detail to a simple card.
    Mx

    I would like to enter the following challenges:
    Simon ‘Monday’ Says... inspired by a song (bluebird by Sara bareillies)

    Sunday, 11 March 2018

    it's a girl

    • LOTV- push chair
    • Lawn fawn- it's a girl border
    • forever friends- kraft notes paper pad
    • Neenah classic crest cardstock
    • memento 'tuxedo black' ink pad
    • copics- E50,51,21,93. E43,55. Rv91,93,95. R83. V91,93. C00,1,3,6,7,8,9. W00,2.
    • wink of stella 'clear' glitter brush marker
    To make this card I cut a strip of checked paper and used the word die to cut the top edge. I die cut the words from a coordinating lilac paper. I then cut some copic friendly card stock to size and die cut the bottom edge, I also kept the word strip too. I stamped and coloured the image using copics.
    To make up the card, I glued the piece of check paper to the bottom portion of the card front. I added the white wording and then the image portion to the top of the card front. I glued the lilac word strip on top of the white one and added glitter pen over the words for a touch of sparkle.
    Mx

    I'd like to enter the following challenge:

    Thursday, 1 February 2018

    mason jar of flowers


    • Stamping Bella: mason jar of flowers
    • Lawn fawn: cross stitches rectangle stackable 
    • Paper smooches: friend word die
    • Memento 'tuxedo black' ink pad
    • Neenah classic crest card
    • Copic: R81, 83& 85. RV00. BG0000, 70. C00, 1 & 2. Y15, 17 & 38. YG03 & 25
    • Gold mirri card
    • Yellow and gold bakers twine
    • Kraft 4x6" card blank
     
    I die cut a panel of white cardstock using the cross stitch die for detail. I stamped the floral image in the bottom corner and coloured with copic markers. I die cut the word friend from gold mirri card and glued this on to the panel. I glued my panel to the card blank, and tied some bakers twine around the top tied in a bow to finish.
    Mx

    Monday, 22 January 2018

    Carnation garden girl


    • Stamping bella- tiny townie garden girl carnation
    • Avery elle- a tag for all
    • Lawn fawn- stitched scalloped borders
    • DCWV-fresh floral 12" paper stack
    • Neenah classic crest cardstock
    • Memento 'tuxedo black' ink pad
    • Copics- skin:E50,51,21,93. Hair:E55,57,59. Pink:R81,83,85. Green:G14. YG13,17. Yellow:Y0000,11. YR21,31. Ground:W00,1.

    To make this card, I chose two coordinating papers. I cut side panels from one and scalloped borders from the other. I also die cut the sentiment from the pink dots. For the main feature, I cut Neenah cardstock to create the central panel. I stamped the girl, making sure she fit nicely below the sentiment, then coloured her with copics to match with the papers. I glued the panels and sentiment in place to complete the card.
     
    Mx
     
    I would like to enter:

    Sunday, 14 January 2018

    For my mum

    • LOTV-I'm here for you
    • Memento 'tuxedo black' ink pad
    • Neenah classic crest cardstock
    • Copics- skin:E50,51,21,93. Hair:E55,57,59. Dog:E43,44,47. Clothes:R20,21,22,24,46. Yg21. BG53,10. Y17. Stairs:C00,1,3.
    • SU!- teeny tiny sentiments
    • Patterned paper (from my scrap box so not sure which brand/ collection) 

    I chose to make a 5" square card and found strips of patterned paper that would fit the sketch. I cut the main panel from colouring cardstock and stamped my image. I coloured the image using copics makers that best fitted the paper colours. I then stamped my sentiment and layered on to some more of the patterned paper. I glued all the paper pieces down to complete the card sketch, (although I did flip it so the sentiment better fitted my image.)

    Mx

    Joining in with:


    Wednesday, 3 January 2018

    All our dreams


    • Lili of the valley- all our dreams
    • Lawn fawn- small stitched circle stackables, large stitched rectangle stackables, stitched borders
    • Forever friends (docrafts) Kraft notes 12" paper pads
    • Neenahclassic crest cardstock
    • Memento'tuxedo black'ink pad
    • Copics- skin:E50,51,21,93. leaf:YG61.G21,24. Pink:R85,83,81,0. Bunny:E41,42.
    • Wink of stella 'clear' glitter brush pen
    I cut 2 strips of lilac paper and glued these to down each edge of the card front. I then cut a strip of checked paper, using the stitched borders to add detail. I glued this down the centre of the card to complete the background. For the topper, I cut a mat of cardstock, stamped the image onto it and coloured using copics. For added detail, I brushed glitter onto the hearts. I glued the topper down flat onto the card. Using another piece of cardstock, I stamped then die cut the sentiment. This completed the sketch, glued down with foam for dimension.

    Mx

    Challenge I would like to enter:


    Friday, 1 December 2017

    Selfies in the Snow

    • Hunkydory cute Christmas luxury card collection: Selfies in the Snow
    • Hunkydory essential book of Christmas sentiments
    • Hunkydory adorable scorable cardstock
    • silver mirri card
    • 7x7" & 5x7" portrait & landscape white card blanks
    For the 7" square card, I mat and layered the card front with the patterned cardstock on silver mirri. I then arranged the frames and image topper at various angles and raised them up onto different depths of foam pads to create dimension. I completed the front with the sentiment, positioned on the printed border edge. I added the insert trimmed down to cover the inside of the card.
    inside
    I used the remaining cardstock for the portrait 5x7" card. I positioned the border to run vertical on the card this time, mat and layered onto mirri card. I then positioned the little square toppers and sentiment onto the card, all on angles and glued down with foam pads. I used the remaining insert to cover the inside of the card.
    inside
    I made a feature of the image printed on the other sheet of cardstock for the next card. I mat and layered onto silver mirri to fit the front of this 5x7" card blank. I chose a sentiment from the essential book to coordinate and glued this in place using foam pads for dimension.
    For the final card, I arranged the remaining toppers and frame to create the design. I mat and layered the card front with mirri card and blue adorable scorable. I then glued the image topper on shallow foam pads in the centre. I added the frame raised up on deeper foam pads and overlapped the two with the sentiment in the corner.
    Mx

    Wednesday, 29 November 2017

    Merry Christmas my deer


    • Hunkydory festive elegance luxury card collection: Merry Christmas my deer
    • Hunkydory essential book of Christmas sentiments
    • Silver & rainbow mirri card
    • clear acetate
    • Pinflair ice diamonds sprinkles
    • doodlebug lily white glitter
    • 7x7", 6x6" & 5x5" card blanks
    For this 7" square card, I created a shaker using a topper and frame from the collection. I mat and layered the card front with rainbow mirri and patterned cardstock. I then added the topper image onto the card, glued down flat. I cut acetate to fill the frame and sealed with foam tape. I added a mix of the pinflair sprinkles and doodlebug glitter onto the topper for the shaking element. I positioned the frame on top complete the shaker element. The little sentiment was added to the top corner on foam pads to complete the card. For the inside, I trimmed the insert to fit inside with the printed sentiment.
    inside

    I used the remaining patterned cardstock to create this little 5" square card. I turned the paper so the border ran across the front and trimmed to cover the card blank. I added the deer image and sentiment toppers to the card which I made flat for posting. I trimmed the matching piece of insert down to complete the inside too.
    inside

    For the 6" square card, I matt and layered the silver mirri and patterned cardstocks onto the card front. I then positioned the topper with the deer onto the front, so the snowline continued from background to topper. I completed the front with a sentiment from the essential book.

    The final card was created to feature the printed deer from this patterned cardstock. I simply trimmed it down to fit the 5x5" card, with a matt of silver mirri and finished with an essential book sentiment.
    Mx

    Tuesday, 28 November 2017

    festive forest

     
    • Hunkydory cute christmas luxury card collection: festive forest
    • Hunkydory essential book of Christmas sentiments
    • Hunkydory little book of snowy scenes
    • Hunkydory luxury card collections (various offcuts of cardstock from other sets)
    • silver mirri card
    • silver & aqua ribbon
    • A5, 7x7", 5x7", 6x6" & 5x5" card blanks
    For the A5 card, I covered the card blank with the silver mirri card. I then trimmed the scene printed on the cardstock from the collection to mat onto the front. I simply added a sentiment topper from the collection to complete the front. I also finished the inside of the card with the matching insert, trimmed to fit.
    inside

    I used the other half of the patterned card stock as the background for this 6" square card. I trimmed the cardstock down to cover the card front. I then added one of the larger toppers from the collection, using foam pads for dimension. I chose to position a sentiment from the essential book beneath to finish the card.
    For the 5" square cards, I found some coordinating pieces of cardstock left over from the various hunkydory Christmas collections I have used. I trimmed them to sit side by side, filling the card front. I edged the join between the cardstocks with silver ribbon. I then positioned the little image topper on foam in the larger panel. I finished the card with the matching sentiment tag, embellished with a ribbon bow to sit across the border.
    This 5 x 5" card was also made with the offcuts of cardstock from other collections. Similar to the card above, the cardstocks were trimmed to fit on the card front. I edged this one with silver and aqua ribbons and tied a double bow for the tag. The little toppers were again glued down with foam pads.
    Using the second sheet of cardstock from the collection, I created this 5x7" card. I cut the cardstock down to fit the card front, keeping the border on the folded edge. I then added the other large topper, with the coordinating edges. I positioned the essential book sentiment overlapping the topper to mirror the curved shaping of the top edge.
    For this 7" square card, I used the remaining cardstock to back a little book image. I simply mat and layered the cardstock onto silver mirri to cover the card front. I added the little book image onto silver mirri to create the topper, which was glued to the card using foam pads for dimension. I covered the inside with the coordinating insert, trimmed to size.
    inside
    Mx

    Tuesday, 21 November 2017

    Robin redbreast

    • Hunkydory snowy season luxury card collection: Robin redbreast
    • Hunkydory essential book of Christmas sentiments
    • silver ribbon
    • A5 & 6x4" landscape & portrait white card blanks
    For the first A5 card, I covered my card front with the cardstock. I then simply added the large square topper with a sentiment topper beneath, both raised on foam pads for dimension. I cut the coordinating insert to fit inside with the printed message.
    inside
    For this A5 card, I trimmed the other half of the cardstock to fit the card front. I then added the large circle topper to the centre. I chose an essential book sentiment and positioned it in the corner overlapping the border. I used the remaining insert to fill the inside of the card.
    inside
    I used the little robin topper to create this 6x4" card. I trimmed the cardstock down to fill the card front, with the border running across the base of the card. I then simply positioned the robin on foam pads off centre. I found a sentiment from the essential book with the same shaping to compliment the image and glued this in place. I trimmed the coordinating insert down, adding the blank piece to the inside of this card.
    inside
    I created the final card to make a feature of the printed image on the cardstock. I simply cut it to fill the front of a 6x4" card. I added the border strip to fill the space beside the robin and ground the sentiment. I glued the sentiment tag on foam pads, with a silver ribbon bow tied as a finishing touch. For the inside of the card, I carefully trimmed the insert down to include the message and border.
    inside
    Mx

    Thursday, 16 November 2017

    Angel's Wings

    • Hunkydory cute Christmas luxury card collection: Angel's Wings
    • Hunkydory second little book of Christmas
    • Hunkydory essential book of Christmas sentiments
    • silver mirri card
    • ribbons
    •  6x6", A5 & 6x4" landscape white card blanks
    For the A5 card, I mat and layered the patterned cardstock onto silver mirri. I then arranged the image and coordinating frame onto foam pads in the main section of the card. I added a bow to the sentiment tag and glued this in place on the printed border.

    Using the other sheet of cardstock, I created this 6" square card. I cut mirri card to cover the card front and added the patterned cardstock on top, with the border across the base. I interlocked the frame and image topper to create a more interesting shape and glued this into place. I added an essential book sentiment in the corner to complete the card.

    For the other 6x6" card, I pieced together the starry border from one sheet and the other starry patterned cardstock to cover the card front. I added a border strip to cover the join, (as there wasn't one in this collection, I took a spare one from another set which was similar to the printed border on this cardstock). To create the topper, I used the coordinating image from the little book and glued the frame on top. I then carefully trimmed away the excess little book page which was overhanging the frame, so the image appeared to sit neatly within the surround. I glued this onto the card front with foam pads for dimension.
     
    Using the printed images of the angels on the cardstock, I made two 6x4" cards. I cut the cardstock to fill the card fronts. I then chose ribbons to sit in the space beside the angels and secured this in position before I glued to the card blank. I then simply tied bows in the same ribbons and attached to the cards to embellish the selected messages.

    Mx