Showing posts with label friend. Show all posts

Tuesday, 18 February 2020

mice time to celebrate.


  • My favourite things- it’s a mice time to celebrate (stamps & dies)
  • Lawn fawn- happy birthday border lawn cuts
  • Prima- free spirit paper 
  • WeR memory keepers- love 2 craft papers
  • Copies- C00,1,2,4. R000,00,20,21,81. RV34. BV00,11. B00. BG53. YG11,21,41.
  • Memento dye ink pad-tuxedo black 
  • Wink of Stella brush pen- clear
  • 6” square card blank


I picked a main patterned paper to act as a background. I added a strip of dark polka dots, layered with a yellow pattern. I also used the dark paper to die cut my greeting. I layered all these and glued onto the card blank. I then stamped, coloured and die cut the cute mice images. I used 1mm foam on one mouse and 2mm foam on the other to create more dimension. I added sparkle to the Pom poms, to finish.

I’m entering the Simon says Wednesday ‘use 2 or more pattern paper’ challenge blog, I’m so glad I did too. I don’t use my patterned papers much but the background paper really makes the card.

Mx

Friday, 19 July 2019

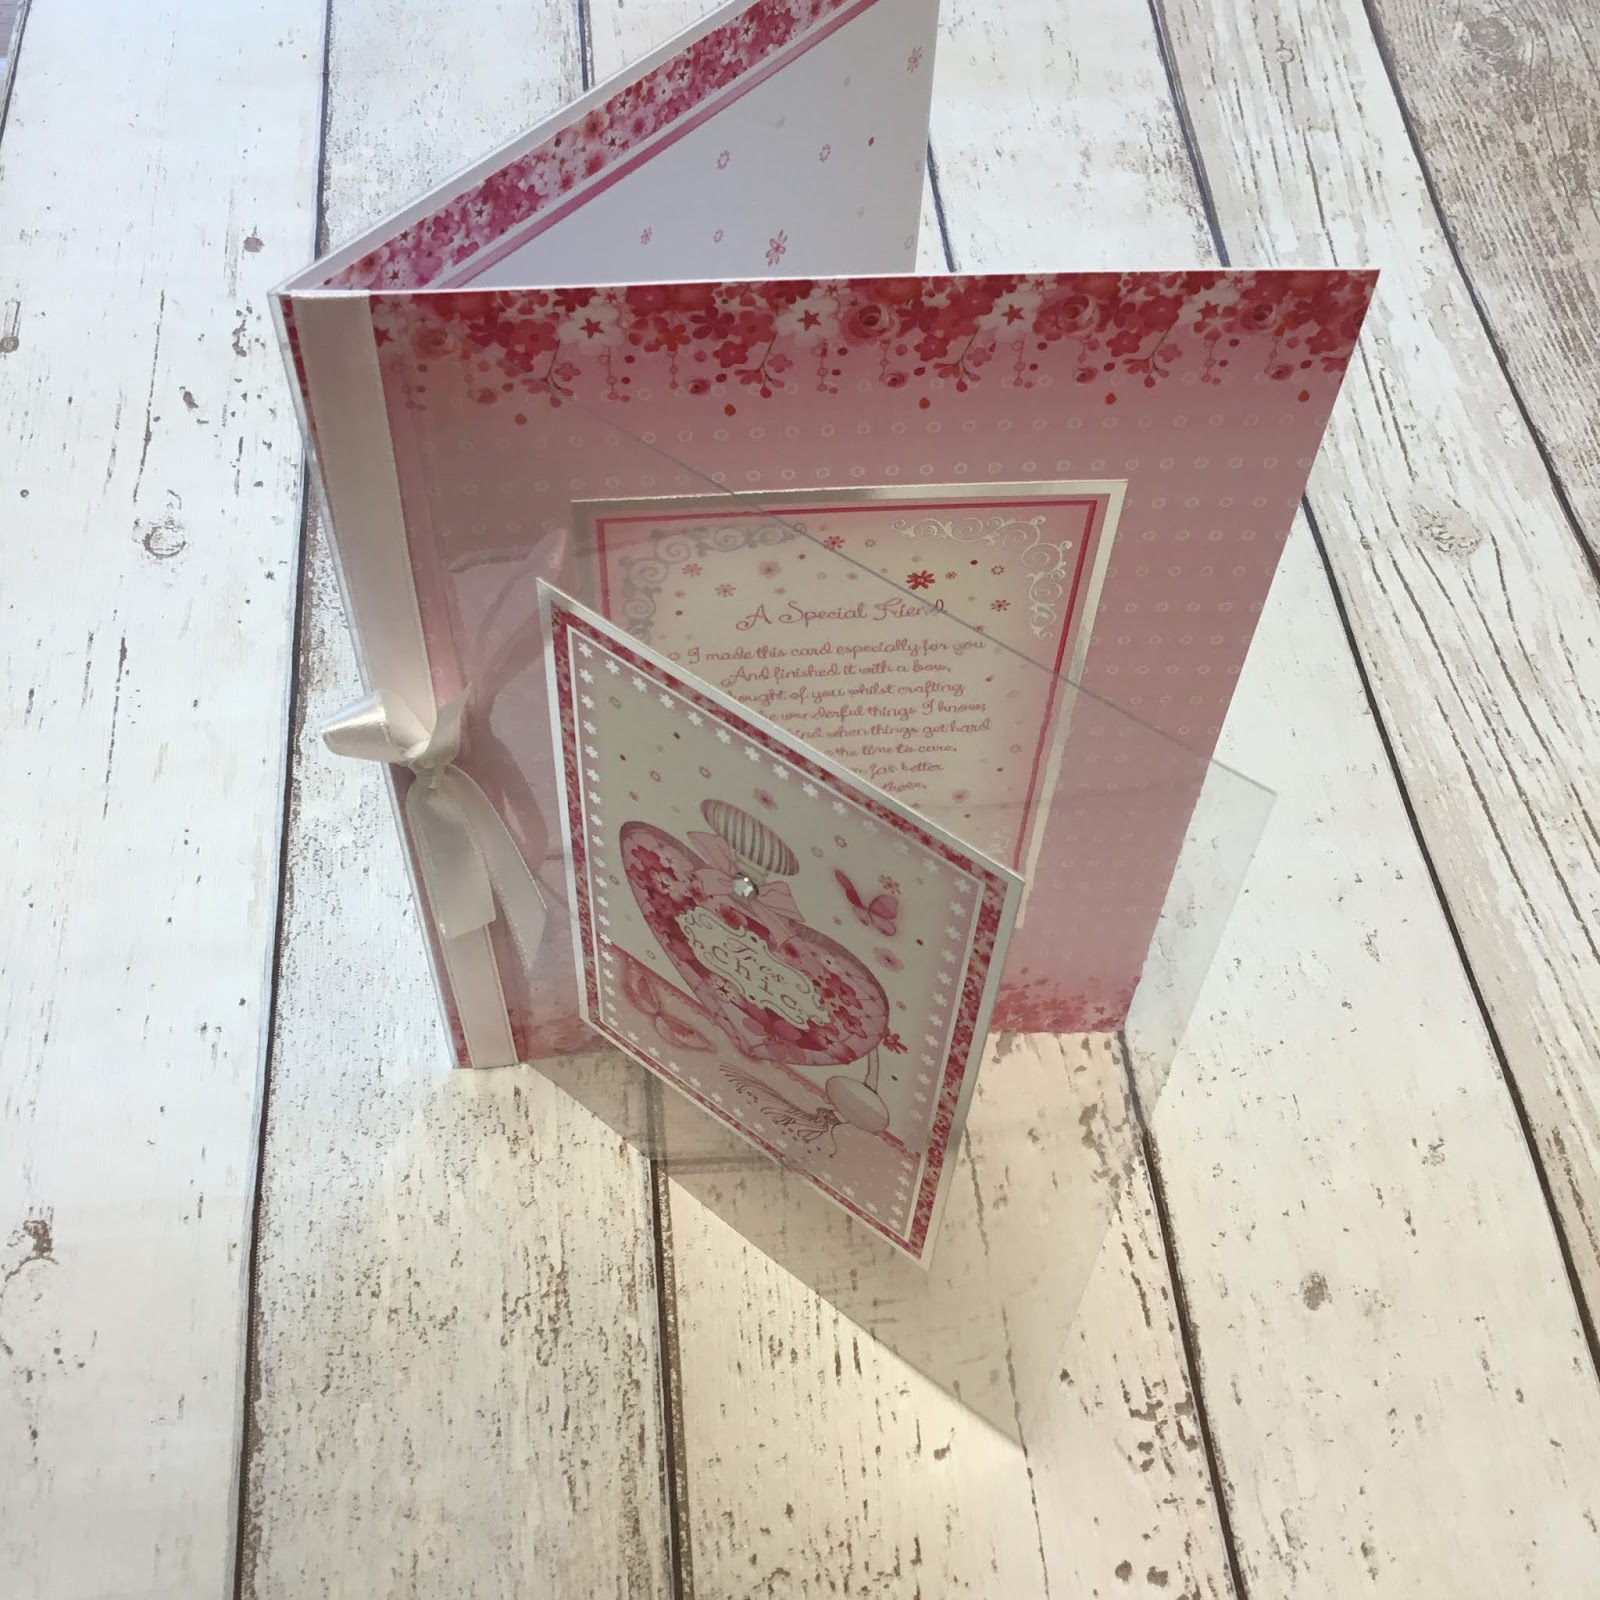
Chic 60th


So I wanted to make a special card for a friends 60th birthday. I instantly thought of using the hunkydory window to the heart postcard collection. I used the a special friend toppers, matching paper and insert. 
 
 
I folded an a5 cardblank and covered the front with patterned paper. I scored a piece of a4 acetate in the centre, then on one side scored a second line 2.5cm away. I creased the folds, added a couple bits of tape in the folded strip and glued it to my card blank. I wrapped some white ribbon around the card front and acetate to cover the glue, then tied in a bow. 
 
 
I trimmed the picture side of the insert to fit the inside of the card. I stamped my 60th sentiment and added some glitter pen to add sparkle. I trimmed the greeting side of insert to be the same size as the toppers.
 
 
I glued the first topper in position on the front of the card blank. I positioned another on top of the acetate in line with the one on the card front. I then used the insert greeting paper to cover the glue on the reverse of the acetate. As a final touch, I added a stick on gem to the perfume bottle.
 
Mx


Thursday, 1 February 2018

mason jar of flowers


  • Stamping Bella: mason jar of flowers
  • Lawn fawn: cross stitches rectangle stackable 
  • Paper smooches: friend word die
  • Memento 'tuxedo black' ink pad
  • Neenah classic crest card
  • Copic: R81, 83& 85. RV00. BG0000, 70. C00, 1 & 2. Y15, 17 & 38. YG03 & 25
  • Gold mirri card
  • Yellow and gold bakers twine
  • Kraft 4x6" card blank
 
I die cut a panel of white cardstock using the cross stitch die for detail. I stamped the floral image in the bottom corner and coloured with copic markers. I die cut the word friend from gold mirri card and glued this on to the panel. I glued my panel to the card blank, and tied some bakers twine around the top tied in a bow to finish.
Mx

Thursday, 23 November 2017

Robin and Friends

  • Hunkydory Christmas classics luxury card collection: Robin and Friends
  • Hunkydory little book of snowy scenes
  • Hunkydory essential book of Christmas sentiments
  • gold mirri card
  • A5, 7x7" & 5x7" white card blanks
 
For the 7 square card, I mat and layered the card front with gold mirri and the red printed cardstock. I then glued the image topper down flat, just above the centre on the card front. I added the frame surrounding the image and placed a sentiment beneath, raised on foam pads. I cut the insert sheet, with the coordinating image, down to fit inside the card.
inside
 
I created this 5x7" card using the printed image as the main feature. I trimmed the cardstock down and layered onto gold mirri to fit the card front. I finished it with a large decorative essential book sentiment. I added the insert to the inside, cut down to include the printed message.
inside
 
Using the other sheet of cardstock, I made this 5x7" card. I covered the card front with the cardstock, featuring the robin printed in the corner. I then positioned the image topper in the space above and nestled the sentiment beside the printed robin. The insert was trimmed down, so the inside matched the card front with a nice sentiment.
inside

I made the final card using the remaining cardstock and a complimentary little book image. I covered the A5 card blank with the cardstock. I then mat and layered the little book page onto gold mirri to create a topper. I added this to the card using foam pads, along with small sentiment from the collection. I used the other half of the insert sheet to finish the inside of this card.
inside

Mx

Sunday, 5 November 2017

Champagne chic

  • Hunkydory especially for her luxury card collection: champagne chic
  • Lawn fawn custom craft dies: happy birthday border & Finley's 123's
  • Avery elle custom steel dies: a tag for all die
  • gold trimmed pink organza ribbon
  • Gold mirri card
  • A5 & landscape 5x7" white card blanks
For the first A5 card, I used the lady in the little black dress topper with the black frame and coordinating cardstock to create my design. I cut the cardstock down to fit the front with a mat of gold mirri card. I then positioned the topper image and glued this flat. I added the frame and sentiment, raised up on foam pads. I finished the card with the coordinating insert, trimmed to fit inside.
inside
I used the remaining rose cardstock as a background for the pink lady. I cut a mat of gold mirri to cover the card and trimmed the rose cardstock as a layer, but didn't glue this down. I die cut the happy birthday sentiment from gold mirri card. I then laid everything in position and wrapped the ribbon around the cardstock in place and secured at the back. I then glued the cardstock onto the card front. I glued the sentiment and image topper in place. and finished with a ribbon bow.
Using the other cardstock from the collection, I created another A5 card. I cut the mat and layer of gold mirri and patterned cardstocks to fit the front. I then diecut the '50' and birthday sentiment from gold mirri. I arranged these onto the card along with the two ladies topper and rose frame. Once happy with the design, I glued the die cuts and image down flat and raised the frame up on foam pads. For the inside, I trimmed the coordinating insert down to fit neatly.
inside
 For this 5x7" card, I made a feature of the printed image on the remaining cardstock. I trimmed the top border from the cardstock, layered onto mirri and glued to the inside of the card. I then cut away the card front to reveal the panel inside. I cut the image section down to fit the card front, on a mat of gold mirri card. To complete, I glued the friend sentiment from the collection in the space beside the ladies, using foam for dimension.
inside
Mx

Thursday, 7 September 2017

party girl

  • hunkydory tots to teens card collection: party girl
  • hunkydory tots to teens little book
  • hunkydory essential book of 2016 sentiments
  • Tattered lace- 'large numbers' dies
  • gold mirri, pink, teal and black adorable scorable cardstock
  • pink ribbon
  • A5 (black), 8x8", 5x7", 6x6", 6x4" card blanks
For the 8" square card, I cut down a piece of patterned card to matt on gold mirri for the front of the card. I added the large image topper and positioned the sentiment topper to overlap. I added the matching insert to complete the inside too.

inside

I used the spare border from the cardstock to trim the top of this 6x4" card. I used some teal cardstock beneath and added coordinating ribbon to cover the join. I then placed the little image topper with the sentiment tag staggered on the front. I added a bow tied in the same ribbon to cover the hole in the top of the sentiment tag to finish.


 Using the remaining off-cut of patterned cardstock, I made this simple 6x4" card. I covered the front with gold mirri and trimmed the cardstock down to layer on top. I completed the design with a sentiment topper glued on with foam pads.


I designed this card using the circle image topper and a coordinating sentiment. I layered these onto soft pink cardstock, trimmed with a piece of the balloon cardstock below. I covered the join between the two cardstocks with the sentiment border from the collection.
I used the remaining border to add a sentiment to this simple card. I used more of the soft pink card to matt onto the card front. I layered the little book image with gold mirri card and centred this on the card front, before adding the border across.

I made this A5 card using a black card blank to bring out the little black dress on the topper. I cut the balloon cardstock to leave a small edge of black on the card front and gutted the centre to save the cardstock which would be covered by the topper, before gluing onto the card. I matted a little book page onto gold mirri, then layered onto black cardstock to create the topper. I completed the front with a '21' die-cut from the same gold mirri card and added a section of insert to finish the inside.


inside
I used a strip of the remaining balloon cardstock to create a decorative border on a square card. I edged the balloons with gold mirri next to the little book image and completed with a coordinating sentiment from the essential book. I had enough cardstock and little book pages to make 2 more of this design to complete the collection.
Mx

Sunday, 25 June 2017

Sabrina loves the spa!!


  • Stampin bella- uptown girl 'Sabrina loves the spa'
  • Paper smooches- 'friend' word die
  • Lawn fawn- scalloped rectangle stackables
  • Memento 'tuxedo black' ink pad
  • Neenah classic crest cardstock
  • Copics- E50,51,21&93. Y12,E31,34,35. R81,83,85. BV000,00,01,02. YG17,21,23,25. Y19. B000, BG70. C00,0,1. W00,1,2,3,4&5. 0
  • Lilac dot pattern paper
  • Funky foam

I covered the card blank with the patterned paper. I then die cut a panel of white Neenah cardstock, using the scalloped rectangle to create the topper. I stamped the image onto the panel, making sure there was room for the 'friend' beneath. I then coloured the image using copics. I positioned the 'friend' die and cut the word out of the panel, making sure I saved the inner parts to complete the letters. I added foam to the back of the panel and glued this onto the card. Finally, I carefully added the pieces to complete the letters. I think die cutting the letters out of the panel creates a fun twist on a simple but effective card design.
 
Mx
 
I would like to enter the following challenges: