Showing posts with label yellow. Show all posts

Thursday, 1 February 2018

mason jar of flowers


  • Stamping Bella: mason jar of flowers
  • Lawn fawn: cross stitches rectangle stackable 
  • Paper smooches: friend word die
  • Memento 'tuxedo black' ink pad
  • Neenah classic crest card
  • Copic: R81, 83& 85. RV00. BG0000, 70. C00, 1 & 2. Y15, 17 & 38. YG03 & 25
  • Gold mirri card
  • Yellow and gold bakers twine
  • Kraft 4x6" card blank
 
I die cut a panel of white cardstock using the cross stitch die for detail. I stamped the floral image in the bottom corner and coloured with copic markers. I die cut the word friend from gold mirri card and glued this on to the panel. I glued my panel to the card blank, and tied some bakers twine around the top tied in a bow to finish.
Mx

Thursday, 30 November 2017

O Holy Night

  • Hunkydory Christmas classics luxury card collection: O Holy Night
  • Gold mirri card
  • A5 & DL card blanks
For the first A5 card, I cut the cardstock down to cover the card front. ( I have saved the other half of the sheet to use with another topper or little book image later!!) I then simply added the image and sentiment toppers on foam pads for dimension. I trimmed the coordinating insert down to fill the inside of the card and add the little printed verse to finish the card.
inside
 I created the DL card to make a feature of the printed panel on the second sheet of cardstock. I simply cut this to fill the card blank and placed the little sentiment over the printed border.
For the final card, I mat and layered the remaining cardstock onto gold mirri for the front of the A5 card blank. Again, I very simply glued the image and sentiment toppers in position using foam pads. I also cut the insert down to add the matching background and message to complete the card.

inside

Mx

Wednesday, 25 October 2017

star of wonder

  • Hunkydory cute Christmas luxury card collection: star of wonder
  • Hunkydory essential book of Christmas sentiments
  • Hunkydory adorable scorable cardstock
  • gold mirri card
  • red & white bakers twine
  • 8x8" & 6x4" landscape card blanks
I used the largest topper with the scalloped frame to make this 8" square card. I covered the card blank with the coordinating coloured adorable scorable card. I then mat and layered the yellow cardstock from the collection onto gold mirri card, to create a base for the toppers. I positioned the image and frame central to the mat, with the image raised up on foam pads. I then completed the front using the scalloped sentiment overlapping in the bottom corner, again glued with foam pads. I trimmed down the matching insert to fit the inside of the card.
inside
For the first 6x4" card, I used the oval toppers. I covered the card front with the cardstock featuring the border strip. I then layered the toppers on, slightly overlapping with different depths of foam to create dimension.
I created the second 6x4" card to feature the printed image on the remaining cardstock. I simply matted the cardstock onto gold mirri card, to fit the front of the card blank and finished with an essential book sentiment.
Using the other sheet of patterned cardstock, I created the final card. I trimmed down the section with the characters to fit the card front. I then added two strands of bakers twine and wrapped them underneath the cardstock and secured in position, before gluing to the card blank. I finished the card with a tag sentiment from the essential book, angled on foam pads and embellished with a twine bow.
Mx

Thursday, 10 August 2017

yellow roses

  • DCWV fresh floral stack 12x12" paper pad
  • sentimentally yours 'elegant milestone birthdays' stamp
  • do crafts papermania stamp set (mum stamp...lost the packaging so I cant be certain)
  • archival 'sepia' ink pad
  • 7x7" kraft card blank
I chose this paper as the focal point for the card. I fussy cut the flowers and leaves from the background to fit the card front, making sure they remained connected as one piece. I took the remaining paper for the background and trimmed this to size as a matt on the card front. I then stamped the paper with the two sentiments, carefully positioned to sit together with the floral paper cut piece. Once the pieces were ready, I glued the paper flat onto the card blank, then added the flowers using foam pads to create dimension. It's fiddly work to fussy cut an image like this, but I think the results feel special enough to be a worthwhile celebration for a special someone's big birthday!
Mx

Friday, 26 May 2017

Butterflies


  • SU!- butterflies thinlit die
  • SU!- cottage greetings
  • Wilted violet distress ink pad & aubergine dream pixie powders
  • Peacock feathers distress ink pad & teal wash pixie powders
  • Fossilized amber distress ink pad & straw yellow pixie powders
  • Watercolour cardstock
  • White glitter cardstock
  • 4x6" card blanks

I used a combination of ink and pixie powder on watercolour cardstock to create three different coloured backgrounds. I squished ink onto my palette and diluted with some water. I brushed this onto the cardstock, sprayed with more water and added a sprinkle of powder. I blotted the excess water and paint at the edges, before drying with a heat tool for speed. I then used distress inks to stamp a sentiment onto each background. I also coloured the outer edges of the card blanks to coordinate, using blending foam and the distress ink pads. For the main feature, I die cut butterflies from glitter cardstock. Finally, I layered each of the backgrounds onto the card blanks then glued the butterflies in position.

I would like to enter the following challenge:
Paper players - cas butterfly

Mx

Friday, 14 April 2017

gift wrapped...


  • LOTV- gift wrapped
  • My favourite things- stitched scallop basic edge die
  • Sentimentally yours- elegant milestone birthday
  • Patterned paper- country companions 'for someone special'
  • Memento 'tuxedo black' ink pad
  • Neenah classic crest cardstock
  • Copics- W3,1,00. R000. Y18,17,15,13. V17,15,12,0000. R85,83,81. YG13,11.
  • Sakura- glaze pen #849, clear star glitter pen #700
  • Wink of stella 'clear' glitter brush pen
  • Yellow and gold bakers twine
I die cut my patterned paper to create a decorative edge, then trimmed it down to fit the card blank. I then positioned my sentiment and image stamps beneath according to the sketch. I coloured my image with copics, then used glitter and glaze pens to accent the image and sentiment. Finally, I glued the paper down and added twine tied in a bow. I think it's a lovely image and colour combination for a big Easter time birthday!
 
Mx
 
I would like to enter the following challenges:
Simon Monday says: hip hop
Simon Wednesday says: spring color inspiration
freshly made sketch #283

Tuesday, 7 March 2017

Happy hedgehogs


  • My favourite things- happy hedgehogs (stamps & dies)
  • My favourite things- stitch rectangle scallop edge frame
  • SU!- crazy about you
  • SU!- dots for days
  • Tim holtz 'fossilized amber's distress ink pad
  • Memento'tuxedo black'ink pad
  • Neenahclassic crest cardstock
  • Copics-E41,42,43,44,47,59. E35,37,39. YG63,67.
  • Kraft cardstock
  • Sakura 'clear star' glitter pen
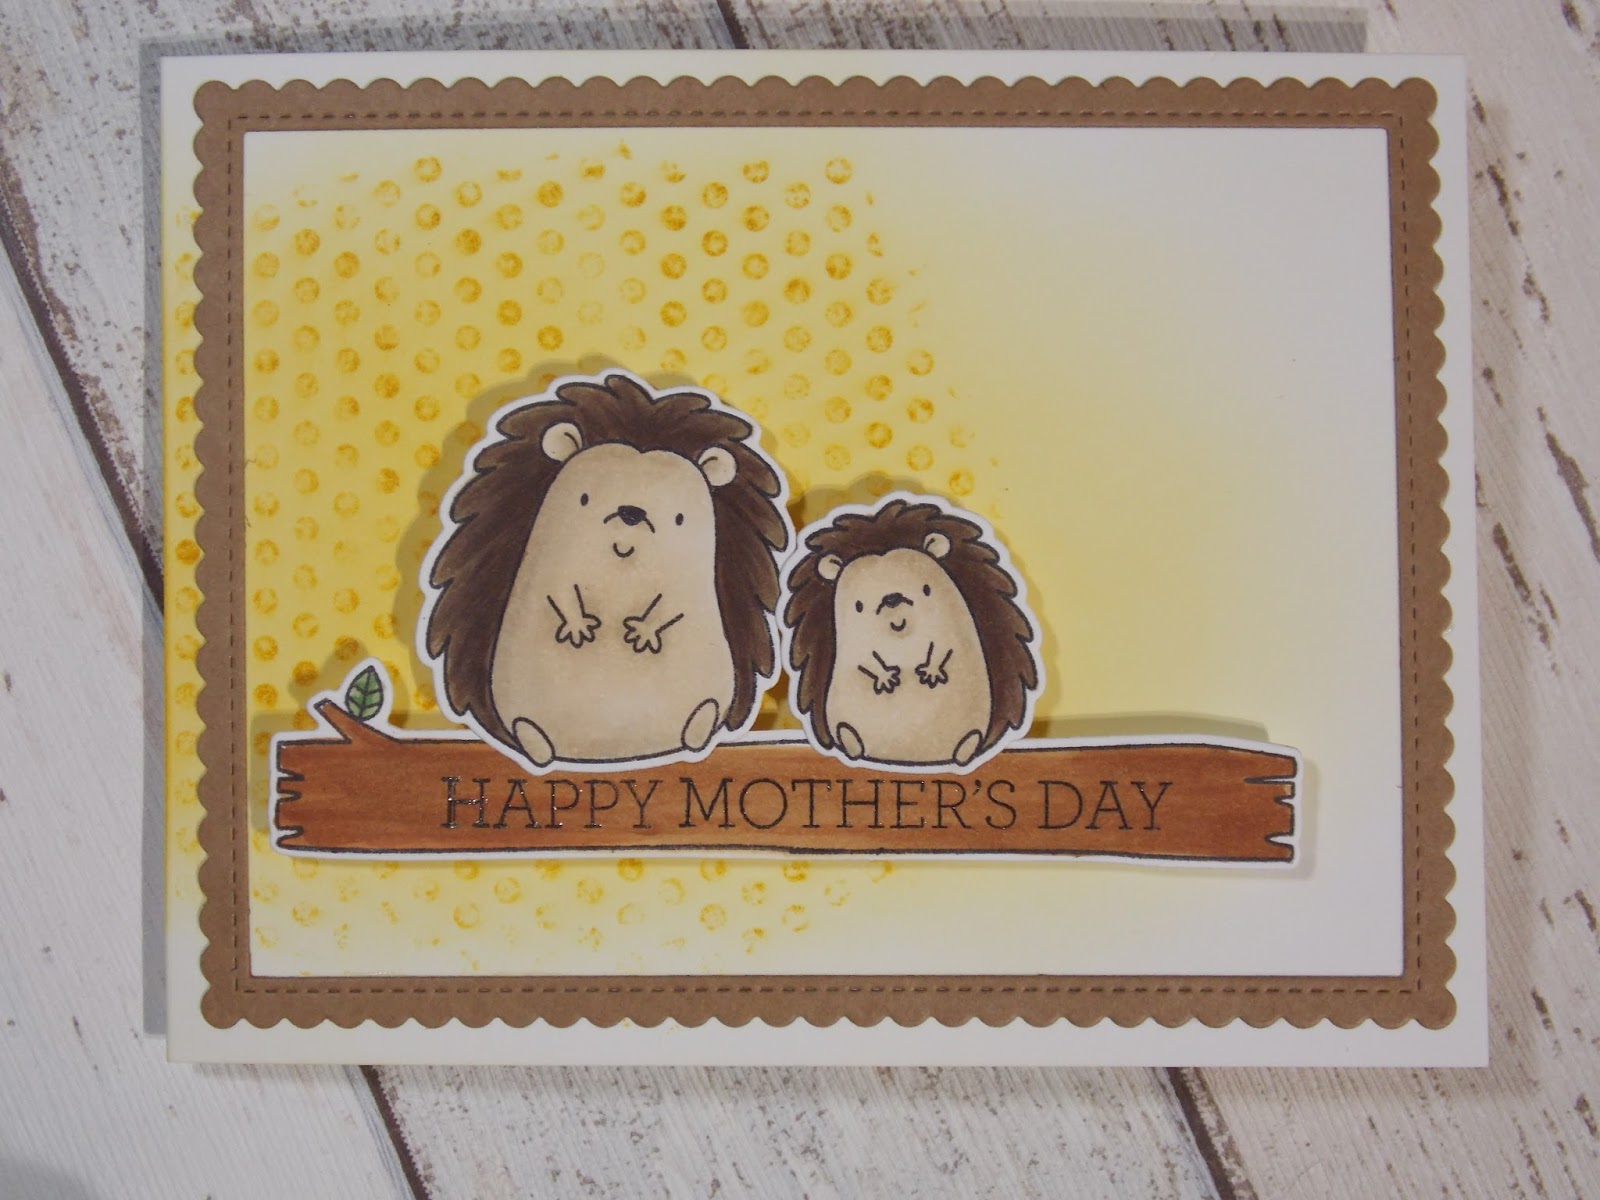
I stamped a portion of the dot background stamp at the folded card edge, then blended some amber ink over the front of the card blank with darker colour concentrated over the dots. I diecut a Kraft card frame and glued this onto the card front. I stamped, coloured and diecut the hedgehogs. To create the extended log, I inked up the stamp but not right to the end and stamped. Next, I masked off most of that log, inked up the stamp again leaving the end, lined it up with open mid section of the log and stamped again. I then coloured the log with copics and diecut. To diecut this, I lined it up and taped in place leaving one end hanging off the edge of the plate and run through the diecut machine. I repeated this for the other side. Using foam tape for dimension, I glued the log and hedgehogs in place. To finish I added glitter pen to the sentiment.
inside
For the inside of the card, I diecut a smaller Kraft frame and glued to the inside. I stamped coloured and diecut a little hedgehog to sit above the sentiment. For the sentiment, I stamped with two colours by first inking the smaller part of the sentiment in yellow, then adding black ink to the larger part of the sentiment, (using the edge of the ink to get it neat and in just the right places). Another option would involve some stamp surgery to carefully cut apart the stamp, which makes it easier to stamp both pieces separately in different coloured inks. Beware though, as you must be careful not to damage your stamp when cutting and need to ensure the sentiment lines up again on the page when stamping!
Mx

Challenge i would like to enter:
Simon 'monday' says - " make your own background"

Thursday, 2 March 2017

Brynn has a baby shower

  • Stamping bella- Brynn has a baby shower
  • Neenahclassic crest cardstock
  • Memento'tuxedo black'ink pad
  • Copics- E50,51,21,93. E34,35,37,57,59. BV0000,000,01,02,04. Y18,15,11. R24. BG70. W00,1,3.
  • Yellow embossed dot & lilac cardstock
To create this card, I covered the card blank with the dotty card. I then cut a matt of white for the stamped image and a layer of lilac card stock. I stamped and coloured the image before adding to the card following the sketch. I added a coordinating banner stamped with a sentiment to complete the card.
 
Mx
 
I would like to enter the following challenge:

Thursday, 2 June 2016

sunflowers and sentiments ...


  • LOTV- sunflowers
  • sentimentally yours- elegant milestone birthdays
  • script background stamp (not sure on the brand)
  • daler rowney aquafine smooth water colour cardstock
  • archival 'jet black & coffee' ink pads
  • tim holtz distress ink pads
  • American crafts twine
  • sakura 'clear star' glitter pen

To make this card I cut a piece of card slightly smaller than my card front. I inked the background with yellow and added some brown around the edges. I stamped some script over the piece to create a background paper. I cut a smaller second panel of card and stamped this with my image and sentiment. I then water coloured the image using distress inks. I added glitter to the sentiment and bee wings. I wrapped twine around the edge of the panel and secured it with a knot. I used foam tape to glue my panel to the card front to add dimension.
 
Mx

challenges I would like to enter:
paper players #297 (yellow, twine, birthday)
sketch Saturday #414

Monday, 25 April 2016

friend...

 
  • SU!- whisper white ink pad, distress dots background stamp, bold butterfly framelits & butterflies thinlits
  • paper smooches 'friend word' wise die
  • 6x4" kraft card blank
  • coral and yellow cardstock
  • white funky foam
  • yellow & white bakers twine
  • neat & tangle clear sequins
I stamped my card blank to create a white dotty background. I added some yellow twine towards the bottom of my card. To do this, I wrapped it around the card blank twice and tied a knot. I die cut the word friend twice, once in some coral cardstock and once in funky foam, then glued both of these layers together to create dimension. I glued this sentiment onto the card blank underlined by the twine. I die cut the solid butterfly in a yellow cardstock, then used a detail butterfly die (in the same size) to cut the coral layer. I glued these together just in the centre (leaving the wings loose to add more dimension), then added them to my card design. The final touch was a few sequins as sparkly accents.
 
 I have finally found a liquid glue that is brilliant to use!! I used the tombow mono multi liquid glue to stick down everything on this card.
Mx
I would like to enter this card into the following challenges:
freshly made sketches- #233
simon says Wednesday- 'make it girlie'


Friday, 12 February 2016

just for you...


inside
  • black 6x4 card blank + white cardstock
  • SU! botanicals for you
  • archival (jet black) ink pad
  • tim holtz distress ink pads (abandoned coral, fossilized amber, tumbled glass and shabby shutters)
  • wink of stella (clear)

I cut two mats of white card to fit my blank. I then stamped the main sentiment into the centre of one. Using the various coloured inks, I stamped the flowers to create a background framing the sentiment. I also added a flourish of them in the corner of the second mat along with a sentiment for the inside of the card. I then glued the mats onto the card blank. The final touch for the card was some glitter to emphasise the sentiment. I think these messages and the flowers are great for all sorts of occasions and the flat design also makes it perfect for posting!!
 
I would like to enter this card into the following challenge:
Mx

Sunday, 6 December 2015

flowers for you !!


inside

  • 4X6" black card blank
  • white stamping cardstock
  • sizzix circle and scalloped circle dies
  • SU! mum's love
  • archival ink pad: jet black, watering can, carnation red, rose madder, venetian orange, chrome yellow.
  • wink of stella- clear
  • SU! sassy salutations (for inside)
I 2-step stamped the flowers on a mat of cardstock and glued this to the card blank. I stamped my greeting and die cut it into a circle, then matted this on to a scallop circle. I added glitter to the 'for you'. finally I added this topper to my card using foam, (you could just glue this straight down to keep it flat for posting!!)
 
for the inside of my card I cut a piece of cardstock to fit and stamped a flower in the bottom corner. I stamped my sentiment and added a final touch of glitter over the sentiment.
Mx
 
challenges I would like to enter are:

Monday, 23 November 2015

starry trees ...


  • 4x6" white card blank, red cardstock and white marker cardstock.
  • SU!- polar party
  • lawn fawn - starry backdrops
  • memento ink pad (tuxedo black, cantaloupe)
  • promarkers (cocoa, moss, pear green, berry red, tulip yellow, sunflower, ice grey 1)
  • wink of stella - clear
I cut all my mats to follow the sketch. I stamped the focal image and sentiment then coloured it. I added sparkle to the baubles and stars. I stamped the stars in yellow for the band. Finally, I stuck all the layers down.
 
Mx
 
challenges I'd like to enter are:

Tuesday, 11 August 2015

fruity!!


I have decorated some tea towel as a gift and felt they needed some packaging.
 I cut 2 pieces of white card to 14x19cm, I used them as a guide to fold the 2 towels neatly and to the same size. I next made a label I cut a 14x4cm piece of cream card, I used coffee archival ink pad and the SU! skinny mini alphabet. then I cut a 35x5cm band of kraft card, this was scored at 15cm, 16.5cm, 31.5 & 33. glue is placed on the left over 2cm flap, the label  is added to one of the long sections and a handmade stamp added to the 2nd. the final thing to do was stack the tea towel, wrap the band around and glue the flap to join the band. I put the finished item into a card bag and sealed it, to keep the tea towels nice and clean.
 
check out how I made these tea towels, on my other blog here...

Mx


Wednesday, 25 February 2015

two by two...

  • 6 x 4 kraft card blank craftwork cards digi cardstock and yellow pearl linen cardstock
  • SU! 'two by two' stamp
  • memento ink and promarkers
  • a brown button and twine
 
I decided to create a vibrant, gender neutral baby card and thought this Noah's ark stamp would work well with the kraft and yellow colour scheme. Following the sketch, I cut my cardstock on an angle to create my mat and layers. I stamped the image (not inking the sentiment attached) and coloured this with promarkers. I then cleaned the stamp and inked only the sentiment this time. this was cut into a banner shape and layered onto more yellow. I curled the edge for a bit of dimension before gluing down all of my layers onto the card blank. the finishing touch of a button tied with twine was added to complete the sketch.
 
Mx

Friday, 13 February 2015

my magnolia valentines ...

 
I created these two valentines cards using magnolia 'tilda' stamps coloured with promarkers. I have added sizzix die cut letters for the messages and the hearts. I inked the card blanks with tim holts distress ink and stamped the background for added interest. I also used an embossing folder for the circle layer on the love card. I used stickles to add glittered accents to the bee wings and cosmic shimmer pearlescent paint and a silk edged organza bow to the love card. The love envelope and insert was also stamped with the hearts background to match the card.
 
 
Happy Valentines day all,
 
Mx

Sunday, 1 February 2015

coffee kraft...

 
I folded a kraft card blank in half and stamped the splatter background ( French foliage by SU!) in memento (rich cocoa) ink. I then cut a piece of white digi cardstock and stamped positively chevrons from SU! using tim holtz (mustard seed) distress ink, using the remaining ink to create a softer shade between the chevrons. I wrapped twine around this panel tied in a knot on the front. This was then stuck to the card blank using foam pads for dimension.  Finally, I stamped the coffee cup (perfect blend by SU!) using memento ink. I stamped it twice, colouring one brown with copics and adding the message to the other with a cream background using promarkers. I then cut out the images to decoupage the cream sections onto the complete brown cup. I stuck this onto the card to complete the cas(e) this sketch challenge.
 
Mx

Wednesday, 14 May 2014

fairy friends ...

 
stamps: friends forever from lili of the valley and for my family by stampin up!
inks: memento ink pad (tuxedo black), tim holtz distress ink pads (shabby shutters and warm lipstick) sakura micron pen and promarkers
cardstock: craftwork cards digi cardstock and a 5x5 card blank
extras: self adhesive pearl and liquid pearls (white opal)
 
I chose a cute fairy image to make a birthday card for my sister. I cut the matt to fit the card blank and doodled my border using the sakura micron pen. i then stamped the image and coloured it using the promarkers (to match the paper players colour challenge). I used the tim holtz distress ink to colour the card blank and added my matt. I hand shaped a banner with the sentiment stamped on, then glued it onto the card and embellished with an adhesive pearl. the final touch was some liquid pearls on the wings and the antennae for that extra magical feel.
 
challenge #195


'fairies'
 
'add pearls'
Mx

Friday, 25 April 2014

sun and rain to make it bright again !!

had trouble with the camera, my apologies for the picture quality !!
stamps: watering the flowers from lili of the valley
inks: memento (tuxedo black) and promarkers
cardstock: Bo bunny 6x6 paper pad (ambrosia collection), 6x6 kraft card blank, kraft cardstock and craftworks digi cardstock
dies: large paper doily sizzlits from stampin up used with the bigshot from sizzix

I cut the first paper as a matt to fit the cardblank. the second paper was cut into a banner by hand, to layer on top. I die cut some kraft card to create a doily to lay between the papers to follow the sketch. the topper was stamped onto digi cardstock with memento ink and coloured using promarkers to match the papers. this was matted onto another piece of kraft card and added to the card. I think this is a nice simple design that really makes the most of the pretty papers and cute LOTV image, perfect for a summer birthday !!
 
freshly made sketch #133

yellow/ lemon
birthday
 Mx

Saturday, 29 March 2014

something for spring ...

stamps: vivid vases, Madison avenue, teeny tiny sentiments from stampin up!
inks: tim holtz (picked raspberry & peacock feathers) ink pads, memento (tuxedo black) ink pad, promarkers
cardstock: craftwork cards digi cardstock plus 6x4" card blank
dies: finishing touches edgelits, stylish stripes embossing folder from stamping up! & sizzix using the big shot
 
   I cut the cardblank with a decorative edge die to reveal the inside, where I placed an embossed panel of card. I inked the front of the card with pink, then  stamped a repeat pattern with the block to create a background to place on the front of the card. for the topper, I stamped the image onto cardstock, (I chose not to ink the attached message, replacing this with a separate mothers day sentiment). the image was coloured using promarkers, then cut to shape and a matt inked in pink to edge the topper. I stuck this to the front of the card, carefully lining it up and only adding tape to the overlap so it didn't attach to the inside too!! I  edged the paper piece inside with a line of pink using a fine tipped promarker (you could matt and layer for a similar effect). the finishing touch was two inked pieces of card, which I shaped into banners and layered onto the embossed card inside. this adds interest and a pop of colour to the inside of the card and completes the chosen sketch. I think it makes for a nice bright card that could work equally well for a birthday or thankyou if you swap the sentiment!!
 
open view


Mx