Showing posts with label cars. Show all posts

Thursday, 25 January 2018

motoring classics


  • Hunkydory charming chaps 'motoring classics' luxury card collection 
  • Silver Miri cardstock 
  • White card blank
  • Bakers twine (docrafts)
  • Su! Large numbers framelit dies
 To make this card i used the sketch as a starting point. I chose the cardstock with the image in the bottom corner. I trimmed to size, just smaller than my card blank. I added a coordinating baker's twine to create a band, securing it at the back of the piece of card and tied a knot at the front for added detail. I matt and layered onto a piece of miri, cut to the same size as my cardblank. I glued both layers to the front of my 5x7" cardblank. I diecut the big '50' from some silver Miri card for the sentiment, and added it to my card using foam tape. To finish the card I added the coordinating insert to the inside of my card.


 To make this card I simply Matt and layered the remaining cardstock onto some more Miri, cut to fit the front of a 7x7" cardblank. I chose the layout of my toppers and sentiment and glued it all in place, using different depths of foam tape for dimension. Finally I added the coordinating insert to complete my card.

Mx

I would like to enter the following challenge blog:

Tuesday, 24 October 2017

driving home for Christmas

  • Hunkydory snowy season luxury card collection: driving home for Christmas
  • Hunkydory essential book of Christmas sentiments
  • A5 landscape & 6x6" card blanks
I created this landscape A5 card using the large topper from the collection. I cut the patterned cardstock in half and removed the snowy border. I then cut the striped border from the remaining half a sheet of cardstock. I added the main piece of cardstock to the front of the card and trimmed off the end of the card blank to reveal the inside of the card. I then added the other matching border inside the card, to sit neatly in the reveal. I used half of the decoupage layers on foam to add dimension to the topper. To complete the card front, I simply positioned the topper image along with an essential book sentiment raised up on foam pads.
For the second card, I made a feature of the printed image on the cardstock. I trimmed down the cardstock to fit the front of a 6" square card. I then layered on the coordinating border across the top, raised on foam. I also layered the car with the remaining decoupage pieces to give this dimension and mirri accents. I completed the card with the sentiment topper from the set in the space above the car and the insert trimmed to fit inside.
inside
I felt the best use of the toppers in this decoupage style collection was to make two nice cards. I still have a full sheet of cardstock left over from this collection, which I will use later with either the little book images or some extra toppers from other collections.
Mx

Friday, 1 September 2017

just married

  •  hunkydory special occasions luxury card collection: just married
  • silver mirri card
  • A5, 6x6" & 7x7" card blanks
 
For the first card, I took the plainer half of one cardstock sheet and matted this onto the A5 card blank. I then positioned the topper image and frame on the front, with the 'just married' letter hearts arranged below and glued down with foam pads.
 

I created a 6" square card using the image on the remaining cardstock as a focal point. I simply trimmed and layered onto silver mirri to fit the card front. I added the sentiment topper on foam to complete.
 
 
For the 7x7" card, I used the remaining toppers and cardstock to create a softer look. Again, I trimmed the matt of cardstock down, layered onto mirri and glued to the card front. I added the centre image topper and frame, finished with the sentiment in the top corner.  


Mx

Friday, 18 November 2016

classic car...


  • papermania- nostalgia classic cars stamps
  • SU!- for my family
  • my favourite things- line up dots background
  • kraft & black cardstock
  • archival 'jet black' ink pad
  • black funky foam
  • black gems
I masked off an area of my card blank and used the large background stamp to add pattern to my card blank. I also stamped the sentiment straight onto my card blank. I stamped a car image onto some kraft cardstock and matt & layered with some black cardstock. I glued black funky foam to the back of the cardstock, then glued it onto my card to give dimension (you could also use foam tape, or glue it flat). the final touch was 3 self adhesive black gems, to finish the sketch layout. I added a birthday sentiment to the inside of this card, but it could easily be changed to a father's day card too!!
Mx
 
challenges I would like to enter:

Monday, 13 June 2016

sunday drive...

  • lawn fawn- stitched rectangle stackables & louie ABC'S
  • hunky-dory- little book of manly moments
  • black & kraft cardstock
  • black funky foam
 
to make this super quick 'fathers day' card...I used a sheet from the little book (with a car image) to cover the front of a black card blank. I created a frame using the stitched dies from kraft cardstock and glued this on to my card. I die cut the letters from both kraft cardstock and black funky foam, to spell dad. I glued these layers together to add a dimensional element on to my card.
I took the inside of the die cut frame and stamped a fathers day greeting. I glued this to the inside of my card, to create a finished look and somewhere nice to write.
 you could easily use a different image and die cut words, to change the look of this card for other occasions.
Mx

challenge I would like to enter:
simon says: father's day/ for a guy

Monday, 15 June 2015

speedy...


this card was quick and easy to make, the simple colour combo makes this card effective and quite stylish!!
I generally forget to take a picture of the inside of my card, so I included a picture of the insert this time...

insert
  • black and kraft 6x4" card blank
  • archival ink pad (jet black)
  • papermania- nostalgia classic cars by john byrs
  • SU!- guy greetings
  • SU!/ sizzix- little letters thinlits
cut the kraft card into a mat to fit the front of a 6x4" card blank and stamp the main image in the centre. lightly draw a pencil line at the bottom corner of the card, where the letters will be. tape the last letter down and die cut it , then move on to the middle and beginning using the pencil as a base line to keep it all level, (don't forget to rub out the pencil once you've finish!). fold the black card blank and attach the stamped and die cut panel using foam tape for dimension
 cut a 2nd mat to fit the inside of the card, stamp this with a sentiment and tape down inside the card blank.
 
 
Mx

Saturday, 16 August 2014

merry chirstmas man !!

 
stamps: loads of love from stampin up!
inks: memento ink pad (tuxedo black), archival ink pad (olive), promarkers, copic and sakura micron pen
cardstock: 6x4 landscape kraft card blank, neenah desert sand (for the matt) and red paper from my stash 
 
I stamped the truck into the corner of my matt and coloured it in using my promarkers and copic pens. I then masked off the truck to add the tree in green, using the stamp-a-ma-jig to line it up so it sits inside the truck. following the sketch, I also stamped the message directly onto the matt. to complete the design, I added a freehand border using my sakura micron pen and then matt and layered with red onto the card blank. I think this simple but quirky card works perfectly for a more masculine take on Christmas. 

Seize the sketch # 26
 
Mx

Friday, 25 April 2014

sun and rain to make it bright again !!

had trouble with the camera, my apologies for the picture quality !!
stamps: watering the flowers from lili of the valley
inks: memento (tuxedo black) and promarkers
cardstock: Bo bunny 6x6 paper pad (ambrosia collection), 6x6 kraft card blank, kraft cardstock and craftworks digi cardstock
dies: large paper doily sizzlits from stampin up used with the bigshot from sizzix

I cut the first paper as a matt to fit the cardblank. the second paper was cut into a banner by hand, to layer on top. I die cut some kraft card to create a doily to lay between the papers to follow the sketch. the topper was stamped onto digi cardstock with memento ink and coloured using promarkers to match the papers. this was matted onto another piece of kraft card and added to the card. I think this is a nice simple design that really makes the most of the pretty papers and cute LOTV image, perfect for a summer birthday !!
 
freshly made sketch #133

yellow/ lemon
birthday
 Mx

Thursday, 16 January 2014

simply mini ...

 
stamps: papermania nostalgia classic cars clear stamps
inks: archival (jet black) ink pad
cardstock: black and kraft cardstock, kraft 6x4" card blank
I cut a mat in kraft cardstock and layered it on to some black card. I then stamped my chosen car design (the Austin mini cooper) onto the kraft square, using black ink. I stamped the sentiment on to a piece of kraft and cut in to a banner shape (leaving space for an embellishment to be added later) , then I matted this layer on to black cardstock.  i glued all the layers together, then finished by adding a button. you can also change the stamped image for anything the man in your life may like such as football, fishing, DIY, etc.
 
 
Mx

Monday, 16 December 2013

one for the gents ...


stamps:  'for the gents' hunky-dory stamps and 'abc- 123 sketch alphabet and numbers' and 'for the family' by stampin up!
inks: tim holtz distress ink pad and archival ink pad (jet black)
card: 6x4 card blank, craftwork card digi cardstock and kraft card
other: inkssentials glossy accents, simply gorjuss bakers twine and stampin up! punch extra large petite pennants

I saw this sketch and thought it would be perfect for a car themed card with the bunting. I used the car stamp to create a background on kraft card. I then distress inked the card blank and some other white card to turn it blue. this was used to punch out the pieces for the bunting and cut out the banner. I cut a further piece of kraft to layer onto the blue banner. these were stamped with the sentiments and added to the card. I used a piece of twine to join the bunting and finish the design, using some glossy accents. I think the sketchy style of the lettering and cars work well with the simple design and limited colour palette for this card.
 
seize the sketch #10
 
Mx

Sunday, 15 December 2013

toot toot !!


stamps: positively chevrons from stamping up!, toot toot and for him sentiments from LOTV 
inks: promarkers, tim holtz distress ink pads and memento (tuxedo black)
other: 6x6 card blank, craftworks cardstock, oval punch from stampin up!, sizzix oval die cut shape and twine
 
I made this nice, bright birthday card for my granddad, as he loves cars. I thought this LOTV image would be perfect for him. I coloured it with promarkers and coordinated the background in distress inks. the backing paper was inked and then stamped with the chevrons in the second shade of green. following the sketch, I added a message in an oval punch and 3 strands of twine across the backing paper. the ovals and card were edged in brown distress to stand out. the twine was fixed behind the chevron paper for a neat finish, with the topper stuck down using foam pads. I think the bold pattern of the backing paper and the colours work well together for a fun, masculine feel.
 
mojo Monday #323
 
'include a sentiment'
 
Mx

Saturday, 26 October 2013

a krafty car !!

 
stamps: nostalgia classic cars from docrafts papermania (by john byars), for my family from stampin up!
punch: chevron border punch from stampin up!
ink: archival (jet black)
cardstock: kraft & black, kraft 6x4 card blank
 
 I decided to make this card based around the sketch below. I chose a car stamp, to go with the chevrons in the design. I used a kraft card and a dark accent for the colour scheme, since brown was the colour challenge on ribbon girl, it seemed to fit  perfectly with the masculine feel. I kept the look clean and simple, (to add to the no fuss manly theme) by not distressing the edges.
'sketch 29'
 
'October colour challenge- brown'
 
Mx
 

Friday, 31 May 2013

boy oh boy!!

 
so news this week is that I joined facebook, finally. a friend asked me to make a card for a car mad 2 year old boy... so when I saw the monthly challenge on LOTV I figured it was perfect!! Love this cute little stamp, think it works really well with the bright colour scheme for the little ones. the banner is a great way to personalise the card with a name.  

 
paper was taken from DCWV all about boys stack, various punches from stampin up! the image was of course from LOTV (little lorry bear) and coloured using promarkers. all other bits of cardstock used are digi cardstock from craftwork cards and coloured using to promarkers to coordinate.
 
Mx

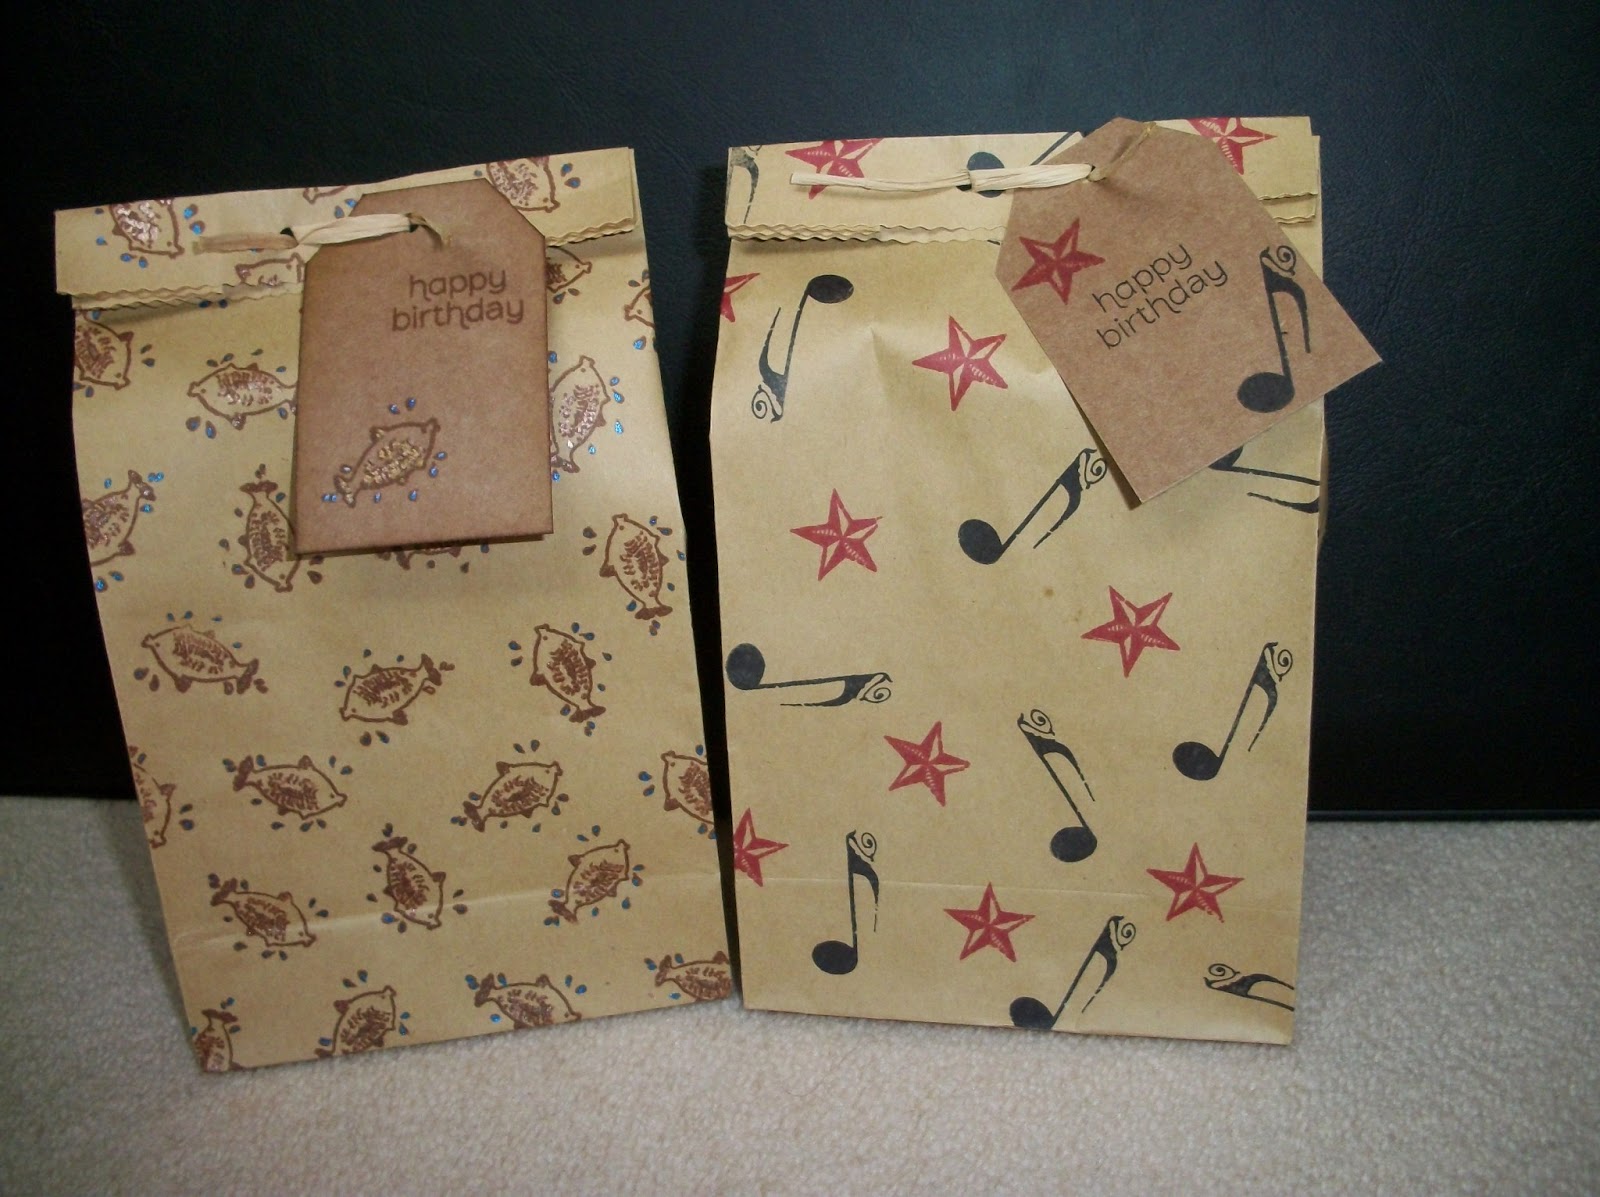
bags of fun !!


ive made birthday gift bags for some loved ones that i thought i would share with you all. i filled this one with a handmade soap and a flannel with a coordinating wrap. i think it makes a nice little gift, with the bag and tag adding the handmade, personal touch. 

i bought these kraft bags and cut the tags from kraft cardstock to match, tied on with rafia. i simply stamped the bags front and back and decorated the tag to match. all of the stamping is done with archival coloured inks and some of the bags have extra detail i hand-painted using cosmic shimmer iridescent water colour paint. the happy birthday message on the tags is from the made for you stamp set by stampin up!.

you can use any of your stamps and pick the colour scheme to suit the person its for. its up to you what you fill them with. some of these have handmade soaps, but others have shop bought smellies. so dont worry if you cant make it yourself there are plenty of places to buy lovely handmade treats. you could even put chocolates or other goodies in and size the bag accordingly.


the good life forever friends clear stamps and inkadinkado rockstar clear stamps 
papermania nostalgia classic cars clear stamps and pigeon from gorguss girls 
stampin up! summer solstice and mixed bunch stamp sets 

im sure the person you send it to will appreciate the thought that has gone into it 
Mx

Wednesday, 17 April 2013

Beep Beep!!

 
thought i'd share this fun little card....I love that everything comes from one stamp set. kept the design simple with a touch of embossing and some matts using up offcuts of coloured paper to bring it all to life.
 
i used  transport travels stamp set designed by Kirsty Wiseman, memento ink pad and digi cardstock by craftworkcards. I coloured the stamped design using promarkers. the blue was embossed with the stripes embossing folder from stampin up! the other layers were plain coloured cardstock, cut to shape. messages were added from the same stamp set to finish the design off.
 
Mx