Thursday 15 December 2016

christmas couple ...


  • LOTV- topper ( just randomly found one in my Christmas crafting box from a few years ago)
  • LOTV- classic Christmas 8x8" paper
  • HOTP patterned paper
  • 6" square card blank & grey cardstock
  • Wink of stella 'clear' glitter brush pen

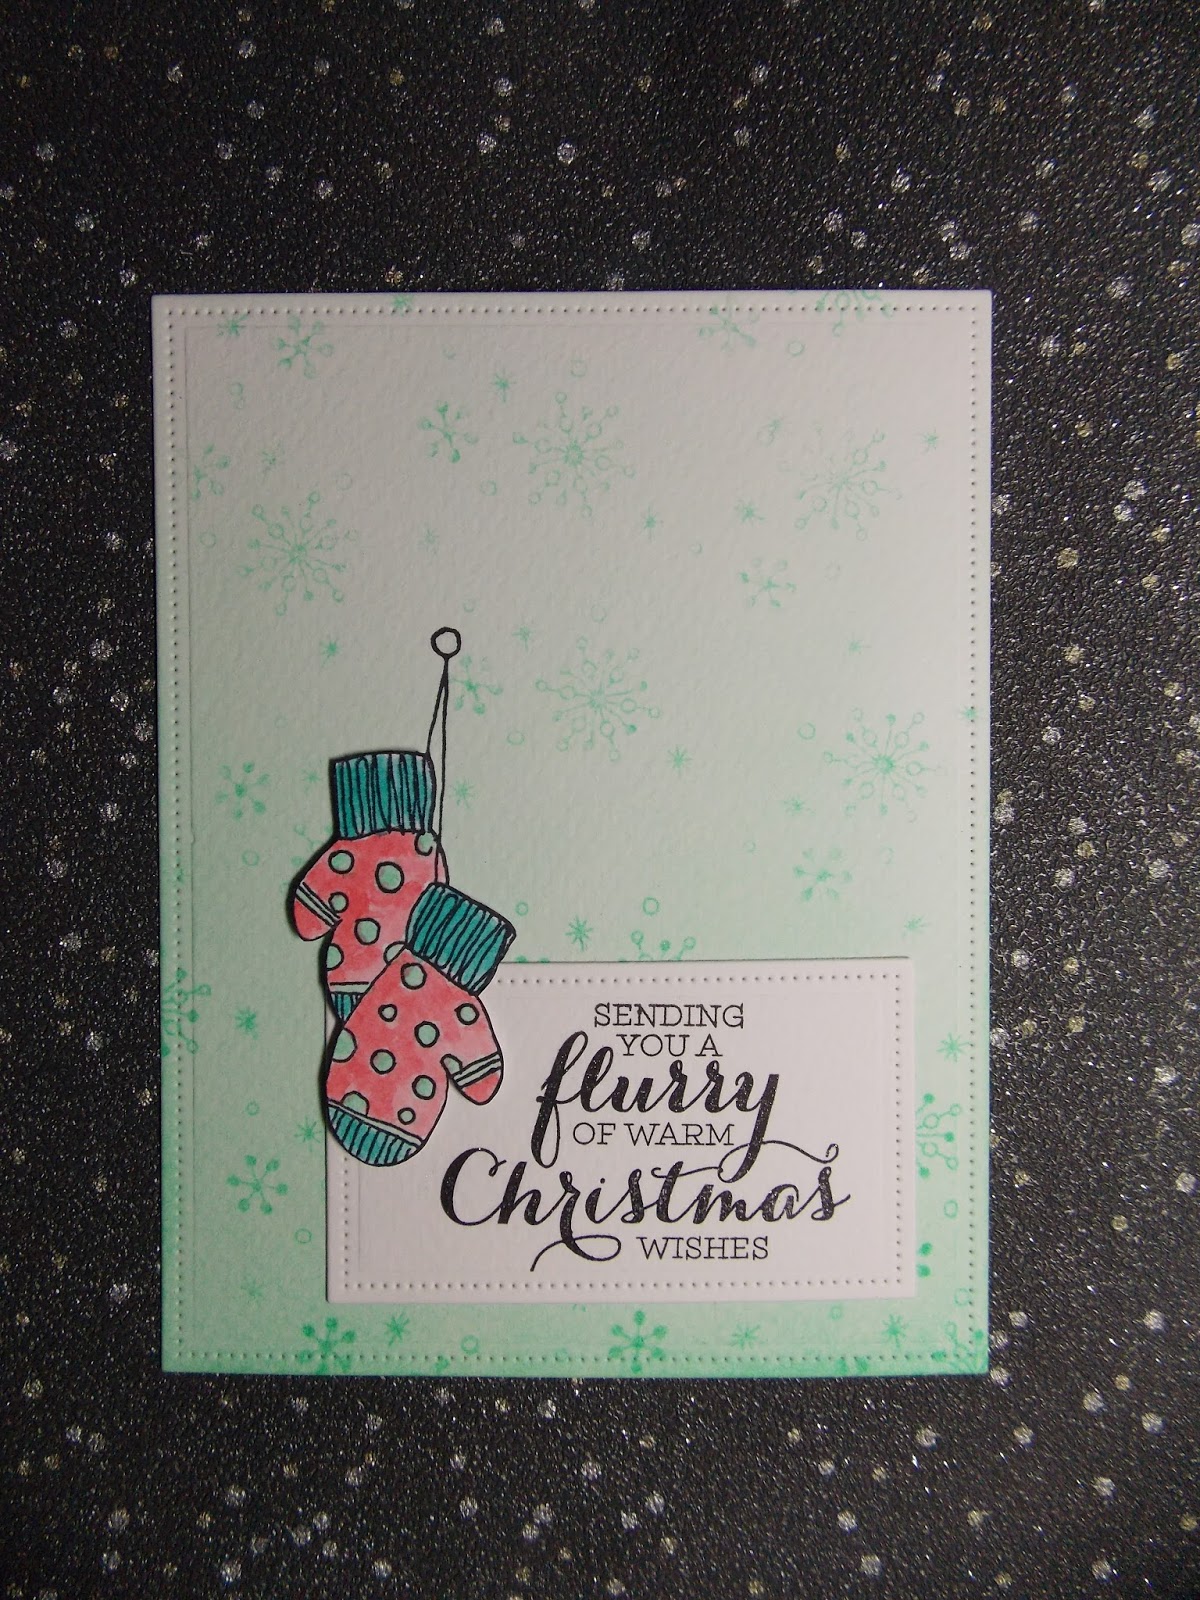
I found a nice old topper in my stash and decided to create a super quick and simple card. Following the sketch, I cut pieces of coordinating paper to size. I  matt and layered with grey cardstock and used a corner punch to round the edges, to match the topper. I glued all the pieces onto my card blank and added a bit of glitter pen.
Mx

Challenges I would like to enter:
Sketch Saturday #442
ABC Christmas challenge

Wednesday 14 December 2016

shoe perfect...

 
  • Do crafts artiste acrylic paint - iris & metallic silver
  • Studio paint - charcoal black
  • Tim holtz 'terminology' tissue wrap
  • Anna Marie designs - flowers & embellishments
  • Black satin ribbon
I covered the mdf shoe blanks with tissue wrap. I then coated them with the lilac paint. I drew the line to create the platform area and painted below the line with silver edged. I edged this with a black line of paint, ensuring it lined through on all sides when the pieces were assembled. To complete, I tied bows and created an arrangement of flowers, then used hot glue to secure them in place.


As this was made as a gift, I created a box for it using black cardstock and two sheets of acetate. Once opened, it can be used to display cards and hold photos, or just placed out on display as home décor.
 
Mx
 
challenge I would like to enter:

Santa wishes...


  • SU!- Christmas wishes
  • Archival 'vermillion' ink pad
  • Memento 'tuxedo black' ink pad
  • Copic- E50,51,21. C1,00.
  • Hotp patterned paper
  • Baker's twine

I stamped the image using red and black ink. I then used my copics to colour the face and add shading to the beard. To complete the sketch, I added patterned paper to the front of the card blank and matted the image panel onto some coordinating green paper. I wrapped bakers twine around this panel and glued it onto the card, using foam tape for dimension. I wanted to keep this one really quick and simple since Christmas is almost here and I haven't made enough cards yet!!
 
Mx

Challenges I'd like to enter:
Freshly made sketches #267
ABC Christmas 'y for yikes & z for zoom'

Tuesday 13 December 2016

special skating couple...


  • LOTV stamp - 'ice skating'
  • circa design stamp - 'wd-gr-22'
  • lawn fawn dies- dotted rectangle stackables
  • copics markers- E40,41,42,50,51,21,55,57,59&93. R24,27,46. YG61,63,67. C00,1,3,5,6,7,&8.
  • tim holtz distress ink pad - 'evergreen bough'
  • memento ink pad - tuxedo black
  • Neenah classic crest solar white cardstock
  • wink of stella - clear
  • 6 x 4 card black
I die cut a panel to fit on the front of my card blank. I then stamped the image and sentiment, following the sketch. I also stamped the image onto a post it and fussy cut this to create a mask. I then used the mask to protect the image whilst I added a distress ink background behind the figures. I removed the masks and coloured the image with copics. I finished with wink of stella on the girl's fur trims and the ground for a touch of snowy sparkle. Finally, I added my matt onto my card blank to complete a simple Christmas card perfect for a couple.
 
Mx

Challenges I would like to enter:
simon Wednesday says: 'ice inspiration'
cas(e) this sketch #201
the ribbon girl December challenge - 'anything goes'
LOTV facebook challenge - 'winter'


Monday 12 December 2016

coral christmas ...


  • Lawn fawn dies- 'dotted rectangles stackables'
  • Tim holtz distress inks- 'cracked pistachio', 'abandoned coral' & 'peacock feathers' 
  • SU! Stamp sets- 'perpetual birthday calendar ' & 'flurry of wishes ' 
  • Paper artsy JOFY stamp- 'jm29'
  • Archival ink pad - 'tuxedo black'
  • Watercolour cardstock 
  • 6x4 card blank 
  • wink of stella glitter pen - 'clear'

I die-cut a panel of cardstock and inked it with an ombre effect. I stamped little snowflakes all over to complete the background, using 2nd generation towards the top portion for a softer colour. I stamped and die-cut my sentiment. I then stamped my image once onto the background and once onto some spare cardstock. I water-coloured the image using distress inks and fussy cut it out. I used a black brush marker on the cut edges to define them. I then added them onto the card using foam, making sure they lined up with the strings to look as though they were hanging. I added glitter to the flurry & Christmas words to complete.

Mx
Challenges I would like to enter:
freshly made sketches #266
simon Monday says: let there be snow

Friday 9 December 2016

don't forget the gifts...

 
  • mdf blank
  • ranger studio paint
  • ranger glue n' seal - matt
  • tim holtz tissue wrap
  • golden gel medium - matt finish
  • adhesive backed felt pads

As the memo blocks from last year were a success and appreciated by those who received them as a gift, I decided to make another this year. I painted the inside of the mdf blank with grey. For the outside, I selected pieces of tissue wrap to add a butterfly to each side of the box. I shaped, glued, then sanded the tissue pieces to cover the outside. I then gave the box a coat of paint to soften the print. I used purple to add a wash of the recipients favourite colour. I sponged a small amount of black on the edges. I added a protective seal using the golden gel medium and felt pads on the base to protect work surfaces from scratches. The right size of white memo pad was purchased on ebay to sit inside, along with a couple of small pencils wrapped in the coordinating tissue to finish it off. 


As before, I packaged the memo block in kraft cardstock and acetate, with a hand stamped wrap ready for gifting.

I would like to enter the following challenge:
  
Mx 


Thursday 8 December 2016

letter rack...


  • mdf blank
  • ranger studio paint- traditional tan & stable brown
  • ranger glue n' seal - matt
  • tim holtz tissue wrap
  • golden gel medium -matt finish
  • adhesive backed felt pads
I made this letter rack using an mdf blank coated with some cream paint. I selected tissue wrap to cover the outer faces of the rack. I cut the pieces roughly into shape and glued them into place, sanding the edges once dry for a neat finish. I then coated the box with another layer of cream, to dull the print of the tissue giving a much softer look. I finished the edges using a small amount of brown paint applied with a sponge. This creates a distressed vintage feel to enhance the paper print. To seal the piece, I coated it with the gel medium. I added felt pads to the base to prevent the rack from scratching work surfaces.
 
  • Kraft & cream cardstock
  • SU! skinny mini alphabet stamp set
  • archival ink pad - sepia
  • red lining tape
  • acetate
As this one was made as a gift, I also created customised packaging using Kraft card. I made the box the perfect size to hold the letter rack snugly and provide some protection from knocks. The window of acetate provides a sneaky peek at what's inside, with the lettering on the band to let you know what it is. I think it provides a professional finish, with that extra attention to detail that makes it feel crafted rather than just 'homemade'... as well as making it easier to wrap up for Christmas !!
 
I would like to enter the following challenge:
 
Mx

Sunday 4 December 2016

celebrate with cake


  • SU!- endless birthday wishes 
  • Lawn fawn- large dotted rectangle & circle stackables 
  • Lawn fawn- stitched scalloped borders 
  • SU!- metallics glitter tape 'silver'
  • Memento 'tuxedo black'ink pad 
  • SU!- 'bermuda bay' ink pad
  • Copics- BG49,23,32. R85,83,81. E43,42,41.
  • Sakura 'clear star'glitter pen 
  • White ribbon 
  • White cardstock 
I die cut a panel of cardstock to fit a card blank and stamped my sentiment in black. I then created a background by stamping a dot image all over in blue. I added an edge of blue to the panel using my copic. I then cut some glitter tape to the length of my card, shaped it with a small scalloped edge diecut and glued on to my card. I coloured my ribbon with pink copic pen for a perfect match, then tied it around my panel and secured it with a bow. For the topper, I stamped my cake image and coloured with copics. I diecut this into a circle and edged it with the pink copic. I added my background panel to a card blank, then placed the topper on using foam pads and finished with glitter pen to add sparkle to the candles.
 
Mx
 
challenge I would like to enter:
simon Wednesday says 'anything goes'

Friday 2 December 2016

'o' christmas tree...


  • SU!- polar party
  • SU!- petite pairs
  • SU!- oval & scalloped oval punch
  • HOTP patterned paper
  • Memento 'tuxedo black' ink pad
  • Neenahclassic crest cardstock
  • Promarkers- pear green, moss, cocoa, berry red, lipstick red
  • Wink of stella - clear & gold
  • Kraft &white cardstock

Mat a piece of patterned paper onto the card blank. Cut a mat of white cardstock, stamp and colour the image. I added glitter to the image for some sparkle. stamp and punch out the sentiment. layer onto a scalloped punched oval. cut a piece of coordinating paper and trim into a banner shape. glue onto the card blank following the sketch.
Mx


Monday 28 November 2016

perfectly patterned presents !!

  • paper artsy JOFY 'jm30' rubber stamp
  • paper smooches wise dies -Christmas words 2
  • lawn fawn lawn cuts - small cross- stitched rectangle stackables & small cross- stitched circle stackables
  • HOTP patterned paper
  • vellum
  • white glitter cardstock
  • 6x4 white landscape card blank
  • archival jet black ink pad
I cut the white glitter card to fill the front of my card blank and gutted it. I then added a matt of patterned paper which I had die cut using the stitched edge. I cut a circle of vellum using one of the stitched edge dies. I also die cut the sentiments from white glitter cardstock. For the image, I stamped the presents onto several different papers, which coordinated with the background matt. I then fussy cut these out and paper pieced them together, to give the effect of different wrapping on each of the presents. I then assembled all of the pieces onto the card blank, following the sketch layout and glued down to complete the card.
 
Mx

I would like to enter the following challenge:
freshly made sketch #264
simon Wednesday says 'Christmas to doe for'
abc Christmas challenge 'x is for... criss cross'

Sunday 27 November 2016

coral congratulations ...

  • paper smooches wise dies 'congratulations'
  • stampin up! 'love & laughter' stamp set
  • kraft 5x5 card blank
  • white cardstock
  • funky foam
  • memento tuxedo black ink
  • tim holtz distress ink 'abandoned coral'
I took a piece of white cardstock and created an ombre effect with the coral distress inks. I then backed the card with funky foam before die cutting the sentiment out 3 times. On the card blank, I stamped the cake and engagement sentiments using the black ink. I then glued the congratulations on top to complete the sketch.
 
Mx

I would like to enter the following challenges:
cas(e) this sketch #199
simon monday says 'trio-tastic'

Monday 21 November 2016

pups with presents...

 
  • LOTV- pups with present
  • circa design- sentiment stamp WD-GR-22
  • lawn fawn- large stitched rectangle stackables
  • my favourite things- stitch rectangle scallop edge frames
  • Neenah desert storm cardstock
  • archival 'jet black' ink pad
  • prisma color pencils- dog1:941,946,947,948. dog2:1070,1072,1074,1076,935. red:923,924. green:1090,911. present:1089,920,950. white:938,1060.
  • sakura '01' micron pen
  • sakura '#849' black glaze pen
  • uni-ball signo broad 'white' pen
  • doodlebug 'lily white' glitter
  • black & red cardstock.
 
I die cut a panel of Neenah cardstock and stamped my image and sentiment in the centre. I coloured my image using prisma colour pencils. I highlighted the dogs eyes and noses on my image using a glaze pen. I added on some snow in the background using a white pen. Since I lost some of the details and the outline whilst colouring, I relined the image using a black pen. For extra sparkle, I used tombow glue to add glitter to the snow. To make my frame, I die cut 2 frames from black cardstock and 1 frame in red cardstock. I layered all 3 together to add slight dimension to the frame. I then added this frame onto the panel. When all the glue had dried, the final step was to glue my finished panel onto my card blank.
Mx
 
I would like to enter the following challenges:

the paper players - clean and simple Christmas
the ribbon girl - November 'use any image' challenge 

puppy with stocking...

 
  • LOTV- puppy with stocking
  • circa design- wonderful Christmas stamp XM-VS-25
  • avery elle- a tag for all die
  • Neenah classic crest white cardstock
  • memento 'tuxedo black' ink pad
  • copics- E59,57,55,53,39,37,35,34. R46,27,24. YG67,63,61. YR21,23. & cool grey markers
  • sakura black '#849' glaze pen
  • wink of stella 'gold' glitter brush pen
  • ranger ice stckles glitter glue
  • gold bells
  • American crafts red bakers twine
 
To create this shaped card I die cut my cardstock into a tag shape. I stamped my sentiment and image, then coloured using copics. I added details to the image using a glaze pen for the dogs eyes and nose, gold glitter on the tinsel and presents, and stickles for texture on the stocking. I used bakers twine to add some gold jingle bells and a bow to the top of my tag. I glued the tag shaped panel onto a card blank, which I had trimmed down to the same size and shape as the tag.
Mx
 
challenges I would like to enter:

the paper players - clean and simple Christmas

magical dragons...

 
  • my favourite things- magical dragons (stamps & dies)
  • SU!- made for you
  • mama elephant- landscape trio dies (before starting this card, i used the cloud die and some template plastic to make a mask)
  • tattered lace- circle dies
  • tim holtz 'tumbled glass & broken china' ditress ink pads
  • memento 'tuxedo black' ink pad
  • copics- V17,15,12. Y38,35. YG25,23,21. RV14,13. E42,41. C00,1. 0.
  • sakura micron '01' pen
  • white funky foam
  • white cardstock
 
I cut a piece of cardstock slightly smaller than my card blank to form a matt. I created a sky background using shades of blue ink and a mask (I created my own mask using the landscape die to form the clouds). I arranged 4 different sized circle dies according to the sketch and die cut them from the matt. I edged each aperture on the matt using a micron pen to create faux stitching. I also stamped a sentiment in the bottom corner of the matt, following the sketch. I temporarily placed my matt onto the card blank, then glued each cut out circle down onto the card blank in its original position. I removed the matt from the card blank and prepared my images.
I stamped, coloured and die cut my dragon images. Since you only see the top half of the dragon and the rest is trimmed off to fit neatly behind the apertures, I only coloured the areas which would be seen. I used the 0 copic marker to add texture/ scales to the dragons. On the reverse of the sky matt, I glued each dragon behind a circle so they were peaking through. I added funky foam (you could use foam tape instead) to the entire back of the matt, then glued in position on my card blank, ensuring all the circles lined up.
Mx
 
Challenges i would like to enter:


Friday 18 November 2016

classic car...


  • papermania- nostalgia classic cars stamps
  • SU!- for my family
  • my favourite things- line up dots background
  • kraft & black cardstock
  • archival 'jet black' ink pad
  • black funky foam
  • black gems
I masked off an area of my card blank and used the large background stamp to add pattern to my card blank. I also stamped the sentiment straight onto my card blank. I stamped a car image onto some kraft cardstock and matt & layered with some black cardstock. I glued black funky foam to the back of the cardstock, then glued it onto my card to give dimension (you could also use foam tape, or glue it flat). the final touch was 3 self adhesive black gems, to finish the sketch layout. I added a birthday sentiment to the inside of this card, but it could easily be changed to a father's day card too!!
Mx
 
challenges I would like to enter:

Tuesday 8 November 2016

Cold hands, warm heart!!

  • LOTV- cold hands, warm heart stamp
  • SU!- wondrous wreath 
  • Lawn fawn- large dotted rectangle stackables 
  • Memento 'tuxedo black' ink pad 
  • Neenahclassic crest cardstock 
  • Copics- snow:C00,01,03. Twig arms:E25,27.carrot nose:Y35,38. Red:R24,27,29. Green:YG61,63,67. Pink:R81,83,85. Blue:BG11,13,49.
  • Tim holtz distress 'tumbled glass & chipped sapphire' ink pad
  • Flower soft 'polar White's
  • Doodlebug sugar coating 'lily white'glitter 
  • Sakura 'clear' glaze pen
I die cut a panel of cardstock the size of my card front. I stamped my image and sentiment, on to this. I also stamped the image onto a post it note and cut it out, to create a mask. I placed the mask over the image, then inked around the top part of the image using blue inks to create a background. I removed the mask and coloured the image using copics. to finish the card I glued the panel onto a card blank, then added glitter and glaze details to the images. 
Mx
 
challenge I would like to enter:

Wednesday 2 November 2016

The Santa Claus....


  • My favourite things - jingle all the way (stamp & dies)
  • SU!- flurry of wishes 
  • Lawn fawn- stitched borders 
  • Tim holtz 'black soot' distress ink pad
  • Memento 'tuxedo black' ink pad 
  • Copics
  • Atyou spica pens- red & gold
  • White cardstock 
I folded a card to make a card blank and inked it black. I then cut a white cardstock panel and added 3 embossed stitched lines using a metal die. I stamped a sentiment below and coloured the letters with red glitter pen. For the image, I stamped, coloured and diecut the Santa and used foam to attach him to the card for added dimension. I repeated the same card with a different santa stamp from the set to create a landscape version of the card.
Mx


Challenges I would like to enter:
Seven hills craft challenge 'favourite Christmas song/movie's (the santa Claus 1994- me and my sister have watched it every year since it come out when we were little)

Saturday 29 October 2016

Crazy birthday!!


  • Tim holtz - crazy dogs & crazy things
  • Lil's inker designs -happy birthday border die
  • Lawn fawn- Finley's 123's
  • Neenahclassic crest cardstock 
  • Memento 'tuxedo black' ink pad 
  • Copics- V17. BG32,34. RV09,55. Y35,38,YR04. C00,02, 08,10. N3,4,5,6,7.
  • DCWV patterned paper (not sure on collection because I've had it years)
  • Wink of stells- gold & clear
  • Ranger glossy accents 
I glued a piece of striped paper to my card blank. I cut a piece of copic friendly cardstock and stamped my images. I die cut a sentiment border along the top edge and the '50' in the bottom corner. I coloured my images using copics then added sparkle with the glitter pens. I glued the panel to the front of my card. The final touch was glossy accents to the nose and eyes.
Mx


Challenge i would like to enter: 


Saturday 22 October 2016

Blue Christmas...


  • Inkylicious- merry Christmas stamp
  • Archival 'jet black' ink pad 
  • Lawn fawn- large dotted circle stackables 
  • HOTP patterned paper 
  • Tim holtz 'tumbled glass' distress ink pad
  • Sakura 'clear star' gelly roll pen
I lightly inked the entire front of my card black. I cut 2 panels of paper in coordinating colours. The largest was cut to 9.5cm x 3.5cm. the second cut to 9.5cm x 2cm. I glued these flat on to my card. I stamped a Christmas greeting on to some white cardstock and diecut into a circle. I also added this to the front of my card flat, to save on postage. The final touch was to add glitter pen to the edges of the matts and the star.
Mx

Challenge I would like to enter:
Freshly made sketches #259
abc Christmas challenge 'u is for... under the pile' (cant remember the last time I used this stamp and the papers are years old, just trying to use up the last scraps)

Birthday wishes!!


  • Pixie powders - aubergine dream & silver dream
  • Avery elle- a tag for all dies
  • SU!- endless (birthday) wishes
  • Watercolour cardstock 
  • Black cardstock 
  • Silver mirri card
I cut a matt of watercolour cardstock and sprinkled on some pixie powders to the top corner. I then sprayed with water and dried using a heat tool. I diecut the birthday sentiment from black and silver card and layered these together to create shadow. I glued the matt on to a card blank made from black cardstock. Finally, I added the diecut sentiment and stamped the 'wishes' below. 
 
Mx


Challenges I would like to enter:

Tuesday 18 October 2016

Sweet rocking horse...

  • LOTV- rocking horse
  • SU!- sweet essentials
  • Memento 'tuxedo black' ink pad 
  • Neenah classic crest cardstock 
  • Copics- skin:E50,51,21,11,93. Teddy:E53,55,57. Rocking horse:W0,1,3,5,6,7. Pink:R81,83,85. Ground:C00,1,3.
  • Lawn fawn- large dotted rectangle stackables 
  • Tim holtz distress ink pad - spun sugar & picked raspberry 
  • Tattered lace- embossing folder (not sure on the design name)
I die cut a piece of cardstock to create my base layer. I inked this using 2 shades of pink, to create an ombre effect background. I then used a embossing folder and my big shot machine to create texture, then I glued this to my card blank. I die cut another matt of cardstock and stamped my image and sentiment. I coloured the image using copics and glued it to the centre of my card.
Mx

I would like to enter the following challenge:

Sweet rocking horse...

  • LOTV- rocking horse
  • SU!- sweet essentials
  • Memento 'tuxedo black' ink pad 
  • Neenah classic crest cardstock 
  • Copics- skin:E50,51,21,11,93. Teddy:E53,55,57. Rocking horse:W0,1,3,5,6,7. Pink:R81,83,85. Ground:C00,1,3.
  • Lawn fawn- large dotted rectangle stackables 
  • Tim holtz distress ink pad - spun sugar & picked raspberry 
  • Tattered lace- embossing folder (not sure on the design name)
I die cut a piece of cardstock to create my base layer. I inked this using 2 shades of pink, to create an ombre effect background. I then used a embossing folder and my big shot machine to create texture, then I glued this to my card blank. I die cut another matt of cardstock and stamped my image and sentiment. I coloured the image using copics and glued it to the centre of my card.
Mx

Friday 7 October 2016

Uptown girl...


  • Stamping bella-mason uptown girl opal the optimist 
  • Sentimentally yours- elegant milestone birthday 
  • LOTV- timeless Victorian paper
  • SU!- finishing touches edgelits
  • Neenahclassic crest cardstock 
  • Memento 'tuxedo black' ink pad 
  • Copics- skin E50,51,21,11,93. Hair E44,43,42.Y21. dress C4. V12,15,17. BG32,34. Dress/bottle YG63,67. Bottle/drink E40,81. Glass BG70. Ground C1,00
  • atyou spica glitter pens - clear, sand and black
  • Clear self adhesive gems and paper flowers (unknown brand)
I took inspiration from the sketch and decided to create an alternative shaped card by cutting the front off at an angle. To do this, I measured 1cm in from two corners on the front of my card blank and drew a diagonal pencil line across to help line up my edge die. I die cut along the line to shape the card with a decorative edge. I cut a mat of paper for both the inside and outside of my card blank and glued them down. I stamped and coloured my image with copics and touches of glitter to create the champagne bubbles and sparkly belt. I then stamped my sentiment onto another piece of card and used my paper trimmer to shape them into rectangles. I matted each of these onto the coordinating paper and glued them to my card, making sure the glue was only on the areas touching the card front and not on the overhang. I added paper flowers in matching colours and clear gems to complete the sketch with a touch of decoration and sparkle.
 
Mx

Challenge i would like to enter:

Tuesday 4 October 2016

Special bouquets...


  • W plus 9- beautiful bouquets ranunculus stamp
  • Sentimentally yours- elegant milestone birthday 
  • Archival 'jet black' ink pad 
  • Daler Rowney- Aqua fine watercolour cardstock 
  • Zig clean color real brush markers- 200,022,025,027,029,036,041,042,043,045,046,052,080&083
  • Black 6x6" card blank
I cut a matt of watercolour cardstock to fit my card blank leaving a small border around the edges. I stamped my flowers in an arrangement using a masking technique to give more depth to the design. I coloured using the zig markers and added water to blend. When I had finished colouring I made sure it was fully dry before stamping my sentiment. 
I have chosen to keep this card looking very crisp, but you could flick some colour on for a more artistic feel or add some gems or sequins for a bit of sparkle.
Mx


The challenge i would like to enter: