Showing posts with label coral. Show all posts

Saturday, 25 June 2022

christening day


  • LOTV: baby christening
  • SU!: inspired events
  • First edition papers ‘blank canvas’
  • Memento ‘tuxedo black’ ink pad
  • Neenah classic crest cardstock
  • Copics: R01,32. RV42. YR30. B41. BG70. YG93. E30,35,53,55,57. W00,1,3.
  • Sakura jelly roll ‘clear star’ glitter pen
  • Pink ribbon. 
To make this card, I cut a 5” square mat and stamped my image and sentiments in place. I coloured my image using copics, then added details to the sentiment and flowers using a glitter pen. 
I wrapped ribbon around the top of the panel and tied the ribbon into a bow. I then layered this panel onto a piece of pink paper.
I used the pink paper to cover the front of my 7” square card blank before adding a mat of cream patterned paper. I used foam tape to attach the finished panel to the centre of the card.
I think this is a nice christening card... it uses quite a traditional image, made clean and fresh by using the coral and keeping the design simple.
Mx

Sunday, 14 January 2018

For my mum

  • LOTV-I'm here for you
  • Memento 'tuxedo black' ink pad
  • Neenah classic crest cardstock
  • Copics- skin:E50,51,21,93. Hair:E55,57,59. Dog:E43,44,47. Clothes:R20,21,22,24,46. Yg21. BG53,10. Y17. Stairs:C00,1,3.
  • SU!- teeny tiny sentiments
  • Patterned paper (from my scrap box so not sure which brand/ collection) 

I chose to make a 5" square card and found strips of patterned paper that would fit the sketch. I cut the main panel from colouring cardstock and stamped my image. I coloured the image using copics makers that best fitted the paper colours. I then stamped my sentiment and layered on to some more of the patterned paper. I glued all the paper pieces down to complete the card sketch, (although I did flip it so the sentiment better fitted my image.)

Mx

Joining in with:


Monday, 2 October 2017

Christmas Cottage...

  • Hunkydory festive elegance luxury card collection: Christmas cottage
  • Hunkydory little book of snowy scenes
  • Hunkydory essential book of Christmas sentiments
  • silver mirri cardstock
  • clear acetate
  • 6"x 6" & A5 card blanks
 For the first A5 card, I cut the patterned cardstock to fill the front of the card blank. I then added the toppers to sit around the printed houses, glued with foam for dimension. I took the coordinating insert and trimmed this down to sit inside.


inside
 For the square card, I trimmed down the remaining patterned cardstock and layered this onto mirri to fill the card front. I then positioned the little topper with the image and message in the sky using foam pads. Again, the inside of the card was finished off with the insert, trimmed to fit neatly.

inside
For this A5 card, I used the patterned cardstock, trimmed to fit the card with the centre gutted to make the most of the piece. I then matted a little book image onto mirri to create a topper. This was glued down with a coordinating sentiment topper from the set. To finish the inside, I added the floral insert, cut down to show the sentiment.


inside


For the final A5 card, I replaced a large section of the card front with acetate. I covered the inside of the card blank with the remaining piece of floral insert. To complete the front, I cut a section of the patterned cardstock and edged it with mirri, to create the border edge covering the join between card blank and acetate. I then carefully glued the topper image, frame and sentiment (from the essential book) in place on the front of the acetate.


Mx

Monday, 12 December 2016

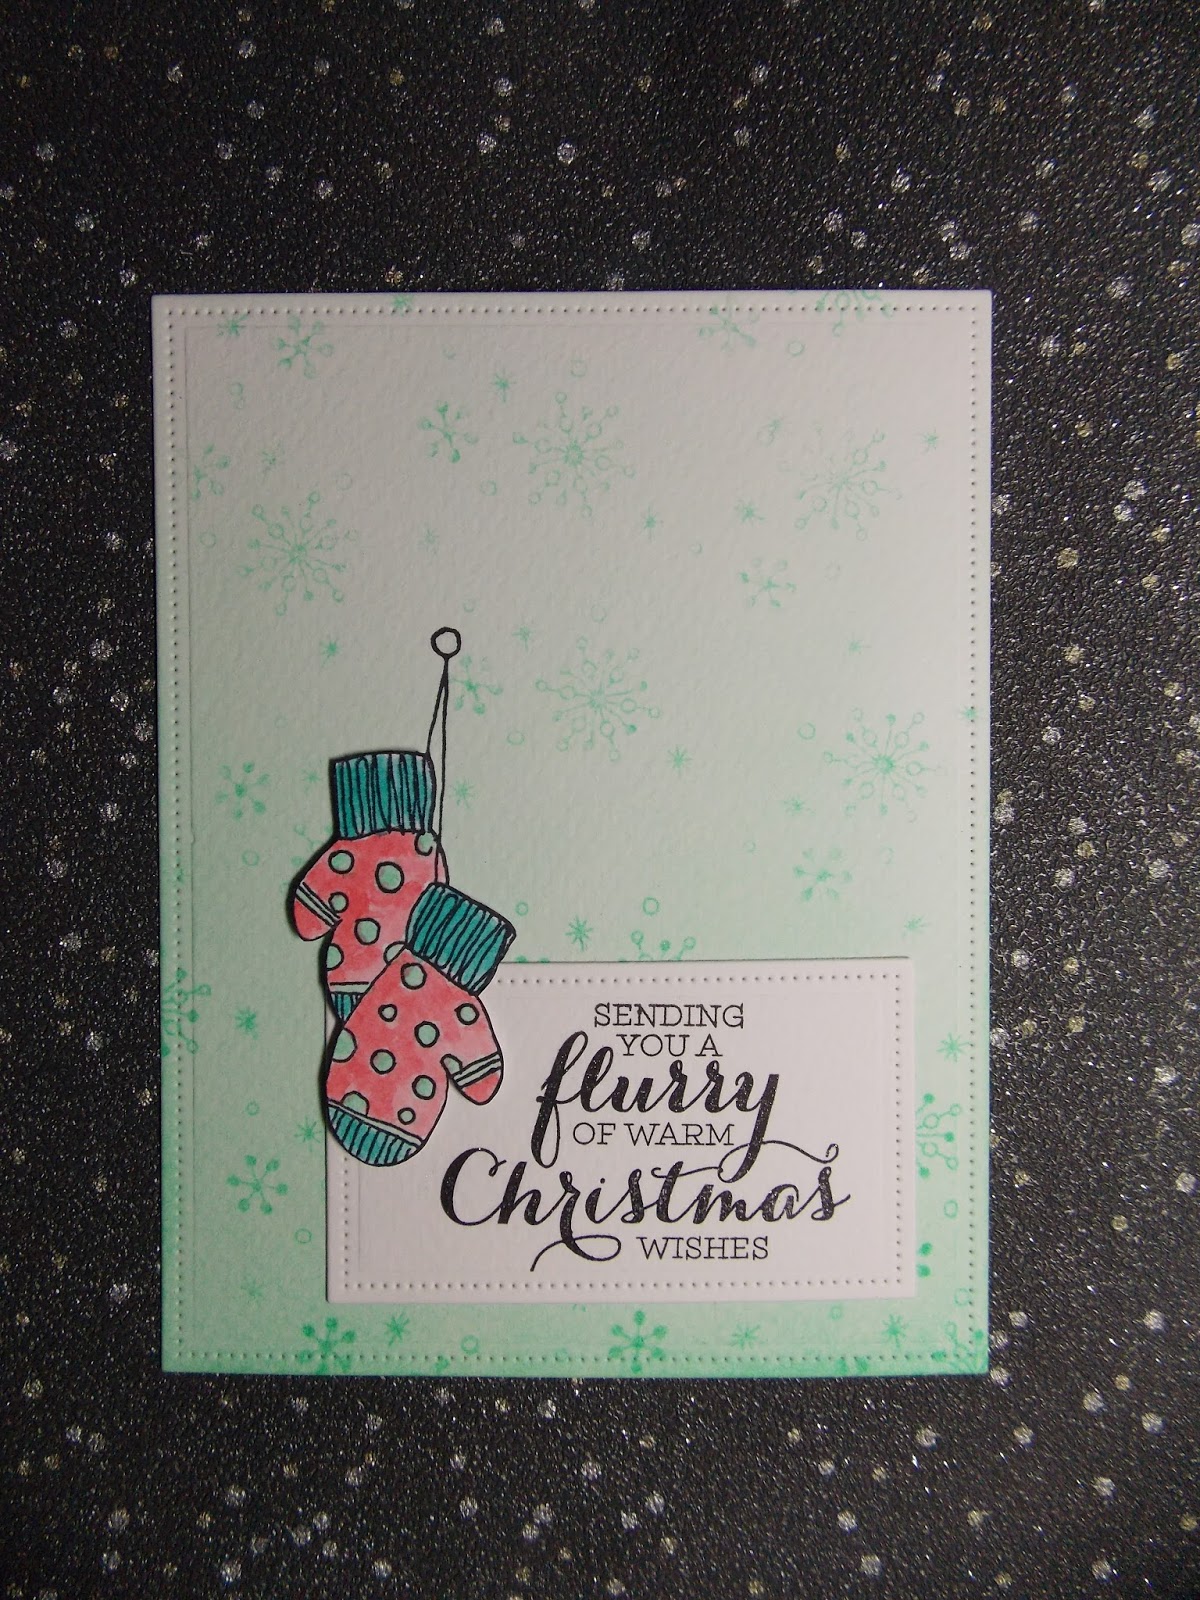
coral christmas ...


  • Lawn fawn dies- 'dotted rectangles stackables'
  • Tim holtz distress inks- 'cracked pistachio', 'abandoned coral' & 'peacock feathers' 
  • SU! Stamp sets- 'perpetual birthday calendar ' & 'flurry of wishes ' 
  • Paper artsy JOFY stamp- 'jm29'
  • Archival ink pad - 'tuxedo black'
  • Watercolour cardstock 
  • 6x4 card blank 
  • wink of stella glitter pen - 'clear'

I die-cut a panel of cardstock and inked it with an ombre effect. I stamped little snowflakes all over to complete the background, using 2nd generation towards the top portion for a softer colour. I stamped and die-cut my sentiment. I then stamped my image once onto the background and once onto some spare cardstock. I water-coloured the image using distress inks and fussy cut it out. I used a black brush marker on the cut edges to define them. I then added them onto the card using foam, making sure they lined up with the strings to look as though they were hanging. I added glitter to the flurry & Christmas words to complete.

Mx
Challenges I would like to enter:
freshly made sketches #266
simon Monday says: let there be snow

Sunday, 27 November 2016

coral congratulations ...

  • paper smooches wise dies 'congratulations'
  • stampin up! 'love & laughter' stamp set
  • kraft 5x5 card blank
  • white cardstock
  • funky foam
  • memento tuxedo black ink
  • tim holtz distress ink 'abandoned coral'
I took a piece of white cardstock and created an ombre effect with the coral distress inks. I then backed the card with funky foam before die cutting the sentiment out 3 times. On the card blank, I stamped the cake and engagement sentiments using the black ink. I then glued the congratulations on top to complete the sketch.
 
Mx

I would like to enter the following challenges:
cas(e) this sketch #199
simon monday says 'trio-tastic'

Saturday, 6 August 2016

birthday flowers...


  • SU!-too kind & happy birthday everyone 
  • SU! Ink pad- calypso coral & pear pizzazz 
  • Archival 'jet black' ink pad 
  • wink of stella- clear
I cut a mat of white cardstock and stamped my floral images. I used the same coral ink pad for the two step stamping, by 2nd generation stamping to create the lighter shade. I inked the card blank with the same coloured ink pad to coordinate with the flowers. I stamped the sentiment slightly overlapping the flower stems and added glitter over it to complete the card.
Mx
 
challenge I would like to enter:

Monday, 25 April 2016

friend...

 
  • SU!- whisper white ink pad, distress dots background stamp, bold butterfly framelits & butterflies thinlits
  • paper smooches 'friend word' wise die
  • 6x4" kraft card blank
  • coral and yellow cardstock
  • white funky foam
  • yellow & white bakers twine
  • neat & tangle clear sequins
I stamped my card blank to create a white dotty background. I added some yellow twine towards the bottom of my card. To do this, I wrapped it around the card blank twice and tied a knot. I die cut the word friend twice, once in some coral cardstock and once in funky foam, then glued both of these layers together to create dimension. I glued this sentiment onto the card blank underlined by the twine. I die cut the solid butterfly in a yellow cardstock, then used a detail butterfly die (in the same size) to cut the coral layer. I glued these together just in the centre (leaving the wings loose to add more dimension), then added them to my card design. The final touch was a few sequins as sparkly accents.
 
 I have finally found a liquid glue that is brilliant to use!! I used the tombow mono multi liquid glue to stick down everything on this card.
Mx

I would like to enter this card into the following challenges:
freshly made sketches- #233
simon says Wednesday- 'make it girlie'


Friday, 12 February 2016

just for you...


inside
  • black 6x4 card blank + white cardstock
  • SU! botanicals for you
  • archival (jet black) ink pad
  • tim holtz distress ink pads (abandoned coral, fossilized amber, tumbled glass and shabby shutters)
  • wink of stella (clear)

I cut two mats of white card to fit my blank. I then stamped the main sentiment into the centre of one. Using the various coloured inks, I stamped the flowers to create a background framing the sentiment. I also added a flourish of them in the corner of the second mat along with a sentiment for the inside of the card. I then glued the mats onto the card blank. The final touch for the card was some glitter to emphasise the sentiment. I think these messages and the flowers are great for all sorts of occasions and the flat design also makes it perfect for posting!!
 
I would like to enter this card into the following challenge:
Mx

Sunday, 31 May 2015

feather fascinators

fascinators
 
As promised, I am sharing pictures of the fascinators I made with you. I bought some fabric and cut strips. I stitched these to prevent the edges fraying, then wrapped them around to shape them into flowers. These were sewn at the back to secure them. I then added loops of organza and satin ribbon and finished off with some black feathers. I backed the finished arrangement with a circle of black felt to keep it neat, securing this with fabric glue and blanket stitching. I then fixed the smallest of these onto a broach pin using thread. I added a fascinator back to the other one, using a hot glue gun, so it could be clipped into hair or pinned onto the outfit. I think its a great way to customise an outfit with something handmade and unique for a special occasion.
 
Mx

Wednesday, 14 May 2014

fairy friends ...

 
stamps: friends forever from lili of the valley and for my family by stampin up!
inks: memento ink pad (tuxedo black), tim holtz distress ink pads (shabby shutters and warm lipstick) sakura micron pen and promarkers
cardstock: craftwork cards digi cardstock and a 5x5 card blank
extras: self adhesive pearl and liquid pearls (white opal)
 
I chose a cute fairy image to make a birthday card for my sister. I cut the matt to fit the card blank and doodled my border using the sakura micron pen. i then stamped the image and coloured it using the promarkers (to match the paper players colour challenge). I used the tim holtz distress ink to colour the card blank and added my matt. I hand shaped a banner with the sentiment stamped on, then glued it onto the card and embellished with an adhesive pearl. the final touch was some liquid pearls on the wings and the antennae for that extra magical feel.
 
challenge #195


'fairies'
 
'add pearls'
Mx