Friday 27 October 2017

owl be home again for christmas


  • Hunkydory cute Christmas luxury card collection: owl be home for Christmas
  • Hunkydory adorable scorable cardstock
  • 6x6" & 5x5" card blanks
I created the 6" square card using a background of red adorable scorable card. I trimmed the printed image from the cardstock down to fit inside the frame. I glued the image down flat then added the frame and sentiment on foam pads to complete the card with some dimension.
For the smaller card, I used the opposite corner of the patterned cardstock with the other image and made a feature of this. I simply trimmed to fit the card front, leaving room down the folded edge for a strip of the contrasting cardstock. I covered the join with the border from the collection and added the sentiment topper to the bottom corner to finish the design.
Mx

Thursday 26 October 2017

the winter village

  • Hunkydory snowy season luxury card collection: the winter village
  • Hunkydory essential book of Christmas sentiments
  • silver mirri card
  • DL & 7x7" card blanks
I created the first square card using the rectangular topper and frame. I covered the card front with the cardstock, placing the border down the folded edge. I then carefully positioned the image, frame and sentiment toppers on foam pads. I completed the card with an insert trimmed down to fit inside.
inside
For the DL card, I used the remaining cardstock with the printed image as the focus. I simply trimmed down the cardstock to mat and layer on silver mirri for the card front. I added a sentiment from the essential book and trimmed the coordinating insert down to complete the card.

inside

I used the circle topper and frame on the other cardstock in the collection to create this 7x7" card. I trimmed the cardstock down to sit with a small border of silver mirri on the front of the card. I then placed the topper and frame off centre, using foam to add dimension. I added the sentiment in the space beside it to complete the card. Again, I trimmed the insert down to fit inside the card.
inside
Mx

Wednesday 25 October 2017

star of wonder

  • Hunkydory cute Christmas luxury card collection: star of wonder
  • Hunkydory essential book of Christmas sentiments
  • Hunkydory adorable scorable cardstock
  • gold mirri card
  • red & white bakers twine
  • 8x8" & 6x4" landscape card blanks
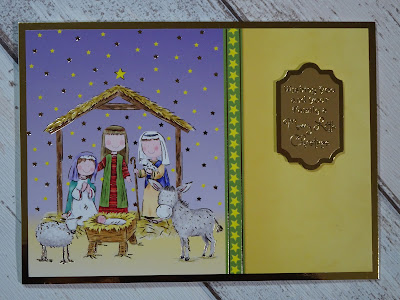
I used the largest topper with the scalloped frame to make this 8" square card. I covered the card blank with the coordinating coloured adorable scorable card. I then mat and layered the yellow cardstock from the collection onto gold mirri card, to create a base for the toppers. I positioned the image and frame central to the mat, with the image raised up on foam pads. I then completed the front using the scalloped sentiment overlapping in the bottom corner, again glued with foam pads. I trimmed down the matching insert to fit the inside of the card.
inside
For the first 6x4" card, I used the oval toppers. I covered the card front with the cardstock featuring the border strip. I then layered the toppers on, slightly overlapping with different depths of foam to create dimension.
I created the second 6x4" card to feature the printed image on the remaining cardstock. I simply matted the cardstock onto gold mirri card, to fit the front of the card blank and finished with an essential book sentiment.
Using the other sheet of patterned cardstock, I created the final card. I trimmed down the section with the characters to fit the card front. I then added two strands of bakers twine and wrapped them underneath the cardstock and secured in position, before gluing to the card blank. I finished the card with a tag sentiment from the essential book, angled on foam pads and embellished with a twine bow.
Mx

Tuesday 24 October 2017

driving home for Christmas

  • Hunkydory snowy season luxury card collection: driving home for Christmas
  • Hunkydory essential book of Christmas sentiments
  • A5 landscape & 6x6" card blanks
I created this landscape A5 card using the large topper from the collection. I cut the patterned cardstock in half and removed the snowy border. I then cut the striped border from the remaining half a sheet of cardstock. I added the main piece of cardstock to the front of the card and trimmed off the end of the card blank to reveal the inside of the card. I then added the other matching border inside the card, to sit neatly in the reveal. I used half of the decoupage layers on foam to add dimension to the topper. To complete the card front, I simply positioned the topper image along with an essential book sentiment raised up on foam pads.
For the second card, I made a feature of the printed image on the cardstock. I trimmed down the cardstock to fit the front of a 6" square card. I then layered on the coordinating border across the top, raised on foam. I also layered the car with the remaining decoupage pieces to give this dimension and mirri accents. I completed the card with the sentiment topper from the set in the space above the car and the insert trimmed to fit inside.
inside
I felt the best use of the toppers in this decoupage style collection was to make two nice cards. I still have a full sheet of cardstock left over from this collection, which I will use later with either the little book images or some extra toppers from other collections.
Mx

Friday 20 October 2017

Winterland walk


  • Hunkydory festive elegance luxury card collection:Winterland walk
  • Hunkydory the little book of snowy scenes 
  • Hunkydory essential book of Christmas sentiments
  • 7x7" & 5x7" white and black card blanks

I created the large square card using the rectangular topper and frame. I trimmed down the cardstock and matted it onto the card front, retaining the border of street lamps on the right. I then added the image topper on flat, with the frame and sentiment raised on foam pads to give the card dimension.
inside

For the first 5x7" card, I used the other printed cardstock from the collection and layered on the front of a black card blank. I then added the little square topper flat and raised the frame on foam pads to complete. Since the frame is printed with 'Happy Christmas', I didn't add a separate sentiment.

inside

For the second 5x7" card, I used a white landscape card blank covered with sections from each cardstock. I used the trees for the top half and the darker print beneath, edged with the holographic foiling which had originally edged the border section on the sheet. I then positioned the image topper onto the card, along with the sentiment.

inside

For the final card, I took the remaining piece of cardstock, printed with snowfall and a moon. I used an image sheet from the little book backed with silver mirri card to create a topper. I layered this on an angle with a little book sentiment to complete the card. The colours in the image compliment the background to work well together, despite coming from different collections.
Mx

Thursday 19 October 2017

The north pole

  • Hunkydory cute Christmas luxury card collection: the north pole
  • 8x8" & 6x6" card blanks
  • Gold mirri card

For the 8" card, I cut a mat of mirri card to fit the card front. I then trimmed the cardstock down and layered this onto the card, with the border down the folded edge. I then added the snow globe topper and sentiment on foam pads to create dimension.

inside

I created the first 6" card using the other patterned cardstock from the set. The decoupage layers for the snow globe fit the printed images on this sheet. I cut the card to sit on the card front with a mat of mirri card. I then layered up the santa and added the north pole beside him to add the mirri shimmer, give the card dimension and complete the scene. The finishing touch was a sentiment above.

inside

I used the remaining cardstock for the final card. I trimmed the border to sit across the base of the card and glued it down flat. I then measured and cut the printed North pole piece to fill the space above. I then added the postcard topper, positioned to be framed by the north pole sign.
inside
Mx


Wednesday 18 October 2017

festive treats

  • Hunkydory festive elegance luxury card collection: festive treats
  • Hunkydory second little book of Christmas
  • Silver mirri card
  • A5, DL and 6x6" card blanks
  • I made the first A5 card using the little topper squares from the collection. I covered the card front with the bright patterned card, cutting the section with the bow print to fit. I then spaced out the four square toppers in the mid section of the card and glued with foam pads. I added the matching insert inside to complete the card.
inside

 Using the other half of the cardstock to create this 6" square card. I turned the sheet on its side so the pattern ran as a border down the side and trimmed to fit the card front. I then added the large rectangular topper, with the sentiment overlapping.
I used a coordinating sheet from the little book to make this A5 card. The rectangular frame worked well to edge the little book image and create separation from the patterned card stock. I covered the card front with the patterned card, then glued the image flat and the frame on foam. I finished the inside with the coordinating insert.
inside

For this DL card, I used the remaining patterned cardstock and another of the square toppers. The image was printed on the cardstock, so I simply trimmed it down to fit on the DL card with a border of silver mirri card. I completed with the sentiment topper on foam in the space above the image and the insert trimmed to fit inside.
inside

Mx

Tuesday 17 October 2017

Merry Christmas, sausage!

  • Hunkydory cute Christmas luxury card collection: Merry Christmas, sausage!
  • 7x7", 6x4" & DL card blanks
  • Gold mirri card
I created this 7" square card using the largest topper from the set. I mat and layered the patterned cardstock and gold mirri onto the card front. I then positioned the topper on using foam pads, so the scarf border on the topper lined up with the dog on the backing card. I completed the card with the coordinating sentiment from the set, overlapping the topper on deeper foam pads.
inside
Using the other piece of patterned cardstock, I created the DL card. I chose the DL format as it fit both borders on, I simply cut the cardstock to fit the card front. I then added the oval topper and large sentiment on foam pads for dimension. I completed the inside with the matching insert trimmed to fit.
inside
For the 6x4" card, I cut down the remaining cardstock to fit the front of the card, this time removing both borders. I then layered the bottom border onto the card with foam pads to create dimension. I added the square topper above the border on foam pads to complete.
inside
Mx