Friday 26 June 2015

star gazing...

outside
 
inside
  • navy 4x4" card blank
  • lawn fawn stitched stackables (dies)
  • distress ink pads- tumbled glass, broken chine & chipped sapphire
  • distress spray stain- picket fence
  • perfect pearls mist- pearl
  • mama elephant - bear hugs stamp set
  • uni-ball signo white pen
  • craftwork cards digi cardstock
  • memento ink pad- tuxedo black
  • copics
  • archival ink pad- cobalt
I cut a strip of card using the dies to make a panel for my card blank. I used the blue distress inks to colour the background, I added spray stain and pearl mist to create stars to make a night sky. I used elements from the stamp set to add a moon and stars. I coloured these with the white pen. I stamped the bears and coloured them using copics. I then fussy cut and added the bears on to the card using foam for dimension. I die cut a stitched square for the inside of my card and stamped the message onto it using a navy ink pad.

Id like to enter this card into the following challenges:
Mx

feet up at 50...

  • 'put your feet up' stamp from LOTV
  • 'today' stamp (had this for years and lost the packaging!!)
  • alphabet typeset bigz dies from SU! & sizzix
  • 12 x12 paper (its been in my stash so long I don't know where its from ...sorry!!)
  • memento ink
  • copics
  • craftwork cards digi cardstock
  • mirri card in gold
I cut a matt and stamped my image at the bottom. I chose a background paper and coloured my image with copics using colours from the paper. I then die cut the 50 from mirri card and added an edging strip to each side of my mat. I stamped the 'today' in position then glued down the 50 above it. I cut my backing paper down and layered this onto my card blank. I then added the matt using foam pads for dimension to complete the card.

I would like to enter this card into the following challenges:
Mx

Thursday 25 June 2015

pretty panels...


  • 'bloom with hope' stamp from stampin up!
  • patterned paper from dcwv's 'fresh floral stack'
  • 6x4 black card blank
  • 'jet black' archival ink
  • sekura micron pen
  • wink of stella glitter brush pen
I followed the layout of the sketch, cutting my paper into three panels sized to fit the card blank. I stamped the sentiment onto some craftwork cards digi cardstock and shaped it into a banner using scissors. I added stitched detail around the edges of my layers with my sekura pen. Once the panels were glued down, I added the glitter to pick out the flowers in the paper. Finally, I stuck down the banner to complete the design.

I'd like to enter this card into the following challenges:
Ribbon girl june colour challenge- 'lilac'
cas(e) this sketch! ~128
 
Mx

Tuesday 16 June 2015

glue...

ok, so I will admit I have a lot of glue!! I have my favourite ones that I use all the time and others I will just get out when I need a particular glue for that project.
 
  1. double sided tape tabs: pre-cut strips of double sided tape
  2. removable tape: used to hold dies in place & masking, with out damaging your cardstock
  3. hobby dots: small dot of glue used to stick embellishments, they are slightly raised and squishy. they are sold in different sizes 
  4. sticky spots: small spot of glue used to hold embellishments eg buttons. these are flat and come in different sizes
  5. micro dots: tiny dots that cover the entire surface of the tape, used to stick paper to paper. these are great if you need a bit of glue in a little area and don't like wet glue!!

 
  1. tape runners: different brands are available, in permanent and repositionable types. they are basically double sided tape without the backing to peel off
  2. hot glue gun: fast adhesion for embellishments etc.
  3. sticks for the glue gun: you can get different heat temperature sticks for specific materials
  4. silicone glue: good to add dimension and gives you wiggle time to line up decoupage
  5. glue pens: different types and brands available. a very controlled way to apply small amounts of glue to small areas. best to read the label and pick the one that suits your needs most
 
 
  1. glue sticks: different brands available... just check it is acid free!!
  2. lick and stick: a product used to make envelopes. apply it to where you want your seal to be, let it completely dry then its ready to lick and stick like a conventional envelope!!
  3. thick pva glue perfect for glitter
  4. standard pva: used most often to stick die cuts on to cards
  5. glossy accents: thick glue that self levels and dries to a clear high gloss finish, to add detail and dimension to your project
  6. clear wet glue: gives you a tiny bit of wiggle time

 
  1. foam pads/ squares: a piece of foam, cut to size with adhesive on both sides. there are many brands, sizes and depths available. depth- 1mm(great for postage), 2mm(a great all rounder), 3mm(easy way to get extra dimension). you can also get black foam pads for use with darker cardstock.
  2. foam tape: same idea as foam squares, instead of pre cut you cut it to your desired length (and width). this is great for shaker cards!!
  3. clear foam tape: so I know its not foam but its the easiest way to describe it. great if you don't really want to see the tape. 
 

  1. double sided sheets: full sheet of double sided adhesive. these can be cut as desired with scissors or dies.
  2. double sided tape: comes in different widths, from many brands. basically tear/cut off desired length, stick down, peel off the backing and stick your things together
  3. strong tape: stix 2 product, which is very sticky and a stronger adhesive than standard double sided tape
  4. finger lift tape: same as double sided tape but instead of the glue been edge to edge, there is a strip of backing either side without glue to make it easier to peel off. (this is more expensive than standard tape, so if you can peel the standard tape don't waste your money!!)
  5. red liner tape: clear double sided tape, comes in different widths. its a slightly thicker and stronger adhesive. best used for boxes, acetate and anything else that you think needs a bit more strength. the backing to this tape is a red film and tends to be very static.

i think that is everything. if i had to pick my top 5, i would choose:
  1. double sided tape
  2. foam pads & tape
  3. glossy accents
  4. red liner
  5. quickie glue
everyone is different, you just have to try and find out which types of glue you prefer. I hope this helps when you are next buying some glue...
Mx

Monday 15 June 2015

speedy...


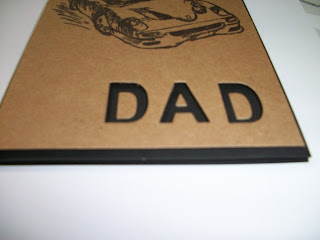
this card was quick and easy to make, the simple colour combo makes this card effective and quite stylish!!
I generally forget to take a picture of the inside of my card, so I included a picture of the insert this time...

insert
  • black and kraft 6x4" card blank
  • archival ink pad (jet black)
  • papermania- nostalgia classic cars by john byrs
  • SU!- guy greetings
  • SU!/ sizzix- little letters thinlits
cut the kraft card into a mat to fit the front of a 6x4" card blank and stamp the main image in the centre. lightly draw a pencil line at the bottom corner of the card, where the letters will be. tape the last letter down and die cut it , then move on to the middle and beginning using the pencil as a base line to keep it all level, (don't forget to rub out the pencil once you've finish!). fold the black card blank and attach the stamped and die cut panel using foam tape for dimension
 cut a 2nd mat to fit the inside of the card, stamp this with a sentiment and tape down inside the card blank.
 
 
Mx

garden of hope ...

sorry about the picture- the vellum was hard to photograph
  • SU! corner garden stamp
  • SU! bloom with hope stamps
  • promarkers & memento black ink pad
  • super smooth white (digi) card
  • archival black ink pad
  • vellum
  • green cardstock
I made a 6x4" card blank using some olive green cardstock. I cut a mat of digi card to fit the front of the card blank. I stamped the large floral image with memento and coloured it with promarkers. I cut a piece of vellum to 6x5" and folded it at 1" to form a 6x4" wrap as an overlay for the mat. I stamped the sentiment using black archival on the vellum. I taped the fold to the back of the mat then taped the mat on to the card blank. To finish this card I cut another mat of white card for the inside. I stamped this with my sentiment in the centre and taped the mat on to the inside of my card blank.
 
Mx

Tuesday 9 June 2015

tool kit...

I probably should have shared my tool kit must haves at the beginning of this tutorial series, but forgot about it.  never mind im doing it now...

so first is my essentials:

  1. paper trimmer (there are lots of different brands and sizes available and you can buy various cutting, scoring, perforating and decorative edge interchangeable blades depending on which trimmer you choose)
  2. score board (shown is a wooden one, you can also buy plastic ones)
  3. scissors (I have big scissors for general stuff, paper scissors, glue scissors and ribbon scissors)
  4. pencil sharpener
  5. pokey tool
  6. ball tool (comes in different sizes used to score card, dry embossing etc)
  7. bone folder (gives you a nice crisp crease when folding card)
  8. pencil
  9. craft knife
  10. ruler
  11. cutting mat

Then we have stuff for stamping:


  1. SU! 'stampin scrub' (use with stampin mist to help get your stamps clean)
  2. SU! stampin mist (stamp cleaner... other brands are available but I like this one!)
  3. SU! stamp-a-ma-jig (helps line stamps up, very handy for sentiments and 2 step stamping)
  4. clear blocks (to mount clear or photopolymer stamps)
  5. versamark pen (used for embossing)
  6. memento pen (can be used to fill in bits you missed when stamping or to draw your own images to colour with alcohol markers)
  7. kraft sheet/ heat resistant mat (protects work surfaces from ink and heat but they are also good to blend on or use as a palette when painting)
  8. archival ink pad - jet black (to be used for watercolouring etc)
  9. memento ink pad - tuxedo black (to be used with alcohol markers eg copics/ promarkers)
black ink pads are basics, you can have as many colours as you like but you will always come back to the blacks. I should have included an embossing ink pad and heat tool too, but you do only need this if you are heat embossing!!

And finally some useful extras:


  1. distress tool (used to create a distressed edge on paper or card)
  2. tweezers (for picking up fiddly bits like embellishments)
  3. pick up pencil (helps pick up small embellishments like gems or pearls)
  4. quickie glue pen
  5. sakura star dust (an easy and fast drying glitter, great for fine detail)
  6. sakura clear glaze (the quickest drying gloss finish, great for fine detail)
  7. white gel pen (for highlights)
  8. sakura micron pen (for details like faux stitching)
I also like the keep some extra bit near my desk when im crafting 
  1. tissue/kitchen roll (to wipe up spills, ink and when painting)
  2. baby wipes (easy clean up and can also clean stamps)
  3. a flannel/ small towel (wipes up any ink but last longer than tissue and you can also dry your hands to save your nice towels!!) 
  4. a day light lamp (helps to see what your doing clearly and also shows the true colour of the cardstock/ pen you are using)
  5. post it notes and scrap paper ( I like a pad or stack of paper to rest on when I am crafting as it helps to give a better impression when stamping and when colouring with alcohol markers. I also like to make notes and do little sketches when I get an idea for a card/ project)
Of course this is just the tools I like to have, if you are starting out you wont need all of these, but you can collect as you go and grow with each new technique you learn...
 
Mx


Tuesday 2 June 2015

Inserts

For todays tutorial, I thought I would share inserts with you. Once you have made a card, its nice to decorate the inside with a sentiment. Inserts can also create a more professional finish if you are selling or just sending your cards. There are different ways of creating an insert. There are also inserts you can buy, (often as part of a card making kit) which can be stuck down in various ways to create different finishes. In the video below, I will talk you through the options and show you some examples ...
 
 
I hope you have found this helpful. If you like these tutorials or would like to suggest any other topics for me to cover, please comment below !!
 
Mx

baked with love ...


  • 'express yourself' by stampin up!
  • 'stitched squares' dies and 'baked with love' stamp and dies set by lawn fawn 
  • copics
  • memento ink pad
  • black glitter pen
  • craftwork cards cardstock and a printed card blank
I die cut the square matt using the stitched square and stamped it with the sentiment. I added the cute little heart onto the end and coloured it in with copics. I stamped the three images and coloured them to coordinate with the coloured card blank. I then used the matching dies to cut them out. I taped the matt onto the card blank and foam pads to stick down the images for some dimension. I added some glitter to the sentiment using the black glitter pen.
 
inside the card
For the inside of the card, I took the matching insert for the card blank and added a sentiment. This message stamp is a single line, so I masked each half off to stamp the sentiment as two separate lines. I stamped, coloured and die cut the spoon to embellish the corner. The final touch was some glitter on the sentiment to match the front.
 
 
Mx