Tuesday 29 September 2015

penguins in paradise!!


inside
  • my favourite things- penguins in paradise stamps and dies
  • lawn fawn- stitched squres and circles dies
  • SU! white Christmas
  • memento ink pad (tuxedo black)
  • copics (E1, C00,0,1, W7,8,9 Y35,38. E59,57,55 G14,05,17. R9,27,24 Y02,08,15)
  • tim holtz distress ink pads (tumbled glass + scattered straw)
  • wink of stella (clear)
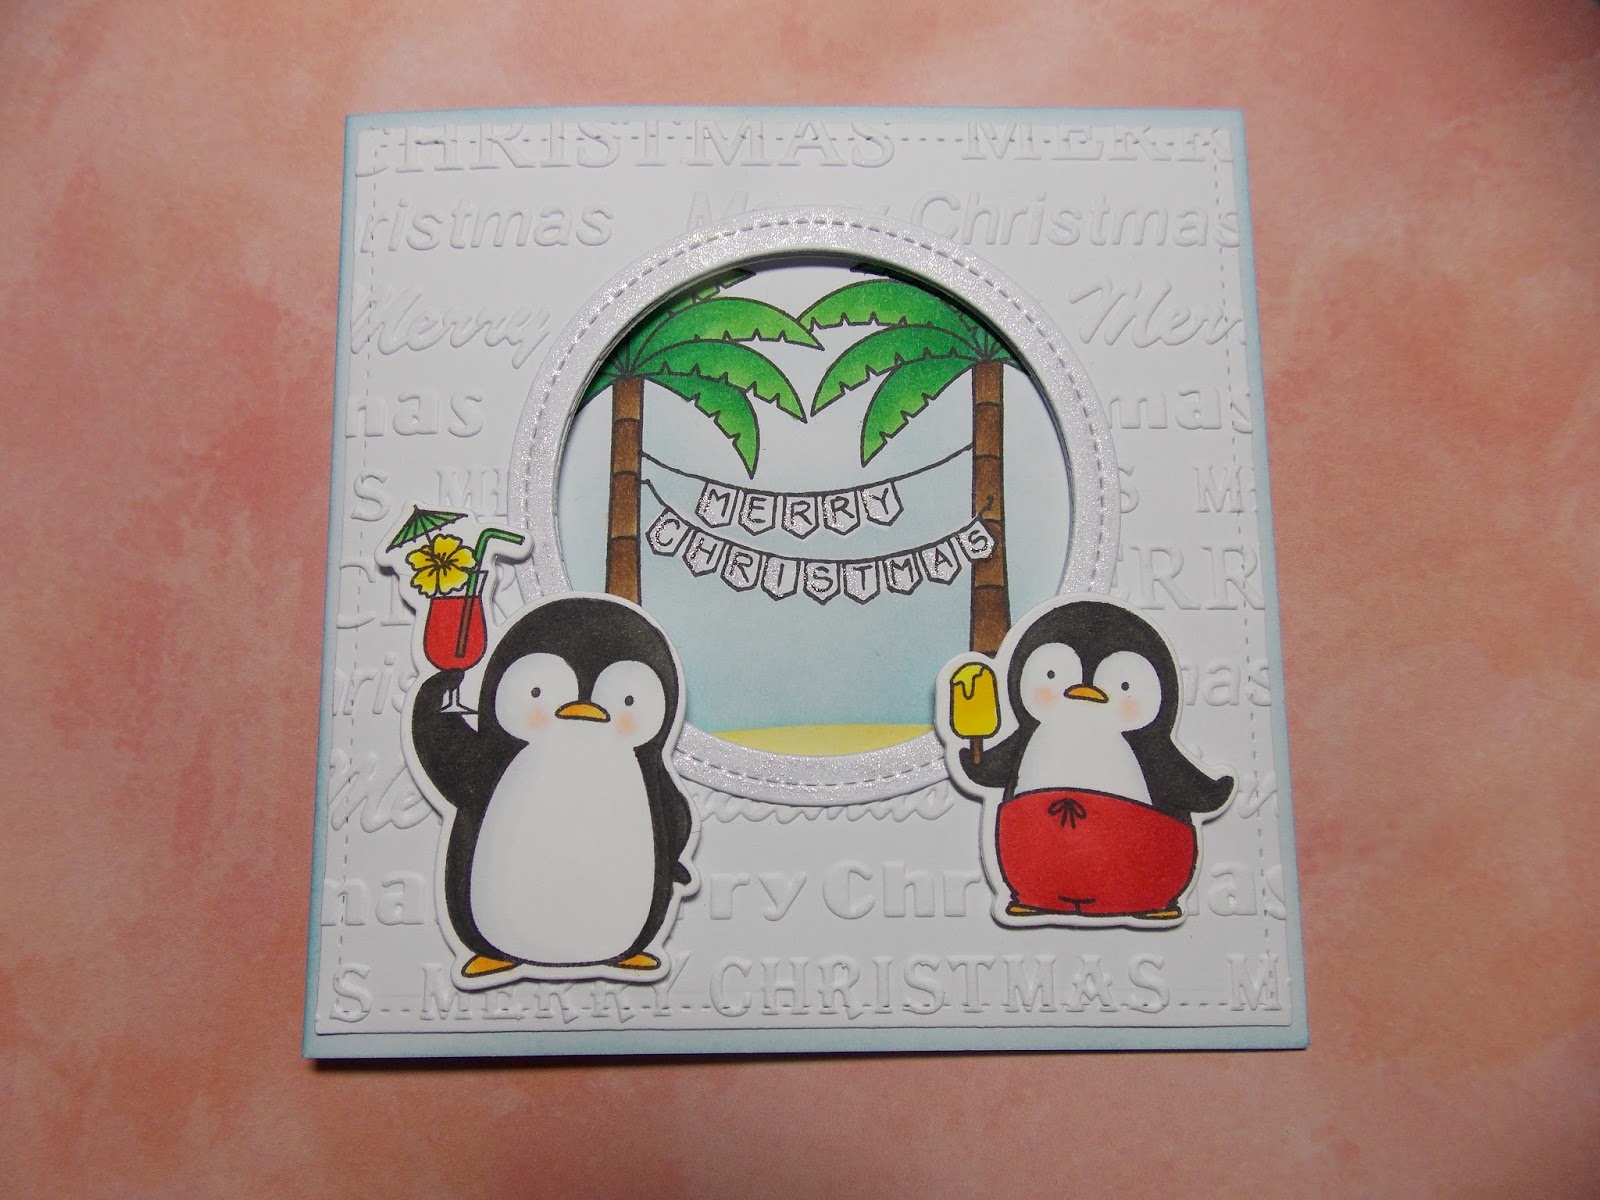
i was asked to make a card to send to someone celebrating Christmas abroad and I knew I had the perfect stamp set !!

to make this card I first cut all my layers. I die cut 2 stitched squares to fit my 5" card blank (one for the front one for inside). I then die cut a circle in the centre of the front mat. I then used this to pencil mark the position of the hole to help line up the die to create the same aperture on my card blank. I also die cut a frame using the stitched circles to enhance the aperture. I embossed the front mat with a Christmas wording embossing folder (don't know the name as I have lost the packaging),and glued the frame onto my layer. I inked the card blank blue then stuck down my mat. i stamped, cut and coloured the penguins and glued these onto the front using silicone glue.

For the inside, I created a scene on the second matt which would show through the aperture. I stamped my word banner and made a mask to place over the top. I stamped a palm tree either side and made masks for these too. I created a pair of masks for the landscape, using the 1st half with a yellow ink pad and blending tool to create sand. i then used the coordinating mask protect the sand whilst i created the sky in the same way. i then removed all the masks and copic coloured the trees before adding glitter shadows to the banner. 

the final touch was some glitter onto the frame around the aperture... after all Christmas needs glitter whether you're home or abroad !!
 
Mx

Sunday 27 September 2015

falling leaves...

    front 

    inside

  • SU! simply sketched and summer solstice stamp sets (I also used a 2005 sentiment stamp, but don't know the name of the set)
  • archival ink pad- jet black, olive & monarch orange
  • 6x4" black card black and white stamping cardstock
I first cut two white mats to fit my card blank. I used the sketch to map the main parts of my card front. I stamped a sentiment on the front of one mat. I added another sentiment in the centre of the second mat to go inside my card. I inked up my leaf stamp using two colours, I tried not to overlap the colours, so they didn't get muddy. I used the lines on my clear block to help with this technique. I stamped the five main leaves in position on the card front. I then second generation stamped to fill in some gaps. These softer leaves help to give a little more depth to the card. I added a final leaf to finish the other matt and stuck these onto my card blank.

Mx
 
I would like to enter these challenges:
 

a present from santa


  • my favourite things- jingle all the way stamps
  • SU!- holiday home stamp set, banners framelit dies and scallop boarder punch
  • memento- tuxedo black
  • copics
  • craftwork cards coloured card blank and cardstock plus kraft cardstock
  • wink of stella
  • glossy accents
I used the banners dies to create my mats, I stamped the large kraft banner with my sentiment. I placed a small green banner just underneath and punched a scallop edge on a strip of green card to go along the top edge of my card blank. I stamped, coloured and fussy cut my santa image and glued it to my card with foam squares. to finish the card, i added a bit of glitter to the presents bow and a bit of gloss to Santa's belt.
 Mx

I would like to enter this challenge:
 

Thursday 24 September 2015

all wrapped up...


  • A3 kraft cardstock- cut to 30x29cm
  • cream card stock- cut to 14x7cm 
  • coloured bakers twine (150cm)
  • SU! little letters thinlit dies
To make the box, I scored the kraft cardstock and cut the flaps, to create the net below. I then added glue the appropriate areas and stuck them together.

 
 To make the label I cut my cream cardstock to 14x7cm and cut holes in all four corners. I used thinlit dies to cut out my letters to just leave a negative, you could cut the letters out of a coloured cardstock. another alterative would be to stamp on to the label. I added bakers twines through the holes on one short edge, then crossed them underneath, before bringing them up through the holes on the opposite edge. I tied the ends in a bow to keep the label on. I used coloured twine to coordinate with the colour of scarf in the box.
I chose to add the label in this way so the box is kept plain making it easy to reuse.
Mx

Tuesday 22 September 2015

a notable gift...

 
i made this memo block by painting an mdf blank with some cream studio paint. i selected a section of the tissue wrap to cover each side of the box, and glued these down. once the glue had dried, i gave the box another coat of cream paint. this dulls the print of the tissue to give a much softer look, i just used cream to keep it quite neutral but you could add a wash of colour. i used a small amount of brown to the edges using a sponge, to give a distressed look and make it feel more vintage. i used the golden gel medium to seal and give a protective coat. i added felt to the underneath to make sure the memo block didn't scratch any work surfaces. i bought  white memo pad/blocks (the right size to fit inside) from ebay and added a couple of small pencils, to complete the memo block.
i think this makes a great gift as it would be useful to most people, the natural colour also means it will go with most décor.
Mx

Friday 4 September 2015

baby love !!


  • LOTV- 'baby with bunny' & 'rocking horse' stamps
  • SU! 'simply wonderful' sentiment stamp
  • mdf heart shape from the mdf man
  • tim holtz tissue wrap- terminologie
  • Claudine hellmuth studio paints and brushes
  • docrafts artiste- flesh
  • golden gel medium
to make this heart hanging decoration, i first painted it cream. I covered my mdf blank with the tissue wrap, then painted another coat of cream over the top. i used brown paint on a sponge to distress the edges. i stamped my chosen images and used the studio paints to colour them. i use a fine brush to do the black outline and details, to give a neater finish as most of the detail is lost during painting the colours. i threaded a ribbon through the hole at the top and tied a couple of bows to finish.
Mx