Showing posts with label my favourite things. Show all posts

Tuesday, 18 February 2020

mice time to celebrate.


  • My favourite things- it’s a mice time to celebrate (stamps & dies)
  • Lawn fawn- happy birthday border lawn cuts
  • Prima- free spirit paper 
  • WeR memory keepers- love 2 craft papers
  • Copies- C00,1,2,4. R000,00,20,21,81. RV34. BV00,11. B00. BG53. YG11,21,41.
  • Memento dye ink pad-tuxedo black 
  • Wink of Stella brush pen- clear
  • 6” square card blank


I picked a main patterned paper to act as a background. I added a strip of dark polka dots, layered with a yellow pattern. I also used the dark paper to die cut my greeting. I layered all these and glued onto the card blank. I then stamped, coloured and die cut the cute mice images. I used 1mm foam on one mouse and 2mm foam on the other to create more dimension. I added sparkle to the Pom poms, to finish.

I’m entering the Simon says Wednesday ‘use 2 or more pattern paper’ challenge blog, I’m so glad I did too. I don’t use my patterned papers much but the background paper really makes the card.

Mx

Friday, 1 March 2019

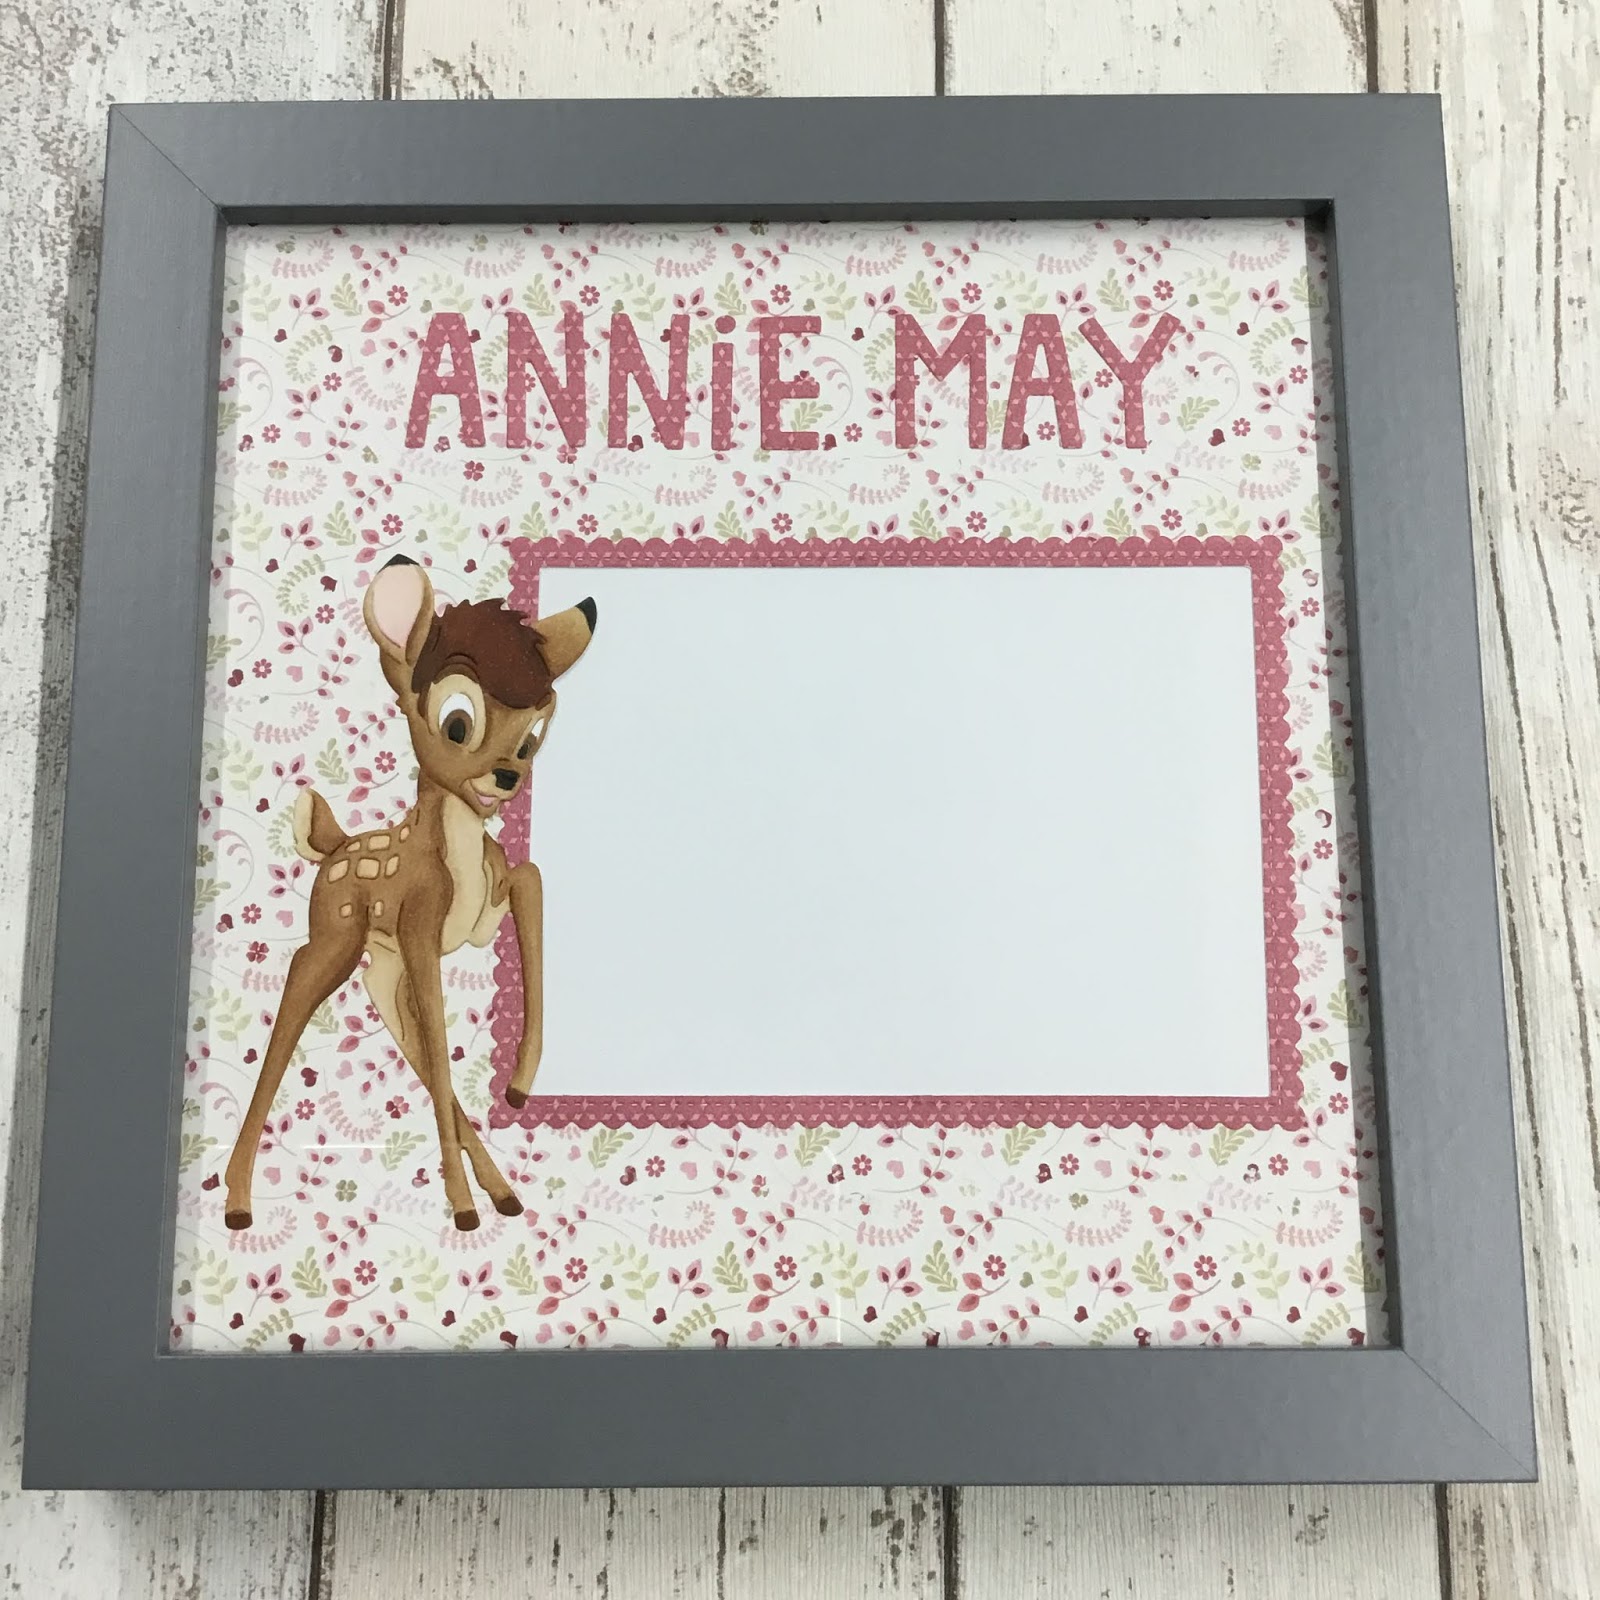
Bambi frame gift


  • Disney bambi metal die
  • Nit wit & LOTV- always & forever paper pad
  • My favourite things- stitch rectangle scallop edge frames
  • Lawn fawn- finley’s ABC’s dies
  • Copic friendly cardstock
  • Copic markers- E30,31,34,35,37,39,57,59. W8,10. R000,81,83.
  • Grey 8” square frame (mine was from wilko)
To make this frame gift, I selected two pieces of coordinating paper. I chose one 8x8 piece for the background and the other to die cut from for embellishments. I diecut the frame and letters to spell the name from the patterned paper. I also diecut my bambi image from white card and added tape to the back, whilst all the pieces where still in the metal die, to hold the sections together. I then removed the bambi from the die and added back in any pieces that had fallen out. I used copic markers to colour the image, using a picture online as reference. 
I decided on the best layout and glued all of the pieces onto the background paper. I used a craft knife to remove any paper showing through the die-cut frame to create an aperture for a photo to sit behind.
I slotted this finished piece into the frame and added a sheet of white card behind, to make it look nice for gifting. I prefer to leave it for the child’s parents to decide which picture they want to display rather than selecting one you like.
Mx

Sunday, 22 April 2018

Birthday bus


  • Avery Elle- birthday bus
  • My favourite things- big birthday die
  • Lawn fawn- large dotted rectangle stackable
  • Memento ‘tuxedo black’ ink pad & dual marker
  • Neenah classic crest
  • Copic- C00,C1,C3,C4,C6,C8. W00,W1,W3,W5. E53, E55,E57,E70,E71,E74,E77,E93. RV42,R43,R32. Y32,YR21. BG70.
  • Watercolour cardstock
  • Tim holtz ‘squeezed lemonade, worn lipstick’ distress ink pads
  • Cosmic shimmer ;burnt orange, straw yellow, scarlet mist’ pixie powders
  • Wink of stella ’clear’ glitter brush marker
  • White embroidery floss
I made my background using inkpads, pixie powders and water. Once dried, I die cut into a panel with the largest rectangle. I then die cut the birthday into the panel, making sure to keep all the cut pieces. I glued the panel and the inside letter pieces onto my white card blank. On another sheet of cardstock, I stamped my images and coloured using copics. I fussy cut all the pieces and glued the little white smoke puffs flat. I added foam tape to the bus for dimension. To attach the balloons, I first tied 2 strands of embroidery floss onto the balloon with a little knot. I then added foam tape to stick it in position and used a few dots of glue to keep the string in place where I wanted. The final touch was a bit of glitter to the hats and balloons.

Thursday, 19 April 2018

Fairy birthday


  • My favourite things- big birthday die
  • Lawn fawn- large dotted rectangle stackable
  • LOTV- fairy a5 stamp set 
  • Memento ‘tuxedo black’ ink pad & dual marker
  • Neenah classic crest 
  • Copic- C1. E50,51,93. RV42,R43,R32. Y32,YR21. BG70.
  • Watercolour cardstock
  • Tim holtz ‘squeezed lemonade, worn lipstick’ distress ink pads
  • Cosmic shimmer ;burnt orange, straw yellow, scarlet mist’ pixie powders
  • Wink of stella’clear’ glitter brush marker
  • Cosmic shimmer ‘crystal stars’ glitter jewels
 
I made a water colour background and die cut the happy birthday letters from it. I die cut a panel of white cardstock and positioned the letters, then glued them down flat. I stamped my fairy image to fit in the top corner on to the panel. I coloured the image and added sparkle to the wings. I glued the finished panel to a card blank. The final touch was to glue on some crystal stars for a bit of extra sparkle.

Mx
I would like to enter:


Saturday, 3 February 2018

Bundles of blossoms


  • My favourite things- bundles of blossoms background
  • Mama elephant- birthday script creative cuts
  • Stampin up!- endless birthday wishes
  • Distress embossing ink pad
  • Wow! Embossing powder
  • Indigo blu- lucious pigment powders 'purple, raspberry,coral & green'
  • Archival 'watering can' ink pad
  • White, black, grey and watercolour cardstock
  • 4x6" white card blank
 
I stamped and embossed the floral background onto some watercolour cardstock. I used the pigment powders and water to create the pearl wash of colour, making sure to wipe any colour off the embossed lines. Once dry, I trimmed the piece to fit the front of my card blank. I cut a thin strip of white card and stamped the 'wishes' sentiment. I glued this to a wider piece of grey card. I die cut the word 'birthday' from both white and black card. I layered the white onto the black, off set slightly to create a shadow. I glued this into position above the 'wishes' to complete my sentiment. I added this to the card flat, however, you could use foam for dimension.
Mx
 
I would like to enter the following challenges:

Thursday, 4 January 2018

Archaic birthday


  • Basic grey- archaic paper pad
  • My favourite things- brush stroke birthday greeting
  • SU!- endless birthday wishes
  • Archival 'jet black' ink pad
  • Black cardstock
  • White 6x4" card blank
For this card I used scraps of coordinating paper, and followed the sketch for my layout. I simply cut the cardstock into strips leaving one piece for the corner. Once all the strips had been glued to the card blank, I chose my sentiment. I stamped the 'happy' and die cut the word 'birthday' for a bolder detail.
I think this card worked well for a men's card and had the added bonus of using some leftover pieces of patterned paper!
Mx


I'm joining :

Sunday, 13 August 2017

pretty peacocks

  • hunkydory especially for her luxury card collection: 'pretty peacock'
  • hunkydory little book of especially for her
  • teal & silver mirri card
  • a sheet of hunkydory cardstock I had spare from another set
  • my favourite things: stitched rectangle scallop edge frames die set
  • 7x7", 5x7" & 3 A5 card blanks

For this 7" square card, I cut the background to fit the card blank with a matt of teal mirri card, trimming off the top border. I then positioned the topper in the centre of the top section. I placed the message on the border beneath the topper. I completed the card with a trimmed down matching insert, which I will later stamp with a sentiment.
 
inside
 
For the 5x7" card, I used the remaining cardstock to matt directly onto the card blank. I then die cut a frame from teal mirri card. I trimmed down a page from the little book to sit inside the frame and glued these onto the card. I cut down the insert to decorate the inside with an image and sentiment.
 
inside
 
For the first A5 card, I used half a sheet of cardstock and positioned an image and sentiment topper on using foam. Again, I added a section of insert inside ready to add a message onto. 

inside
 
For this A5 card, I trimmed the image from the remainder of the card above to use as a topper. I framed this with die cut teal mirri card. I used more mirri card to matt onto the card blank before adding a sheet of coordinating cardstock. I glued down the topper and completed the design with a sentiment border across the bottom.  The insert used the same image along with a message to finish off the inside of the card.
 
inside
 
The last A5 card used the rest of the coordinating cardstock along with a page from the little book. I simply matted each onto silver mirri and glued to the card blank. I completed the inside with an insert which echoed the borders on the topper image.
 
inside
 I love the pretty images in this collection, so I was pleased to make five good sized cards to make the most of it by adding a few extra bits from my stash.
 
I would like to enter the following challenge:
 
Mx

Monday, 12 June 2017

Out of space...


  • Kirsty Wiseman - terrestrial friends
  • Neenahclassic crest cardstock
  • Copics-G46,24,21.YG61. R24,27,29. B14,16,18. A selection of Course marker's
  • Watercolour cardstock
  • Tim holtz distress inks- fossilized amber, blue print sketch, candied apple, chipped sapphire, black spot & hickory smoked
  • White paint
  • My favourite things- brush stroke birthday greeting dies
  • Tim holtz polkadot stencil
I cut a piece of watercolour cardstock to create my space background. I inked the cardstock using the brighter colours randomly spread to fully cover the cardstock. I then added the darker ink over the top to again cover the card. For the stars, I watered down some white acrylic paint and flicked this on to create a fine splattering over the ground. Once dry, I trimmed the background down into two panels to fit the card blank. I then stamped, coloured and fussy cut the rocket from Neenah cardstock. I also die cut a sentiment from watercolour cardstock. To soften the white, I added light patches of ink using the blending tool, then used the dotty stencil to produce a crater effect over the top. I glued the background onto the card blank using double sided tape. I then added the sentiment using liquid glue, and finally positioned the rocket on foam pads to complete the sketch.

I would like to enter the following challenges:
case this sketch #225
Simon Wednesday says: make it masculine
Mx

Sunday, 7 May 2017

edna loves the ocean

  • stamping bella: 'edna loves the ocean' stamp
  • my favourite things: 'pinstripe BG11' stamp
  • lawn fawn: 'small dotted rectangle stackables'
  • SU!: 'party pants'
  • copics: skin- E50, 51, 21. hair- E55, 57, 59. Ground W0. Lips- R00, 35. Yellows- Y13, 15, 18. Orange- Y35, 38. Blue - BG11, 32, 57. Glasses- N5, 7, 9. Wings- R20, R000.
  • Neenah classic crest 'solar white' cardstock
  • 6x4" vertical card blank
  • memento 'tuxedo black' ink pad
  • archival 'jet black' ink pad
  • wink of stella 'clear' glitter pen
  • Orange and white twine
I stamped the image onto the Neenah card stock using memento ink and coloured her with copics. I diecut the image into a rectangle to create the topper. I added a message stamp using archival ink. I then stamped the background directly onto the card blank before adding the topper, using funky foam for dimension. I tied the twine around the top of the card and secured with a knot. The final touch was glitter on the wings.

Challenges I would like to enter:
Simon Monday says: The great outdoors
Seven Hills may colour challenge

Mx

Friday, 14 April 2017

gift wrapped...


  • LOTV- gift wrapped
  • My favourite things- stitched scallop basic edge die
  • Sentimentally yours- elegant milestone birthday
  • Patterned paper- country companions 'for someone special'
  • Memento 'tuxedo black' ink pad
  • Neenah classic crest cardstock
  • Copics- W3,1,00. R000. Y18,17,15,13. V17,15,12,0000. R85,83,81. YG13,11.
  • Sakura- glaze pen #849, clear star glitter pen #700
  • Wink of stella 'clear' glitter brush pen
  • Yellow and gold bakers twine
I die cut my patterned paper to create a decorative edge, then trimmed it down to fit the card blank. I then positioned my sentiment and image stamps beneath according to the sketch. I coloured my image with copics, then used glitter and glaze pens to accent the image and sentiment. Finally, I glued the paper down and added twine tied in a bow. I think it's a lovely image and colour combination for a big Easter time birthday!
 
Mx
 
I would like to enter the following challenges:
Simon Monday says: hip hop
Simon Wednesday says: spring color inspiration
freshly made sketch #283

Saturday, 1 April 2017

My favourite nut

  • Neat & tangled- my favourite nut (stamps and dies)
  • My favourite things- stitched scallop basic edge dies
  • Neenahclassic crest cardstock
  • Memento 'tuxedo black' ink pad
  • Copics- E40,43,44,49. E31,99,30. YG93,95,97,99.
  • Kraft cardstock
  • Doodlebug 'white' twine
I stamped, coloured and diecut the large image from white cardstock. I then created a patterned panel by stamping lots of nuts and colouring them in, again on white cardstock. I diecut the Kraft cardstock into shape and layered with the nuts panel onto the card blank. I added the large nut with foam for dimension. To finish, I coloured twine with my copics for a perfect match and tied on with a bow.
Mx

I would like to enter the following challenge:

Tuesday, 7 March 2017

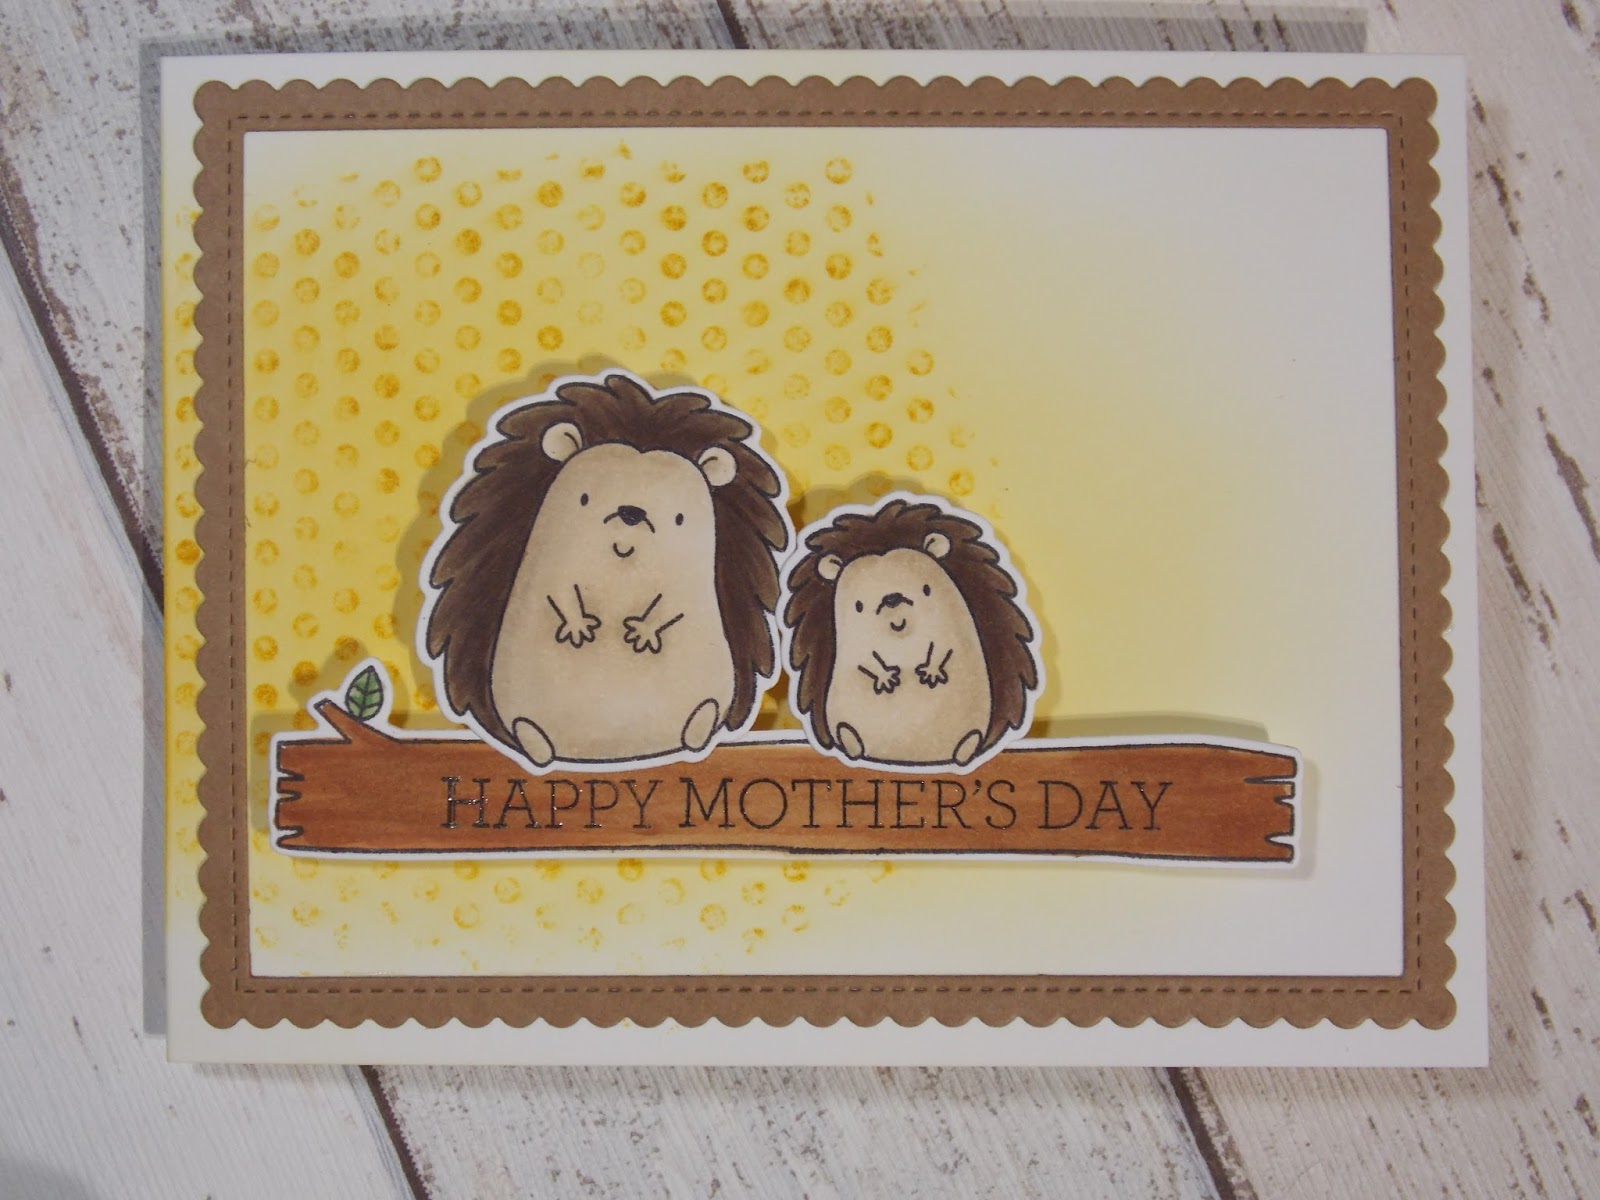
Happy hedgehogs


  • My favourite things- happy hedgehogs (stamps & dies)
  • My favourite things- stitch rectangle scallop edge frame
  • SU!- crazy about you
  • SU!- dots for days
  • Tim holtz 'fossilized amber's distress ink pad
  • Memento'tuxedo black'ink pad
  • Neenahclassic crest cardstock
  • Copics-E41,42,43,44,47,59. E35,37,39. YG63,67.
  • Kraft cardstock
  • Sakura 'clear star' glitter pen
I stamped a portion of the dot background stamp at the folded card edge, then blended some amber ink over the front of the card blank with darker colour concentrated over the dots. I diecut a Kraft card frame and glued this onto the card front. I stamped, coloured and diecut the hedgehogs. To create the extended log, I inked up the stamp but not right to the end and stamped. Next, I masked off most of that log, inked up the stamp again leaving the end, lined it up with open mid section of the log and stamped again. I then coloured the log with copics and diecut. To diecut this, I lined it up and taped in place leaving one end hanging off the edge of the plate and run through the diecut machine. I repeated this for the other side. Using foam tape for dimension, I glued the log and hedgehogs in place. To finish I added glitter pen to the sentiment.
inside
For the inside of the card, I diecut a smaller Kraft frame and glued to the inside. I stamped coloured and diecut a little hedgehog to sit above the sentiment. For the sentiment, I stamped with two colours by first inking the smaller part of the sentiment in yellow, then adding black ink to the larger part of the sentiment, (using the edge of the ink to get it neat and in just the right places). Another option would involve some stamp surgery to carefully cut apart the stamp, which makes it easier to stamp both pieces separately in different coloured inks. Beware though, as you must be careful not to damage your stamp when cutting and need to ensure the sentiment lines up again on the page when stamping!
Mx

Challenge i would like to enter:
Simon 'monday' says - " make your own background"

Monday, 21 November 2016

pups with presents...

 
  • LOTV- pups with present
  • circa design- sentiment stamp WD-GR-22
  • lawn fawn- large stitched rectangle stackables
  • my favourite things- stitch rectangle scallop edge frames
  • Neenah desert storm cardstock
  • archival 'jet black' ink pad
  • prisma color pencils- dog1:941,946,947,948. dog2:1070,1072,1074,1076,935. red:923,924. green:1090,911. present:1089,920,950. white:938,1060.
  • sakura '01' micron pen
  • sakura '#849' black glaze pen
  • uni-ball signo broad 'white' pen
  • doodlebug 'lily white' glitter
  • black & red cardstock.
 
I die cut a panel of Neenah cardstock and stamped my image and sentiment in the centre. I coloured my image using prisma colour pencils. I highlighted the dogs eyes and noses on my image using a glaze pen. I added on some snow in the background using a white pen. Since I lost some of the details and the outline whilst colouring, I relined the image using a black pen. For extra sparkle, I used tombow glue to add glitter to the snow. To make my frame, I die cut 2 frames from black cardstock and 1 frame in red cardstock. I layered all 3 together to add slight dimension to the frame. I then added this frame onto the panel. When all the glue had dried, the final step was to glue my finished panel onto my card blank.
Mx
 
I would like to enter the following challenges:

the paper players - clean and simple Christmas
the ribbon girl - November 'use any image' challenge 

magical dragons...

 
  • my favourite things- magical dragons (stamps & dies)
  • SU!- made for you
  • mama elephant- landscape trio dies (before starting this card, i used the cloud die and some template plastic to make a mask)
  • tattered lace- circle dies
  • tim holtz 'tumbled glass & broken china' ditress ink pads
  • memento 'tuxedo black' ink pad
  • copics- V17,15,12. Y38,35. YG25,23,21. RV14,13. E42,41. C00,1. 0.
  • sakura micron '01' pen
  • white funky foam
  • white cardstock
 
I cut a piece of cardstock slightly smaller than my card blank to form a matt. I created a sky background using shades of blue ink and a mask (I created my own mask using the landscape die to form the clouds). I arranged 4 different sized circle dies according to the sketch and die cut them from the matt. I edged each aperture on the matt using a micron pen to create faux stitching. I also stamped a sentiment in the bottom corner of the matt, following the sketch. I temporarily placed my matt onto the card blank, then glued each cut out circle down onto the card blank in its original position. I removed the matt from the card blank and prepared my images.
I stamped, coloured and die cut my dragon images. Since you only see the top half of the dragon and the rest is trimmed off to fit neatly behind the apertures, I only coloured the areas which would be seen. I used the 0 copic marker to add texture/ scales to the dragons. On the reverse of the sky matt, I glued each dragon behind a circle so they were peaking through. I added funky foam (you could use foam tape instead) to the entire back of the matt, then glued in position on my card blank, ensuring all the circles lined up.
Mx
 
Challenges i would like to enter:


Friday, 18 November 2016

classic car...


  • papermania- nostalgia classic cars stamps
  • SU!- for my family
  • my favourite things- line up dots background
  • kraft & black cardstock
  • archival 'jet black' ink pad
  • black funky foam
  • black gems
I masked off an area of my card blank and used the large background stamp to add pattern to my card blank. I also stamped the sentiment straight onto my card blank. I stamped a car image onto some kraft cardstock and matt & layered with some black cardstock. I glued black funky foam to the back of the cardstock, then glued it onto my card to give dimension (you could also use foam tape, or glue it flat). the final touch was 3 self adhesive black gems, to finish the sketch layout. I added a birthday sentiment to the inside of this card, but it could easily be changed to a father's day card too!!
Mx
 
challenges I would like to enter:

Wednesday, 2 November 2016

The Santa Claus....


  • My favourite things - jingle all the way (stamp & dies)
  • SU!- flurry of wishes 
  • Lawn fawn- stitched borders 
  • Tim holtz 'black soot' distress ink pad
  • Memento 'tuxedo black' ink pad 
  • Copics
  • Atyou spica pens- red & gold
  • White cardstock 
I folded a card to make a card blank and inked it black. I then cut a white cardstock panel and added 3 embossed stitched lines using a metal die. I stamped a sentiment below and coloured the letters with red glitter pen. For the image, I stamped, coloured and diecut the Santa and used foam to attach him to the card for added dimension. I repeated the same card with a different santa stamp from the set to create a landscape version of the card.
Mx


Challenges I would like to enter:
Seven hills craft challenge 'favourite Christmas song/movie's (the santa Claus 1994- me and my sister have watched it every year since it come out when we were little)

Tuesday, 27 September 2016

Jingle all the way...

  • My favourite things - jingle all the way (stamps & dies)
  • SU!- wishing you
  • Lawn fawn- large stitched rectangle stackables
  • Lawn fawn- stitched borders
  • Neenah classic crest cardstock
  • Memento 'tuxedo black' ink pad
  • Copics- R24,27,46,59. E50,51,21,93. C00,1,2,5,7,9. G05,09,14. E30,31. 0.
  • HOTP patterned paper
  • wink of stella 'gold' glitter brush pen

I die cut my paper using the rectangle die and glued this onto my card blank. I cut a strip of white card, embossed stitched borders to either side of the panel. I stamped my sentiment and glued the panel on to the card, to match the sketch. I stamped coloured and diecut my Santa images and attached these onto the card using foam tape for dimension. The finishing touch was the gold glitter, on his belt buckle and the bow on the present.
Mx
 
 
challenges I would like to enter:
Paper players #314
ABC Christmas s is for... stitching


Sunday, 11 September 2016

Santa's elves...


  • My favourite things- Santa's elves (stamps & dies)
  • LOTV- classic Christmas 8x8" paper pad 
  • Neenahclassic crest cardstock 
  • Copics- R24,27,29,59. G28,29.YG67. E50,51,21,11.E93. C00,1,3,7,8,9. Y21.YR23.
  • Wink of stella 'gold'
  • Kraft card blank (10.5x15cm)
I cut a 7cm piece of plain coloured paper and layered with a 6.6cm piece of patterned paper. I then glued this matt to my card. I cut a 1x9cm strip of coordinating paper and trimmed the ends to make a banner, which I also glued on to my card blank. I stamped coloured and die cut my elf image. This was added to my card using foam tape for dimension. Finally, I added gold wink of stella for a some sparkle on the bauble, ribbon and bell.
Mx
perfect for a batch make !!
I'd like to enter the following challenges:
Freshly made sketches #253


Friday, 15 July 2016

Birthday dahlias...


  • W plus 9- beautiful bouquets:dahlias
  • Lawn fawn- large stitched rectangle stackables 
  • My favourite things- brush stroke birthday greeting die-namics
  • SU! Ink pads- blushing bride, so saffron, old olive and pool party
  • Daler Rowney- Aqua fine smooth cardstock 
  • Kraft card blank 
  • Black and Kraft cardstock 
I die cut my cardstock panel to fit the front of my card and stamped my floral images. I taped my panel onto a board to hold it flat while I water coloured it using stampin up ink pads. I die cut my sentiment, twice from black cardstock and once from Kraft card. I glued both black layers together and added the Kraft layer on top but slightly off set this to create a shadow. I glued my card panel onto the card blank and added the sentiment to the centre to complete my card.
Mx

challenge I would like to enter:
colour Q: #350

Monday, 16 May 2016

Penguins in paradise!!


  • My favourite things- penguins in paradise (stamps & dies)
  • Lawn fawn- stitched large rectangle stackables dies
  • Mama elephant-stitched hillside dies
  • Memento 'tuxedo black' ink pad
  • Copics-YG03,05,06. G14. E35,39,29,93. RV09,1906. Y35,38. C00,1. W7,8,9
  • Versamark ink pad & pen
  • WOW- bright white & black embossing powder
  • Wink of stella-clear
  • Textured coloured cardstock, 6x4" card blank, white copic friendly cardstock

I planned my design to match the sketch, then die cut all my coloured cardstock panels. I stamped a small flower image all over the pink panel using versamark ink and used white heat embossing powder. I die cut a strip of orange card and stamped my sentiment. I then used black embossing powder to give a shiny finish to this. I die cut and stamped my images and coloured using copics. I added wink of stella to the pink ring on my penguin image. Since I had black embossing powder out I used a versamark pen to add powder to the penguins eyes. I added all the card stock panels flat to my card base to create the background. I used 1mm foam to add the palm tree and 2mm foam tape for the banner and penguin. I think this will make the perfect card for my sister's birthday this summer.
Mx

Challenges I would like to enter:
Freshly made sketches #236
MFT card challenges: colour challenge 45
Seven hills craft challenge blog- may theme 'embossing'