Showing posts with label kraft. Show all posts

Monday, 12 March 2018

baby christening


for the card:
  • LOTV- baby christening
  • LOTV- for her sentiments
  • LOTV- vintage labels occasions
  • tattered lace- circle dies
  • LOTV- country lady paper pad
  • memento 'tuxedo black' ink pad
  • Neenah classic crest cardstock
  • copics- skin:E50,51,21,93. window:E31,43,55,57,59.BG70. dress:Wo,1,2,3. pink:R81,83,95,56.RV91. green:YG93
  • kraft cardstock
  • vintage lace ribbon
  • paper roses 
      
 I cut my background papers to size and glued the top section directly to the card blank. I added ribbon to the top edge of the second piece, securing the ribbon ends on the reverse, then glued this onto the front of my card blank. I stamped and coloured my main image on Neenah cardstock, then die cut into a circle. I diecut a larger circle from kraft to mat and layer. I created a custom sentiment by combining several stamps and masking off certain sections to create the saying I wanted. I die cut this into a smaller circle and again matted with a larger kraft layer. Once all of the elements were prepared, I decided on my floral arrangement. As I was using paper roses on wires, I put small holes into the toppers where I would need them and pushed the wire through. I added a small amount of glue directly beneath each rose, then for extra security, I taped the wire in place at the back of the topper.(If you were using flowers without wires or prefer to cut the wires off, you would attach the topper to the card then simply glue the flowers on using hot glue or silicon glue gel.) Finally, I added the completed toppers to my card using foam for dimension.


for the box:
  • a3 kraft cardstock
  • lawn fawn- Finley's ABCs
  • LOTV- country lady paper pad
As the flowers are raised from the card, I made a simple box with lift off lid to fit my card perfectly, instead of an envelope. I then decorated the lid with die cut letters to spell out the name, using the left over paper from the card. I think this adds an extra personal touch and a professional finish.

Mx
I'd like to enter the following challenges:

Wednesday, 13 September 2017

Floral shadow


  • Altenew- floral shadow
  • Avery elle- with sympathy
  • Archival'jet black & sepia' ink pads
  • Kraft & black card stock
I trimmed a piece of black card and folded it down the centre to create a card blank. I then cut matt of kraft cardstock for the front of the card. I stamped the floral images across the top of the card in the sepia ink, following the sketch. I then added the sentiment, stamped in black  beneath. I glued the kraft matt onto the card front to complete this simple card. I think the simplicity of the design works perfectly for a sympathy card, with the focus on the message created by the space in the sketch and stronger contrast of ink.

I would like to enter:
Sevenhills crafts 'spotlight it!' challenge
Mx

Monday, 11 September 2017

Baby bear


  • SU!- baby bear
  • SU! 'crumb cake, soft suede & chocolate chip' ink pads
  • Kraft & ivory cardstock
  • brown adhesive pearl

I cut the ivory cardstock to matt onto the kraft card blank. I stamped the 3 layers of the bear, working from light to dark. To make lining up each layer easier, I used my misti, but the stamps are clear so you could manage without. I finished the card off with a simple message stamped onto kraft card. I cut the sentiment into a banner shape, finished with an adhesive pearl. I kept this card neutral with the ivory and brown tones for sending to those who wish to keep the babies gender a surprise.

Mx
I would like to enter the following challenges:

Sunday, 3 September 2017

packaging pouches!!


  • Kraft & cream cardstock
  • Stampin up! 'skinny mini alphabet' & 'epic alphabet' stamp sets
  • Archival ' sepia' ink pad 
  • Card bags
I stitched these little pouches as gifts and wanted to package them nicely to send. I found clear card bags which fit the pouches in neatly and sealed them in. For the top piece, I measured the width of the bag and decided on the height I wanted, (bearing in mind the stamp size + matting). I cut the Kraft card to the right width and doubled the height. I folded the cardstock in half over the top of the bag and secured with staples. I then cut the cream cardstock to layer on top and cover the staples. Before gluing into place, I used the letter stamps to spell out the contents 'wash bag!' or 'cosmetic bag' to complete this simple packaging. 


Mx

Thursday, 10 August 2017

yellow roses

  • DCWV fresh floral stack 12x12" paper pad
  • sentimentally yours 'elegant milestone birthdays' stamp
  • do crafts papermania stamp set (mum stamp...lost the packaging so I cant be certain)
  • archival 'sepia' ink pad
  • 7x7" kraft card blank
I chose this paper as the focal point for the card. I fussy cut the flowers and leaves from the background to fit the card front, making sure they remained connected as one piece. I took the remaining paper for the background and trimmed this to size as a matt on the card front. I then stamped the paper with the two sentiments, carefully positioned to sit together with the floral paper cut piece. Once the pieces were ready, I glued the paper flat onto the card blank, then added the flowers using foam pads to create dimension. It's fiddly work to fussy cut an image like this, but I think the results feel special enough to be a worthwhile celebration for a special someone's big birthday!
Mx

Sunday, 9 April 2017

Heartfelt sympathy


inside
  • SU!- heartfelt sympathy
  • Tattered lace- large circles dies
  • Archival 'coffee' ink pad
  • Tim holtz 'brushed corduroy & gathered twigs' ink pads
  • Cream & Kraft cardstock
I cut a mat of cream cardstock to fit the card front. I stamped this all over with the small image to create a background. I then stamped the large sentiment onto another piece of cream cardstock, die cut into a circle and die cut a larger Kraft circle to layer onto. For the inside, I stamped the verse onto cream card and die cut into a circle. I inked the edges of all 3 cream layers, before I glued them into place to complete this simple card.
 
Mx

Saturday, 1 April 2017

My favourite nut

  • Neat & tangled- my favourite nut (stamps and dies)
  • My favourite things- stitched scallop basic edge dies
  • Neenahclassic crest cardstock
  • Memento 'tuxedo black' ink pad
  • Copics- E40,43,44,49. E31,99,30. YG93,95,97,99.
  • Kraft cardstock
  • Doodlebug 'white' twine
I stamped, coloured and diecut the large image from white cardstock. I then created a patterned panel by stamping lots of nuts and colouring them in, again on white cardstock. I diecut the Kraft cardstock into shape and layered with the nuts panel onto the card blank. I added the large nut with foam for dimension. To finish, I coloured twine with my copics for a perfect match and tied on with a bow.
Mx

I would like to enter the following challenge:

Tuesday, 21 March 2017

Bella & friends


  • SU!- Bella & friends
  • W plus 9- unforgettable (sentiment)
  • Archival 'jet black' ink pad
  • Daler&rowney- aquafine smooth watercolour cardstock
  • Zig clean color real brush markers- 068,032,047,020,050 & 036
  • Kraft 5x7" card blank
I cut a mat of white card to fit on my card blank. I then stamped my image and water coloured with my brush markers, including a small haze of blue around them for sky. I stamped my sentiment and glued the mat to the card to finish.
 
Mx
 
I would like to enter the following challenges:

Friday, 10 March 2017

Woodland wonders


  • Avery elle- woodland wonders (stamps & dies)
  • Archival 'coffee' ink pad
  • Prismacolor coloured pencils- trees: pc947,945,941. pc938. pc911,1005. Owl: pc1076,1074,1072,1070. pc1034. pc938. Butterflies: pc1008,956,1086. Banner: pc1008
  • Kraft cardstock

I also used the Misti stamping tool for this technique, although it is possible without, the Misti makes it alot easier. You could also use a pen to trace the lines after colouring, however the wax does coat the nib and becomes difficult if doing large amounts.

Begin by stamping the images you would like to use and colouring with the prisma pencils. Then, stamp again directly over the top to redefine the lines. I started by doing the trees and then moved on to the critters as this was easier with my Misti. I added detail to the butterflies using the dot trail in the coordinating die set. To make the sentiment banner, I repeated the colouring procedure, then diecut it. I glued my banner onto my card using foam tape for dimension.
 
Mx


Monday, 2 January 2017

a birthday flower...

  • 7x7" white card blank
  • kraft cardstock
  • DCWV floral fair paper stack
  • poppy stamps- fancy happy birthday die
  • wink of stella- clear
to make this card I took 3 papers from the paper pad. the 1st sheet, I used to mat straight on to the card blank. I cut a kraft layer and die-cut the sentiment out of the centre (gutting). I then matted this layer with the 2nd sheet of paper and glued the sentiment in to the centre. the 3rd sheet of paper I fussy cut the flowers out to make an arrangement in two corners of the card. I attached these to my card using foam for dimension, I also added a touch of sparkle to the flower to complete my card.
Mx

I would like to enter the following challenge:

Friday, 9 December 2016

don't forget the gifts...

 
  • mdf blank
  • ranger studio paint
  • ranger glue n' seal - matt
  • tim holtz tissue wrap
  • golden gel medium - matt finish
  • adhesive backed felt pads

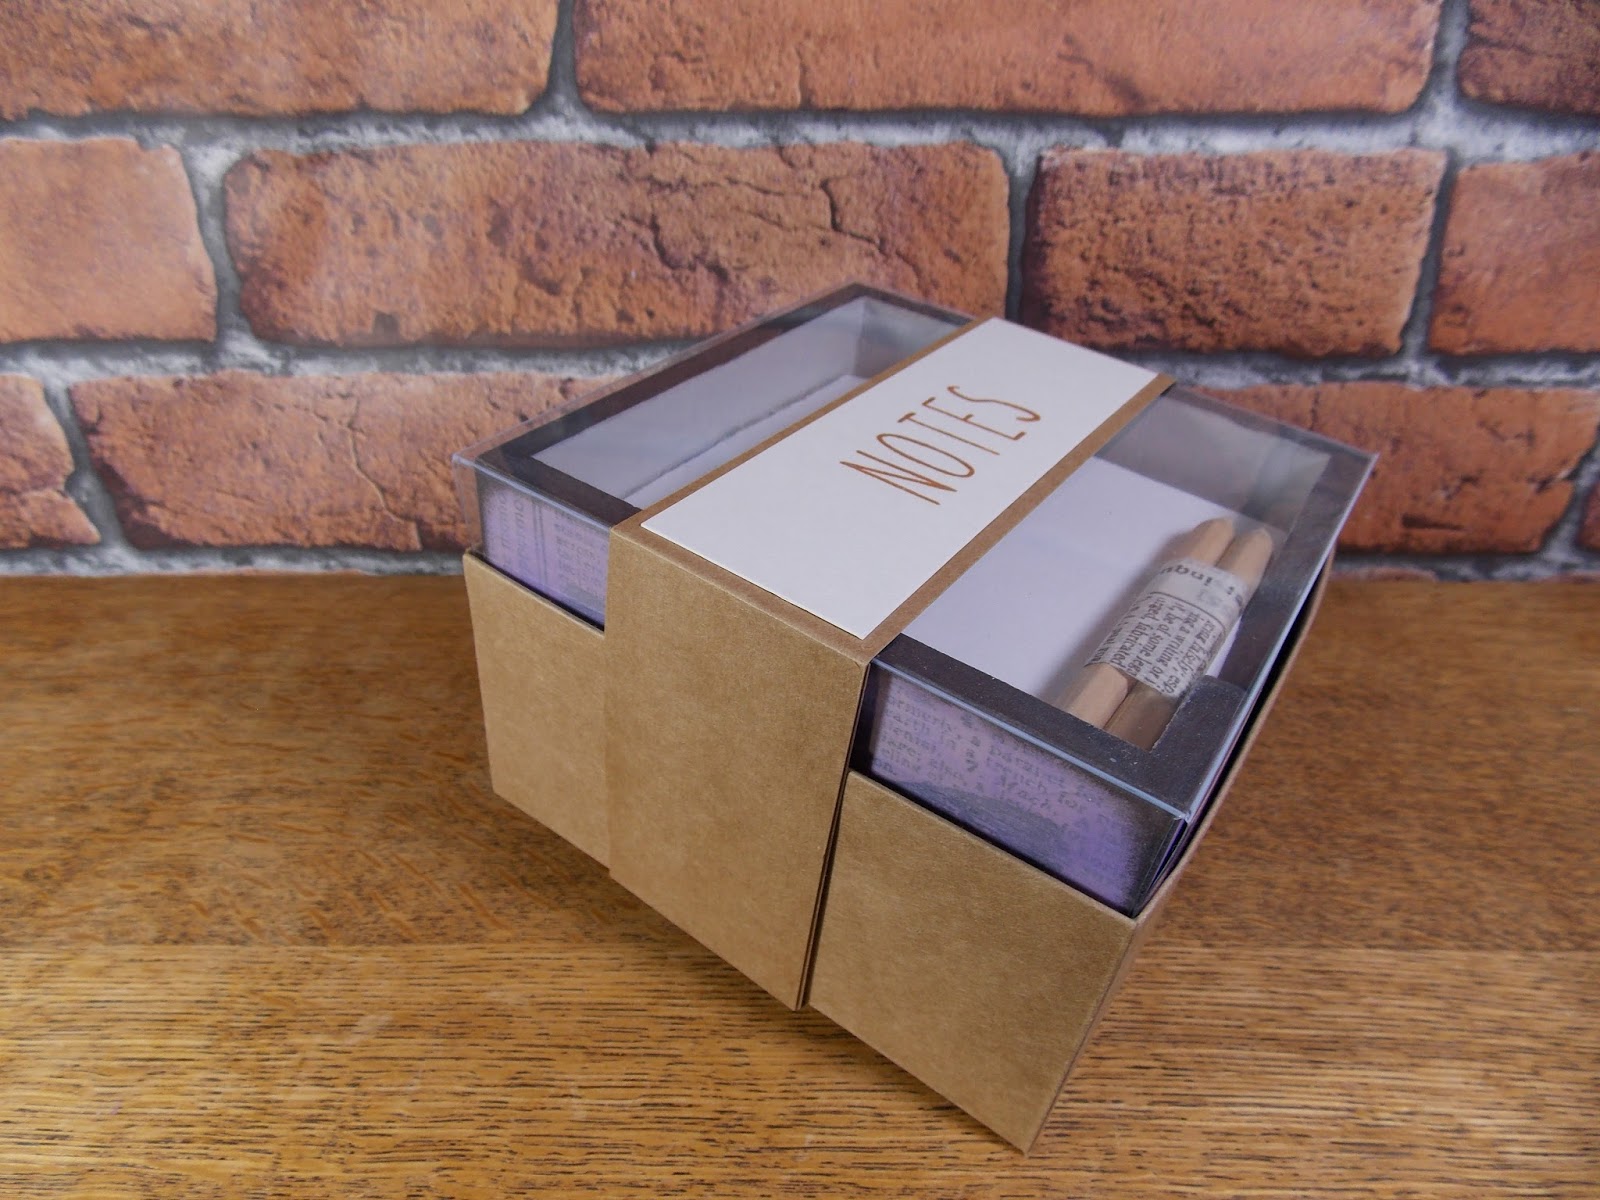
As the memo blocks from last year were a success and appreciated by those who received them as a gift, I decided to make another this year. I painted the inside of the mdf blank with grey. For the outside, I selected pieces of tissue wrap to add a butterfly to each side of the box. I shaped, glued, then sanded the tissue pieces to cover the outside. I then gave the box a coat of paint to soften the print. I used purple to add a wash of the recipients favourite colour. I sponged a small amount of black on the edges. I added a protective seal using the golden gel medium and felt pads on the base to protect work surfaces from scratches. The right size of white memo pad was purchased on ebay to sit inside, along with a couple of small pencils wrapped in the coordinating tissue to finish it off. 


As before, I packaged the memo block in kraft cardstock and acetate, with a hand stamped wrap ready for gifting.

I would like to enter the following challenge:
  
Mx 


Thursday, 8 December 2016

letter rack...


  • mdf blank
  • ranger studio paint- traditional tan & stable brown
  • ranger glue n' seal - matt
  • tim holtz tissue wrap
  • golden gel medium -matt finish
  • adhesive backed felt pads
I made this letter rack using an mdf blank coated with some cream paint. I selected tissue wrap to cover the outer faces of the rack. I cut the pieces roughly into shape and glued them into place, sanding the edges once dry for a neat finish. I then coated the box with another layer of cream, to dull the print of the tissue giving a much softer look. I finished the edges using a small amount of brown paint applied with a sponge. This creates a distressed vintage feel to enhance the paper print. To seal the piece, I coated it with the gel medium. I added felt pads to the base to prevent the rack from scratching work surfaces.
 
  • Kraft & cream cardstock
  • SU! skinny mini alphabet stamp set
  • archival ink pad - sepia
  • red lining tape
  • acetate
As this one was made as a gift, I also created customised packaging using Kraft card. I made the box the perfect size to hold the letter rack snugly and provide some protection from knocks. The window of acetate provides a sneaky peek at what's inside, with the lettering on the band to let you know what it is. I think it provides a professional finish, with that extra attention to detail that makes it feel crafted rather than just 'homemade'... as well as making it easier to wrap up for Christmas !!
 
I would like to enter the following challenge:
 
Mx

Friday, 2 December 2016

'o' christmas tree...


  • SU!- polar party
  • SU!- petite pairs
  • SU!- oval & scalloped oval punch
  • HOTP patterned paper
  • Memento 'tuxedo black' ink pad
  • Neenahclassic crest cardstock
  • Promarkers- pear green, moss, cocoa, berry red, lipstick red
  • Wink of stella - clear & gold
  • Kraft &white cardstock

Mat a piece of patterned paper onto the card blank. Cut a mat of white cardstock, stamp and colour the image. I added glitter to the image for some sparkle. stamp and punch out the sentiment. layer onto a scalloped punched oval. cut a piece of coordinating paper and trim into a banner shape. glue onto the card blank following the sketch.
Mx


Sunday, 27 November 2016

coral congratulations ...

  • paper smooches wise dies 'congratulations'
  • stampin up! 'love & laughter' stamp set
  • kraft 5x5 card blank
  • white cardstock
  • funky foam
  • memento tuxedo black ink
  • tim holtz distress ink 'abandoned coral'
I took a piece of white cardstock and created an ombre effect with the coral distress inks. I then backed the card with funky foam before die cutting the sentiment out 3 times. On the card blank, I stamped the cake and engagement sentiments using the black ink. I then glued the congratulations on top to complete the sketch.
 
Mx

I would like to enter the following challenges:
cas(e) this sketch #199
simon monday says 'trio-tastic'

Monday, 21 November 2016

pups with presents...

 
  • LOTV- pups with present
  • circa design- sentiment stamp WD-GR-22
  • lawn fawn- large stitched rectangle stackables
  • my favourite things- stitch rectangle scallop edge frames
  • Neenah desert storm cardstock
  • archival 'jet black' ink pad
  • prisma color pencils- dog1:941,946,947,948. dog2:1070,1072,1074,1076,935. red:923,924. green:1090,911. present:1089,920,950. white:938,1060.
  • sakura '01' micron pen
  • sakura '#849' black glaze pen
  • uni-ball signo broad 'white' pen
  • doodlebug 'lily white' glitter
  • black & red cardstock.
 
I die cut a panel of Neenah cardstock and stamped my image and sentiment in the centre. I coloured my image using prisma colour pencils. I highlighted the dogs eyes and noses on my image using a glaze pen. I added on some snow in the background using a white pen. Since I lost some of the details and the outline whilst colouring, I relined the image using a black pen. For extra sparkle, I used tombow glue to add glitter to the snow. To make my frame, I die cut 2 frames from black cardstock and 1 frame in red cardstock. I layered all 3 together to add slight dimension to the frame. I then added this frame onto the panel. When all the glue had dried, the final step was to glue my finished panel onto my card blank.
Mx
 
I would like to enter the following challenges:

the paper players - clean and simple Christmas
the ribbon girl - November 'use any image' challenge 

Friday, 18 November 2016

classic car...


  • papermania- nostalgia classic cars stamps
  • SU!- for my family
  • my favourite things- line up dots background
  • kraft & black cardstock
  • archival 'jet black' ink pad
  • black funky foam
  • black gems
I masked off an area of my card blank and used the large background stamp to add pattern to my card blank. I also stamped the sentiment straight onto my card blank. I stamped a car image onto some kraft cardstock and matt & layered with some black cardstock. I glued black funky foam to the back of the cardstock, then glued it onto my card to give dimension (you could also use foam tape, or glue it flat). the final touch was 3 self adhesive black gems, to finish the sketch layout. I added a birthday sentiment to the inside of this card, but it could easily be changed to a father's day card too!!
Mx
 
challenges I would like to enter:

Friday, 15 July 2016

Birthday dahlias...


  • W plus 9- beautiful bouquets:dahlias
  • Lawn fawn- large stitched rectangle stackables 
  • My favourite things- brush stroke birthday greeting die-namics
  • SU! Ink pads- blushing bride, so saffron, old olive and pool party
  • Daler Rowney- Aqua fine smooth cardstock 
  • Kraft card blank 
  • Black and Kraft cardstock 
I die cut my cardstock panel to fit the front of my card and stamped my floral images. I taped my panel onto a board to hold it flat while I water coloured it using stampin up ink pads. I die cut my sentiment, twice from black cardstock and once from Kraft card. I glued both black layers together and added the Kraft layer on top but slightly off set this to create a shadow. I glued my card panel onto the card blank and added the sentiment to the centre to complete my card.
Mx

challenge I would like to enter:
colour Q: #350

Monday, 4 July 2016

roses for a friend...


  • altenew- build -a-rose stamp & dies
  • paper smooches- friend word die
  • lawn fawn- large stitched rectangles
  • SU!- dots for days (background stamp)
  • SU! ink pads- pink pirouette, blushing bride, pear pizzazz & soft sky
  • kraft card blank
I stamped dots to create a decorative panel for my card and die cut this into shape. I then die cut the word friend from the panel and kept the inside pieces for later. I then glued the panel onto the card and carefully added the floating pieces back in place to complete the word.
I stamped the rose and 3 leaves from the stamp set and die cut the images. I had to use 2nd generation stamping to get the right shade of some of the colours. I attached the leaves flat and the rose using foam, according to the sketch.
Mx
 
challenges I would like to enter:

Sunday, 26 June 2016

beautiful sympathy...


  • W plus 9- beautiful bouquets: ranunculus 
  • Avery elle- with sympathy die
  • SU!ink pads- blushing bride, so saffron, wisteria wonder, pear pizzazz, soft sky
  • Archival 'jet black ' ink pad
  • Daler Rowney- Aqua fine smooth watercolour cardstock 
  • 6x4" Kraft card blank & cardstock 
I cut a matt of watercolour cardstock to fit my card blank, leaving a small border. I stamped my floral image and watercoloured it using stamping up ink pads. I diecut the  sentiment  twice and layered these together to give more dimension to my card.
Mx

Challenges i would like to enter: 


Friday, 24 June 2016

a pretty big birthday !!


  • LOTV- james butterflies
  • LOTV- dress shoppe 8x8" paper pad
  • memento 'tuxedo black' ink pad & copic friendly cardstock
  • copics- E31,35,37. YR31. R81,83,85. YG95,97,99
  • wink of stella 'clear' glitterpen
  • sakura glaze pen #849 (black)
  • uni-ball signo 'white' pen
  • lawn fawn cuts- finleys 123's
  • 5x7 kraft card blank and cardstock
I cut a matt of the lighter paper to fit on my card. I then cut a panel of the pink paper and matted this onto kraft before sticking onto the card. I then created my topper by stamping the image, colouring with copics and mattand layering this onto kraft. For added detail in the image, I added black glaze pen to the nose and eyes, allowing this to dry before adding white highlights and sparkling the flowers and butterflies. To complete the card, I die cut the numbers in kraft and blue card and layered these onto the card.
 
Mx

the sketch challenge I would like to enter is:
sketch Saturday- #417