Showing posts with label mothers day. Show all posts

Sunday, 14 January 2018

For my mum

  • LOTV-I'm here for you
  • Memento 'tuxedo black' ink pad
  • Neenah classic crest cardstock
  • Copics- skin:E50,51,21,93. Hair:E55,57,59. Dog:E43,44,47. Clothes:R20,21,22,24,46. Yg21. BG53,10. Y17. Stairs:C00,1,3.
  • SU!- teeny tiny sentiments
  • Patterned paper (from my scrap box so not sure which brand/ collection) 

I chose to make a 5" square card and found strips of patterned paper that would fit the sketch. I cut the main panel from colouring cardstock and stamped my image. I coloured the image using copics makers that best fitted the paper colours. I then stamped my sentiment and layered on to some more of the patterned paper. I glued all the paper pieces down to complete the card sketch, (although I did flip it so the sentiment better fitted my image.)

Mx

Joining in with:


Wednesday, 7 June 2017

tea mum


  • hunkydory especially for her collection- time for tea : Toppers, card and inserts
  • silver mirri card
  • die cut letters
  • clear adhesive gems
  • 8x8 white card blanks 
I created a layered mum card on an 8x8 card. I used the background paper and added decoupage elements from the topper sheet to raise the tea pot and tea cup. I mat and layered this with some silver mirri card onto the card blank. I then finished it off with some die cut letters to spell out 'mum', using mirri card stock.  
For the second card, I created another 8x8 card. Again, I matt and layered the patterned paper onto the silver mirri to fit the card blank. I then layered up the frames and topper from the sheet at different angles and glued down with foam for dimension. I added the 'mum' sentiment from the topper sheet in the bottom right hand corner. To complete the front of the card, I embellished the 2 of the corners with rows of 3 adhesive gems
On the inside, I cut down one of the inserts to fit inside, carrying the image from the topper through to the centre for that extra special touch.
inside

Mx


The challenge i would like to enter

Thursday, 16 March 2017

wonderful mum...


  • Mama elephant- butterfly kisses
  • SU!- wonderful mum
  • Zig clean color real brush markers-025 pink,200 almond pink, 047 may green, 037 cornflour blue
  • Versamark ​ink pad
  • Wow! 'opaque bright White's embossing powder
  • Dealer Rowney-aqua fine smooth watercolour cardstock
  • Sakura micron '005' pen
 
 I wanted to create a soft, water colour style card for mothers day. I stamped the image with the versamark ink, then added the white embossing powder. I also added the sentiment in the same way and used the heat tool to melt the embossing powder. I then coloured the flower using the brush markers, blended out with a water brush. I added a background of blue, concentrated around the message to make the white writing pop. As a finishing touch, I used the micron pen to freehand a border to edge the card.
 
Mx

Tuesday, 7 March 2017

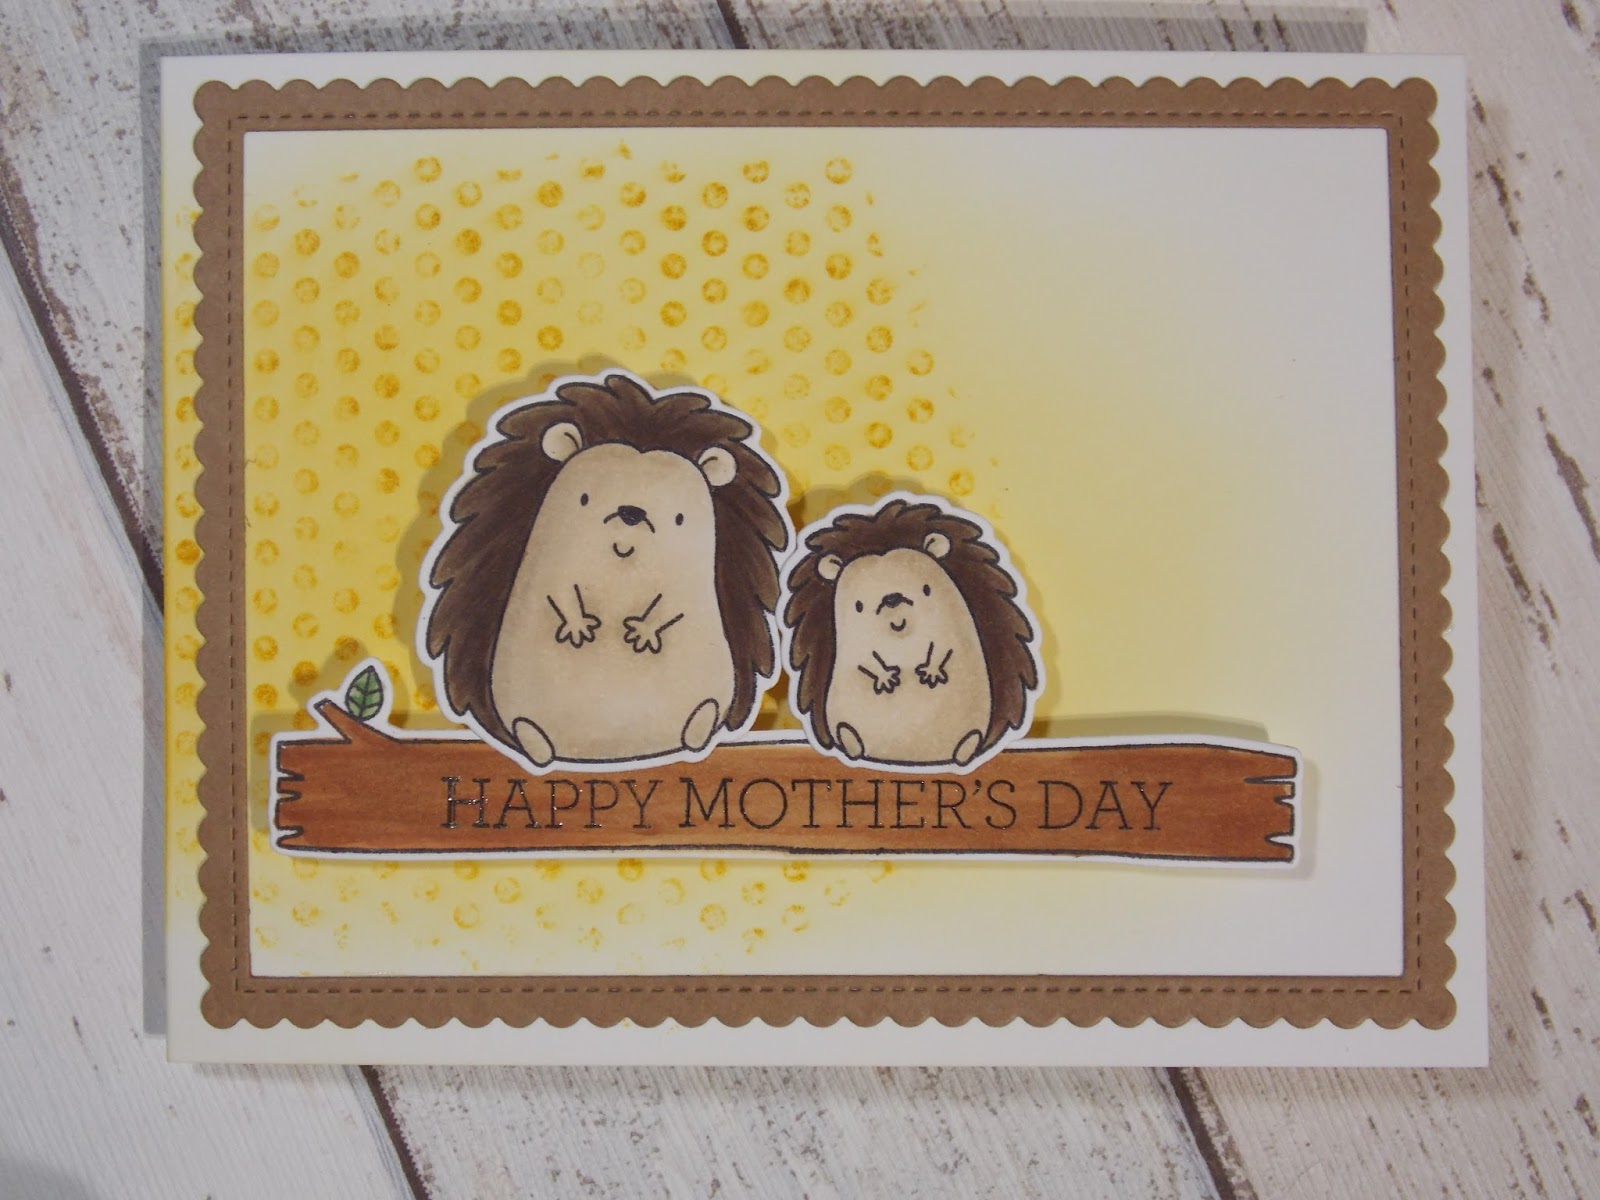
Happy hedgehogs


  • My favourite things- happy hedgehogs (stamps & dies)
  • My favourite things- stitch rectangle scallop edge frame
  • SU!- crazy about you
  • SU!- dots for days
  • Tim holtz 'fossilized amber's distress ink pad
  • Memento'tuxedo black'ink pad
  • Neenahclassic crest cardstock
  • Copics-E41,42,43,44,47,59. E35,37,39. YG63,67.
  • Kraft cardstock
  • Sakura 'clear star' glitter pen
I stamped a portion of the dot background stamp at the folded card edge, then blended some amber ink over the front of the card blank with darker colour concentrated over the dots. I diecut a Kraft card frame and glued this onto the card front. I stamped, coloured and diecut the hedgehogs. To create the extended log, I inked up the stamp but not right to the end and stamped. Next, I masked off most of that log, inked up the stamp again leaving the end, lined it up with open mid section of the log and stamped again. I then coloured the log with copics and diecut. To diecut this, I lined it up and taped in place leaving one end hanging off the edge of the plate and run through the diecut machine. I repeated this for the other side. Using foam tape for dimension, I glued the log and hedgehogs in place. To finish I added glitter pen to the sentiment.
inside
For the inside of the card, I diecut a smaller Kraft frame and glued to the inside. I stamped coloured and diecut a little hedgehog to sit above the sentiment. For the sentiment, I stamped with two colours by first inking the smaller part of the sentiment in yellow, then adding black ink to the larger part of the sentiment, (using the edge of the ink to get it neat and in just the right places). Another option would involve some stamp surgery to carefully cut apart the stamp, which makes it easier to stamp both pieces separately in different coloured inks. Beware though, as you must be careful not to damage your stamp when cutting and need to ensure the sentiment lines up again on the page when stamping!
Mx

Challenge i would like to enter:
Simon 'monday' says - " make your own background"

Thursday, 2 March 2017

Brynn has a baby shower

  • Stamping bella- Brynn has a baby shower
  • Neenahclassic crest cardstock
  • Memento'tuxedo black'ink pad
  • Copics- E50,51,21,93. E34,35,37,57,59. BV0000,000,01,02,04. Y18,15,11. R24. BG70. W00,1,3.
  • Yellow embossed dot & lilac cardstock
To create this card, I covered the card blank with the dotty card. I then cut a matt of white for the stamped image and a layer of lilac card stock. I stamped and coloured the image before adding to the card following the sketch. I added a coordinating banner stamped with a sentiment to complete the card.
 
Mx
 
I would like to enter the following challenge:

Sunday, 12 February 2017

twoo cute ...


  • hunkydory 'what a hoot' paper craft kit : twit twoo
  • 7x7 card blank
  • silver mirri card
I took inspiration from the sketch and thought it would work perfectly for this topper sheet as it had a banner on it. I matted my card with silver mirri, then layered with the coordinating paper from the kit. I cut each end of the banner off to sit behind the topper as they do in the sketch, making sure to leave the strip in the middle just over 5" long to be used on another card. I then arranged the topper and banners onto the card blank. I glued the banners in position onto the topper then mounted this on foam pads for dimension. These toppers are so lovely they really don't need a lot doing to them to make a nice card, I will simply stamp a sentiment inside to complete this card.
 
Mx

challenges I would like to enter:
freshly made sketch #274
Simon Wednesday says: cute

Friday, 4 March 2016

mint blooms...


  • SU! – crazy about you
  • Archival ‘jet black’
  • Spellbinders die d-lites – pretty petals A & B
  • DCWV – fresh floral paper stack
  • 6x6” card blank & white cardstock
I cut my papers and white card to create mat and layers, following the sketch layout. I die cut the two flowers from white and the coloured paper, then layered the pieces together. I also stamped and cut the sentiment in to a banner. I completed the card by assembling the layers onto the card blank, using foam on the flower and banner for dimension.

 I would like to enter this card into the following challenge:

MX

Monday, 29 February 2016

worlds best mother !!

  • SU! nice cuppa stamp set and cups & kettle framelit dies
  • fresh floral paper stack -DCWV
  • 6x4" card blank 
  • white and pink cardstock
  • tim holts 'picked raspberry' distress ink
  • wink of stella- clear
I die-cut the tea cup once from pink card and 3 times in white. I inked all the edges with distress and glued them together for a dimensional element. I then stamped the sentiment onto it and highlighted this with glitter to create the topper. To complete the card, I added a mat and layered panel of patterned paper and stuck them to the card following the sketch.

I would like to enter this card into the following challenges:
Mx

Saturday, 29 March 2014

something for spring ...

stamps: vivid vases, Madison avenue, teeny tiny sentiments from stampin up!
inks: tim holtz (picked raspberry & peacock feathers) ink pads, memento (tuxedo black) ink pad, promarkers
cardstock: craftwork cards digi cardstock plus 6x4" card blank
dies: finishing touches edgelits, stylish stripes embossing folder from stamping up! & sizzix using the big shot
 
   I cut the cardblank with a decorative edge die to reveal the inside, where I placed an embossed panel of card. I inked the front of the card with pink, then  stamped a repeat pattern with the block to create a background to place on the front of the card. for the topper, I stamped the image onto cardstock, (I chose not to ink the attached message, replacing this with a separate mothers day sentiment). the image was coloured using promarkers, then cut to shape and a matt inked in pink to edge the topper. I stuck this to the front of the card, carefully lining it up and only adding tape to the overlap so it didn't attach to the inside too!! I  edged the paper piece inside with a line of pink using a fine tipped promarker (you could matt and layer for a similar effect). the finishing touch was two inked pieces of card, which I shaped into banners and layered onto the embossed card inside. this adds interest and a pop of colour to the inside of the card and completes the chosen sketch. I think it makes for a nice bright card that could work equally well for a birthday or thankyou if you swap the sentiment!!
 
open view


Mx

Monday, 17 March 2014

mother's day !!

 
stamps: flower arranging from LOTV and wonderful mother from stampin up!
inks: promarkers, memento (tuxedo black) tim holtz distress ink pads (worn lipstick)
cardstock: 6x4 card blank, craftwork cards digi cardstock.
punches: x-cut corner rounder

I inked my card blank and added a matt with 2 rounded corners. I stamped the LOTV image using the memento ink pad and coloured it using promarkers. I then added the sentiment in the top corner. for the inside of the card, I cut another matt to fit rounding 2 of the corners to match the front. I inked the edges using the same tim holtz ink pad, then stamped the sentiment in the centre. I think it makes a sweet and simple card for mothers day!!

inside

mother's day
Mx
 
... underneath is my sisters card and her explanation of it x

blog takeover !!!!!


stamps: for my family, papillon potpourri, peaceful petals and so very grateful all from stampin up!
inks: promarkers, tim holtz distress ink pads (tumbled glass and shabby shutters), archival (aquamarine) and  memento (tuxedo black)
punches/ dies: bitty butterfly punch, bitty banners framelit, finishing touches and adorning accents edgelits all from stampin up! and a scallop circle framelit from sizzix (all used with the big shot)
cardstock: 5x5 card blank, petal fresh 8x8" paper pad from LOTV & nit wit and craftwork cards digi cardstock.

i'm not a really a crafter, so it normally takes an age to make a super simple card. this time, I was determined to do something that was pretty for mum and showed a bit more of the effort that went into it !! I chose the paper and matched my inks and promarkers to it. the card blank was inked with the blue outside and the green inside. I then die cut the edge to reveal a strip of the green from the front. I die cut another strip inked in green to create a border for the paper. the topper was stamped with the flower and coloured using the promarkers, then die cut into a scalloped circle. I stamped 'mum' in the bottom corner. I also stamped 2 butterflies onto cardstock then used the punch to cut them out. one butterfly was added to the front on a foam pad. the other butterfly was stuck inside along with the sentiments, one of which was stamped onto card and die cut into a banner shape, the other was stamped directly onto the card. it still took quite a while to do the card but i'm pretty pleased with it !!
 
inside

butterfly kisses
Ax

Sunday, 10 March 2013

happy mother's day!!

this is my mothers day card, i used a magnolia stamp coloured using promarkers. i cut the mat using a spellbinders shape die on my big shot machine. the background is using tim holtz distress ink pads and lili of the valley stamps . i also used a lili of the valley stamp to do the message which i coloured using promarkers in co-ordinating colours. i finished with a ribbon at the top tied in a bow.
 i made these chocolate box cakes for my nana's. they are a chocolate cake with chocolate fudge frosting, topped with a selection of chocolates (i choose thornton's classic) .i then decorated the sides with chocolate fingers but you could use anything similar in shape. i choose a nice ribbon and tied a big bow and your finished, (you could do a bow and ribow with icing to make it all edible!!)
for this cake i used orange kitkat instead of chocolate fingers.
 
since it is mother's day i would like to share this card that my mum has made for her mum.
she used toppers and papers from hunkydory crafts and a silver border peel off which has a butterfly design. another fab effort, we mght just make a crafter out of her yet!!
 
Mx