Showing posts with label robins. Show all posts

Thursday, 23 November 2017

Robin and Friends

  • Hunkydory Christmas classics luxury card collection: Robin and Friends
  • Hunkydory little book of snowy scenes
  • Hunkydory essential book of Christmas sentiments
  • gold mirri card
  • A5, 7x7" & 5x7" white card blanks
 
For the 7 square card, I mat and layered the card front with gold mirri and the red printed cardstock. I then glued the image topper down flat, just above the centre on the card front. I added the frame surrounding the image and placed a sentiment beneath, raised on foam pads. I cut the insert sheet, with the coordinating image, down to fit inside the card.
inside
 
I created this 5x7" card using the printed image as the main feature. I trimmed the cardstock down and layered onto gold mirri to fit the card front. I finished it with a large decorative essential book sentiment. I added the insert to the inside, cut down to include the printed message.
inside
 
Using the other sheet of cardstock, I made this 5x7" card. I covered the card front with the cardstock, featuring the robin printed in the corner. I then positioned the image topper in the space above and nestled the sentiment beside the printed robin. The insert was trimmed down, so the inside matched the card front with a nice sentiment.
inside

I made the final card using the remaining cardstock and a complimentary little book image. I covered the A5 card blank with the cardstock. I then mat and layered the little book page onto gold mirri to create a topper. I added this to the card using foam pads, along with small sentiment from the collection. I used the other half of the insert sheet to finish the inside of this card.
inside

Mx

Wednesday, 22 November 2017

Deer winter wishes

  • Hunkydory snowy season luxury card collection: Deer winter wishes
  • silver mirri card
  • A5, DL, 5x7" & 5x5" white card blanks


For the A5 card, I mat and layered one half of the cardstock on silver mirri to fill the card front. I then simply added the image topper offset on the card, using foam for dimension. I trimmed down the insert to have the matching image inside with the printed sentiment.
inside

I cut the other end of the cardstock down to make this DL card. I mat and layered the tree image onto silver mirri and glued to the card front. I finished with one of the long thin toppers on foam pads. Again, I trimmed the matching insert piece down to fit inside.
inside

I used a section of the other printed cardstock in the collection to create this 5x7" card. I carefully cut the cardstock down to fill the card front, with the border running across the bottom of the card. I then added the image central to the main section of the card, with the sentiment overlapping the border edge. I added the coordinating insert to the inside of the card.
inside

 For the first 6" square card, I made a feature of the decorative borders to enhance this topper. I began with the inside of the card, with a cut off border on the outer edge of the card, alongside a section of the insert. I cut away a reveal, then added the cardstock with the border to cover the remaining card front. I finished with the image and sentiment toppers on foam pads, leaving the gap for the sentiment to overhang the card front.
inside

For the final card, I pieced together the offcuts as a background. I covered the join between the cardstock with the coordinating border strip. To complete the card, I added the sentiment topper to one side of the border and centred the image topper on the other section, both raised on foam pads.
Mx

Tuesday, 21 November 2017

Robin redbreast

  • Hunkydory snowy season luxury card collection: Robin redbreast
  • Hunkydory essential book of Christmas sentiments
  • silver ribbon
  • A5 & 6x4" landscape & portrait white card blanks
For the first A5 card, I covered my card front with the cardstock. I then simply added the large square topper with a sentiment topper beneath, both raised on foam pads for dimension. I cut the coordinating insert to fit inside with the printed message.
inside
For this A5 card, I trimmed the other half of the cardstock to fit the card front. I then added the large circle topper to the centre. I chose an essential book sentiment and positioned it in the corner overlapping the border. I used the remaining insert to fill the inside of the card.
inside
I used the little robin topper to create this 6x4" card. I trimmed the cardstock down to fill the card front, with the border running across the base of the card. I then simply positioned the robin on foam pads off centre. I found a sentiment from the essential book with the same shaping to compliment the image and glued this in place. I trimmed the coordinating insert down, adding the blank piece to the inside of this card.
inside
I created the final card to make a feature of the printed image on the cardstock. I simply cut it to fill the front of a 6x4" card. I added the border strip to fill the space beside the robin and ground the sentiment. I glued the sentiment tag on foam pads, with a silver ribbon bow tied as a finishing touch. For the inside of the card, I carefully trimmed the insert down to include the message and border.
inside
Mx
Wednesday, 4 October 2017

festive wonder

 
  • Hunkydory festive elegance luxury card collection: festive wonder
  • Hunkydory essential book of Christmas sentiments
  • adorable scorable Red cardstock
  • A5, 5x7", 6x4" & 6" square white card blanks
 
I created the largest card on half of the starry patterned cardstock. I cut the cardstock to fit the front of the card. I then arranged the frame and image topper at angles and completed with the sentiment topper in the bottom corner. The inside was finished with half sheet of the matching insert.


I cut a section of the other patterned cardstock to fit the front of a 5x7" card blank. I simply added the big robin topper and used a sentiment from the essential book of Christmas sentiments beneath, glued down with foam pads. I trimmed the printed image and sentiment on the other insert to fit inside this card.
 

inside


For the 6x4" card, I used off cuts from each of the patterned cardstocks to fill the card front. I added the border to cover the join and say 'merry Christmas'. I positioned one of the smaller robin toppers to sit over border and complete the card front. I trimmed down the remainder of the first insert to go inside.
 
inside

 
 With the other large topper, I created this square card. I simply matted the front with the red cardstock, before layering on the topper image flat. I added the frame and sentiment topper on foam pads to create dimension. The last piece of insert was cut down to fit inside and can be finish off with a sentiment stamp.


inside


Mx

Monday, 23 November 2015

christmas with friends ...


  • 7x7" white card blank, red and green cardstock, copic friendly cardstock
  • crafters companion (Christmas in moonbeam meadow) - Rudolph and friends
  • SU! warmth and wonder stamps & softly falling embossing folder
  • memento ink pad (tuxedo black)
  • copics (E81,53,55,57,59. E43,44,47,49,81. R24,27,29. G7,14. Y13,15. C00,0,01,02.)
  • tattered lace essentials circle dies
  • ribbon
  • wink of stella- clear
  • ranger glossy accents

I cut my base layers, then embossed the white mat before sticking this to the green one. I glued the ribbon on and secured it to the back of the green card before matting onto the card blank. I die-cut the circle mats and stamped the white one with my image and sentiment. I coloured the image and added glitter and gloss. I added this layer onto the card using foam for dimension.
Mx
 
 challenges I would like to enter are:


Tuesday, 18 November 2014

chocolate box


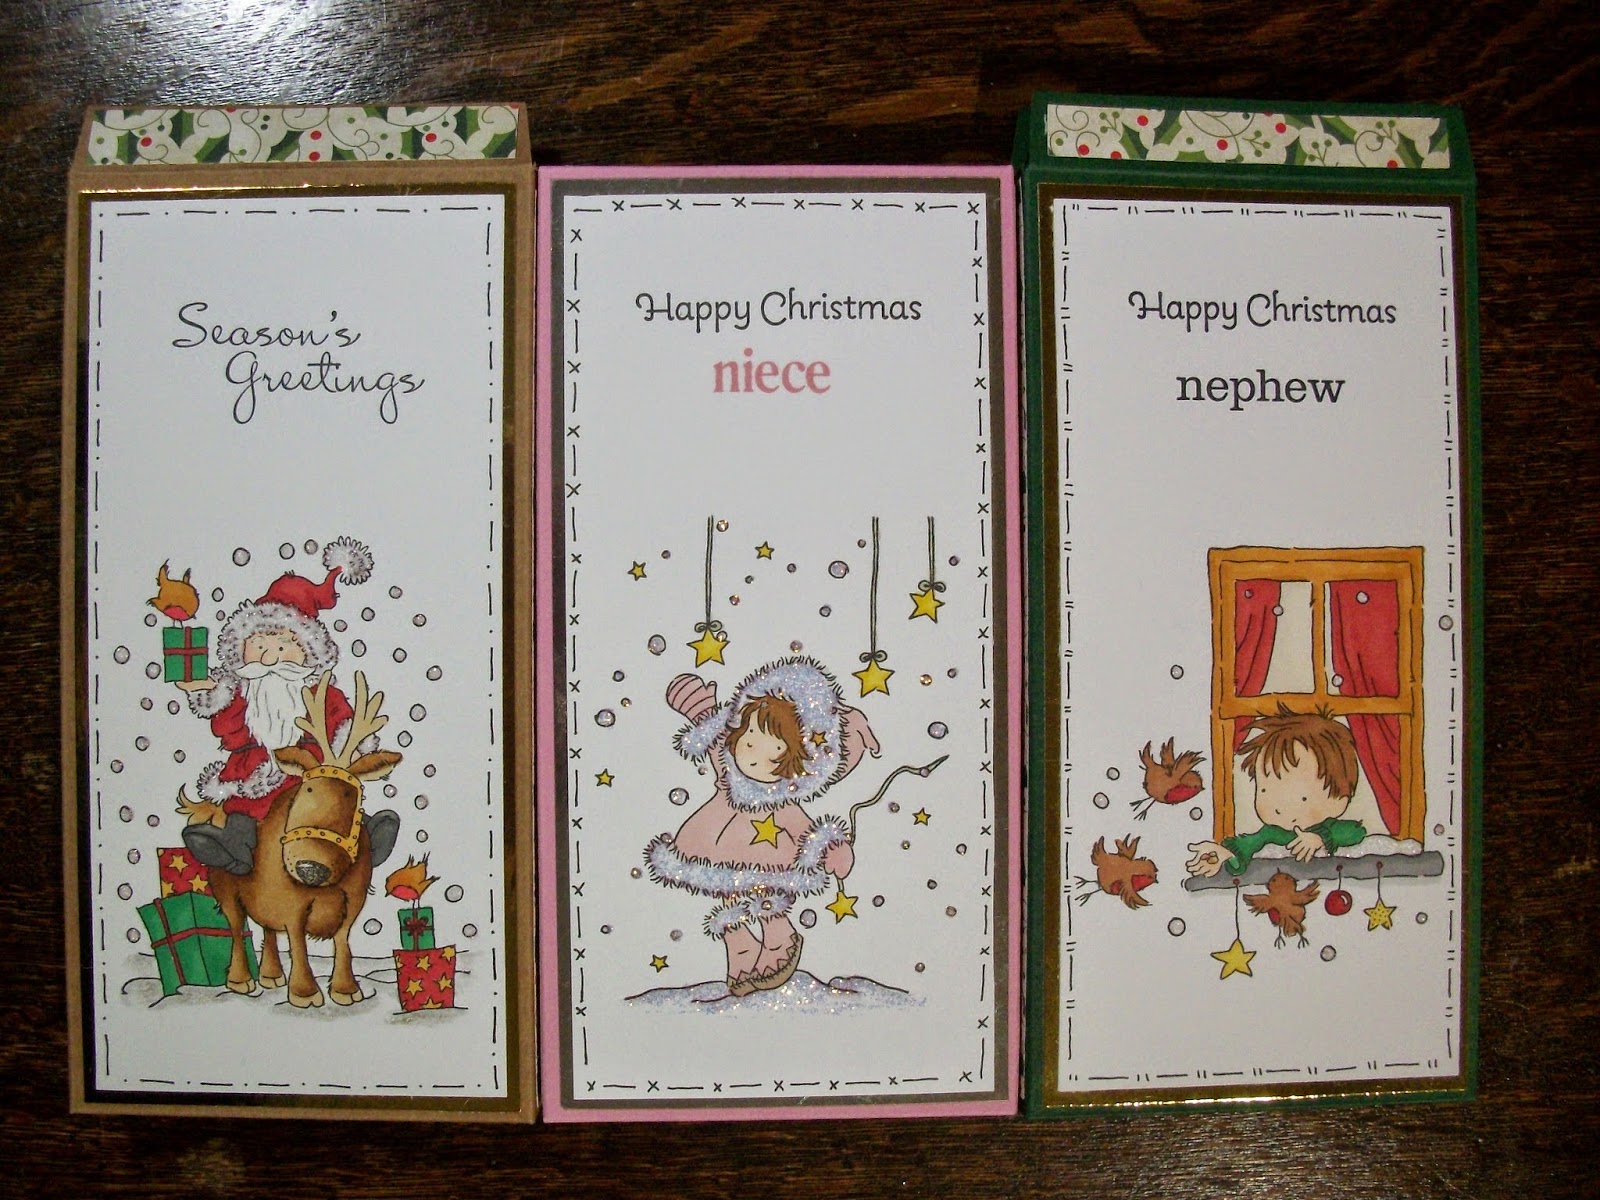
I've made these chocolate box cards to send the kids at christmas. I bought a chocolate bar and measured it to calculate the dimensions of the box. I took an A4 sheet of card and scored the net. folded it and cut it out. I then glued the box together. I then stamped and coloured an image from lili of the valley with a stampin up! sentiment on digi cardstock. I created a freehand border using the sekura micron pen, and added glitter to the images too. I layered mirri card behind the image and added this as a decorative panel to the front of the box. I also found coordinating papers to decorate the sides and top of the box. The chocolate was then sealed inside ready for the kids to open at Christmas.


I think this is a great idea to combine a card and a gift as the flap on the box creates somewhere to write your message and the box holds the gift. you can customise the boxes to have the card open at the front or back (depending on which way up you use the template!!) or make the box to fit a different sized gift. These aren't just for Christmas, change the image and you can send them any time of the year.
 
challenge #20 - Box it up!

'Merry Christmas'

Mx

Thursday, 6 November 2014

merry mail !!


to make this card I inked the 6x4" cardblank using tim holtz distress ink pads. I then stamped a foliage icon (LOTV- set 78) using the same ink pad over the entire background. I added brown ink to the edges. I cut a mat of stamping cardstock and stamped the image (LOTV- Christmas robins) using memento, then coloured this with copics. I added ink to this mat and again used brown to darken the edges. I tied a co-ordinating ribbon to the top with a small knot then matted this layer on to some gold mirri card. i stamped my sentiment (LOTV- set 8) on to a scrap bit of cardstock inked it to match the card and cut it out. for the postmark lines, I directly stamped onto the card once everything else had been glued. to finish this card I added some glitter to the snow. I think the muted browns and post mark create a vintage feel to the card.
http://freshlymadesketches.blogspot.co.uk/2014/11/freshly-made-sketches-161-sketch-by.html

http://thepaperplayers.blogspot.co.uk/2014/11/paper-players-220-theme-challenge-from.html
 
http://ideastoinspire.blogspot.co.uk/p/challenge.html
 
 
Mx

Friday, 13 June 2014

snow much fun !!


stamps: snow much fun and teeny tiny sentiments from stampin up!
inks: memento ink pad (tuxedo black), tim holtz distress ink pads, promarkers and sakura micron pen
punches: modern label and word window from stampin up!
cardstock: 5x5 card blank and craftwork cards digi cardstock

sorry i haven't posted for a while... having building work done at home so i have no internet or craft room!! i have managed to make a card to share with you though. i kept the design simple, with these 2 stampin up! images as the focal point. i coloured the image with promarkers. i added a message punched out and layered it onto another punched shape inked in red. the card blank was inked with another tim holtz distress pad, and the topper matted on. i finished the card with a border drawn with sakura micron pen.

Mx

Saturday, 24 August 2013

make it festive !!


stamp: Christmas robins stamp from LOTV
paint / ink: archival jet black ink pad, claudine hellmuth studio paints and matt medium (and brushes too!!)
other: cut mdf shape, rope trim, tim holtz ideaology tissue wrap (melange), scrabble letters, pinflair snow dust, stickles rock candy by tim holtz, hot glue gun.

I wanted to do something a little different for Christmas so I decided on a hanging plaque. MDF shapes are available, but if you have a handy neighbour like mine, there's no need to buy one.. just put your order in !! fix the rope trim to the wood (staples work well) and you have an instant base to work on.
I covered this one in the tissue wrap and painted over the top for a vintage feel. the stamped image compliments the theme well and the scrabble letter message gives it that quirky edge. of course glitter is needed for that finishing festive touch.

 
i'd like to enter it into the 'make it festive' monthly challenge ... I hope it fits the brief !!
 
Mx