Friday, 29 November 2013

little mermaid...

stamps: little mermaid 2 from lili of the valley, everyday greetings from wild rose studio
inks: memento (tuxedo black), archival ink (rose madder), tim holtz distress ( tumbled glass & worn lipstick) & promarkers
cardstock: craftwork cards digi cardstock & 4x6 card blank
extras: scallop border punch from stampin up!, circle framelit die and big shot from sizzix, liquid pearls (white opal)
 
before things are too busy with Christmas, I decided to make this cute birthday card as I just couldn't resist using this stamp. I thought she would work well with the sketch as a basic design, creating a window into a watery world within the circle. I stamped the girl a second time and cut her out so she sat over the edge of the circle. by mounting her on foam pads this helped give the card some depth. the message was curved to follow the circle, by using a clear stamp and shaping it into an arc on the stamping block. I added liquid pearl bubbles for that extra pretty finish. I kept things simple, just using touches of colour on the edges to highlight those in the image. I don't know about you but I think she's so lovely she only needed a clean and simple card to show her off !!
 
http://ideastoinspire.blogspot.co.uk/p/challenge.html

http://sketchsaturday.blogspot.co.uk/2013/11/week-286-with-bugaboo.html
 
Mx

Wednesday, 27 November 2013

a pretty pink parcel ...


stamp: moonlight wishes from LOTV
ink: promarkers, memento ink pad (tuxedo black) and claudine hellmuth studio paint (painterly pink)
cardstock: mirri card, craftwork cards digi cardstock
other: stickles (stardust), organza ribbon, martha stewart border punch (snowflakes), papier mache box from the works (also available from other stores... the range, hobby craft etc)

i decorated this cute little box as an alternative way to wrap up a christmas gift. i stamped this lovely image from LOTV, and coloured her in soft pastel tones with promarkers. i chose a few different shades of pink for her stocking to coordinate with the studio paint i used on the box (this is a good place to start as the box will take several coats to cover and need drying time too !!) i cut the image into a simple rectangle and rounded the corners for a nice shape. i matted the image onto a piece of mirri card. the ribbon was attached across the back then hidden under a further sheet of craftwork card for a neat finish. it also makes a better surface to write a message on. for the final touch i added some snowflakes, which i cut with the punch and glittered using stickles. the great thing about it is that when the ribbon is untied the tag comes off leaving a plain pink box ready for reusing ... a pretty and planet friendly way to wrap up your pressies !! 


Mx

Sunday, 24 November 2013

one, two, three ...

 
stamps: sassy salutations, pennant parade, positively chevron all from stampin up!
inks: archival ink pad (jet black, coffee, vermillion, olive) tim holtz distress ink pad (barn door)
punch: petite pennants from stampin up!
cardstock: craftwork cards digi cardstock, 4x6 card blank
 
I made this card, but wasn't quite happy with the design in the end... so I made two more variations of it to improve the end result!! ive shown you all three of the cards here so you can see what I mean...
 
 
 the first- I wanted to keep things clean and simple. I made the stripes using strips cut from the chevron background stamp. I layered them under the white matt, stamped the large sentiment with the tree. I stamped and punched the green part out and stuck it on with foam pads, the rest of the design was stamped directly onto the card. unfortunately, the central matt blends into the card too much so it lacks impact.
(oops!!)
 
 
 the second- I repeated the card as above, but this time added a red distressed edge to the matt using tim holtz inks. I think this is an improvement, but its still a little too subtle and gets lost in the design.
(ok ..)
 
 
 the third- this time I took a different approach to edging the matt. I added an extra layer under the matt, coloured in a bright red. I also decided that the merry Christmas would look better in black for that added contrast. I think this works well, with the bold stripes and crisp lines to give the clean and simple card high impact !!
(yay !!)
 
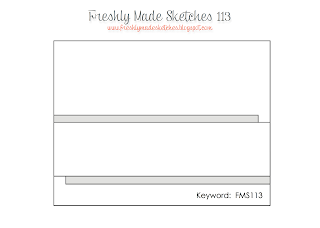
http://freshlymadesketches.blogspot.co.uk/
freshly made sketch 113

I hope you like what I did in the end and showing you that an oops can be an ok and even a yay!!
Mx

Saturday, 23 November 2013

white christmas ...

 
stamps:joyful Christmas by stampin up!
inks: archival (blue violet)
cardstock: craftworkcards digi cardstock, pearlescent paper, 6x6 card blank
dies: window frames collection framelits from stampin up! and the big shot from sizzix
extras: stamposaurus stencils (snowflake design), dreamweaver stencil embossing paste (white), marks & spencer Christmas ribbon (silver) & adhesive gems

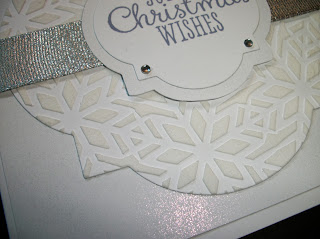
 since the ribbon girl challenge this month was white, I decided to go for a simple design, layering different textures and sparkles for a sophisticated look. I spread texture paste over a snowflake stencil, allowed it to dry then die cut the card into a shape. I cut further layers of pearl and white card using the smaller dies in the same shape. I stamped the sentiment onto the top layer. the embossed piece was then stuck onto a further sheet of pearl paper. I tucked the ribbon under the backing matt, before sticking onto the card to give a professional, clean finish. the other layers were then added over the ribbon using foam pads to add further dimension. I finished off the design with some adhesive gems in the corners for that extra Christmas sparkle.


http://www.ribbongirls.blogspot.co.uk/2013/11/november-colour-challenge.html
 
Mx (with a little help from mum, as I struggle with the all white look)

Wednesday, 20 November 2013

a cute congratualtions ...

 
stamps: baby blanket & all our dreams( sentiment only) from lili of the valley, sentiment from kanban clear stamp set
inks: memento (tuxedo black), archival (jet black) & promarkers
papers: bear necessities 8x8" paper pad from lili of the valley and nitwit collections, 4x6" white card blank, and tag ( not too sure what type I used, just choose one to fit your card or trim a bigger one down !!), and some craftwork cards digi cardstock
extras: pink satin edge organza & bakers twine

I made this baby card for a friend expecting a little girl soon. I figured it would be the perfect opportunity for the LOTV pink and white challenge, and decided to combine it with a fab Friday sketch. I stamped the baby onto the tag, coloured the face and shadows using promarkers, then paper pieced her outfit with the two coordinating papers. I then used a further piece of the checked paper as the matt for the card. the tag was added with some ribbon to finish. I chose a satin edged organza in the pink, and a twine to add different textures. the sentiment was stamped as a finishing touch. I think it keeps things clean and simple, with just enough detail in the soft patterned papers and ribbons to welcome the new arrival. 

(inside view)
again I kept things simple, matt and layering a white sheet of card stamped with the sentiment onto a sheet of the soft patterned pink, (used on the paper piecing on the front)for the inside of the card.

http://fabfridaystampinchallenge.blogspot.co.uk/2013/11/fab-friday-31.html
'fab fri challenge 31'
 

http://ideastoinspire.blogspot.co.uk/p/challenge.html
'pink and white'
 
 
Mx

Saturday, 16 November 2013

all that glitters...

 
stamps: james wrapped in tinsel, set 26- simply sophisticated from lili of the valley
inks: memento (tuxedo black), promarkers
cardstock: 6x6 kraft card blank, kraft card stock, gold miri, craftwork cards digi cardstock
extras: glamour dust (gold), glossy accents, red and gold ribbon

I found this cute bear and decided he would be perfect for the sparkle challenge with the tinsel. I added glamour dust to the tinsel over a gold promarker, and glossy accents to make the baubles shine. I cut him into a rectangle with and rounded two of the corners. I matt and layered him onto the mirri for that extra shimmer. based on the sketch I then placed him on the card with 2 coordinating ribbons (for some more sparkle ... you can never have too much at Christmas!!) and a simple stamped message below. to hide the ends of the ribbon I cut and edged a piece of kraft card so I could tuck the ribbon under. 

http://casethissketch.blogspot.co.uk/2013/11/case-this-sketch-54.html
'#54'
http://www.ribbongirls.blogspot.co.uk/2013/11/lovely-lili-challenge-midweek-reminder.html
'lovely lili challenge- sparkle'
 
http://abcchristmaschallenge.blogspot.co.uk/2013/11/w-for-winter-wishes.html
'w...winter wishes'
 
Mx


Tuesday, 12 November 2013

spot on !!

 
stamps: ornament keepsakes, more merry messages & distressed dots from stampin up!
inks: tim holts distress ink (barn door), archival ink (vermillion & jet black)
extras: craftwork cards digi cardstock, 4x4 card blank, holiday ornaments framelits dies from stampin up! and sizzix big shot die cutting machine

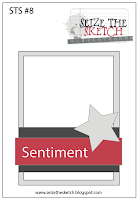
for this card I used the sketch as the basis of my design, using just three elements. I kept this one really simple, with just the red and touches of black on the white. the background was stamped with the dots, then the sentiment matt and layered on top, with the Christmas ornament placed as the focal point. I think the dots and the classic contrast between the colours gives the card a clean modern feel. keeping things this simple also means it could be a great one to make in batches this Christmas !!
 
 
http://seizethesketch.blogspot.co.uk/2013/11/seize-sketch-8-sweet-sassy-stamps.html
'seize the sketch #8'
 
http://www.simonsaysstampblog.com/wednesdaychallenge/
'keep it clean & simple'
 
Mx


Monday, 11 November 2013

full of beans !!

 
stamps: perfect blend, positively chevron & French foliage from stampin up!
ink: memento (rich cocoa), tim holtz distress ink pads ( mustard seed, spiced marmalade), promarkers
cardstock: craftwork cards digi cardstock, landscape 4x6 kraft card blank, corrugated cardstock
others: a brown button & some twine
 
I based my design on the sketch below. I decided to go for a coffee theme, with some wide- awake yellow and orange for the paper players colour challenge. I used a piece of corrugated cardstock for the strip across the card, coloured with orange distress ink. I added a backing of the stampin up! chevron stamp to give a vibrant burst of yellow. the coffee cup was coloured with promarkers, then suck down with foam pads to make it stand out. I stamped the splats onto the Kraft for an added touch. I finally stuck on the button and twine to finish.
 
http://freshlymadesketches.blogspot.co.uk/
 
http://thepaperplayers.blogspot.co.uk/
 
Mx
 

Sunday, 3 November 2013

ROAR !!


stamps: dinoroar, positively chevron & for my family from stampin up!
inks: tim holtz distress ink pads( mustard seed, rusty hinge & walnut stain),  promarkers (marsh green, olive green, ivory & satin) memento ink pad (rich cocoa)
cardstock: craftwork cards digi cardstock, 6x4 kraft card blank

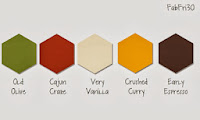
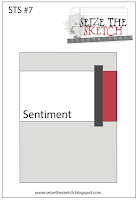
im rather fond of these cute little dinosaur stamps from stampin up!, so i decided to make a birthday card with them. i thought the fab Friday colours would make a nice scheme for the dinosaurs to keep things bright and fun. the chevron pattern enhances this, while the brown and craft bring it all together. the design was kept simple following the sketch with the bands of colour, but i added the grass across the bottom edge to finish things off. for that extra little touch, i repeated the grass stamp and added the ROAR message inside, with a cheeky little t-rex in the corner.
 
inside
 
http://fabfridaystampinchallenge.blogspot.co.uk/
'fab Friday30 - colour challenge'
 
http://seizethesketch.blogspot.co.uk/
'seize the sketch -sts#7'
 
Mx

nuts 'n' botz !!


Stamps: stampendous botz quotz, spots botz set & hot botz, then the setsentiments come from kirsty wiseman robots birthday,
inks: memento ( tuxedo black) & letraset promarkers (in ice grey 1,2,3,4&5)
cardstock: craftwork cards digi cardstock, grey metallic paper, 6x6 card blank

i made this card with two blog challenges in mind. i based the design on the sketch, filling the squares with robots as i thought they would work well with the grey colour scheme. making the most of the stamp sets, i repeated the block of bolts and springs to create the background, which i coloured in promarkers to coordinate with the robots. to add the message, i decided to do something different... by making a slit in the robots tummy, i could slot the curled paper in to make it look like the message was popping out of the bot. i brought the design together with a metallic paper to enhance the robot theme.
 

http://freshlymadesketches.blogspot.co.uk/
'freshly made sketches 110'
 
http://promarkerchallenge.blogspot.co.uk/
'shades of grey'
 
Mx
 

Saturday, 2 November 2013

little red reindeer!!

 
stamps: magnolia reindeer tilda & the stocking (not sure what this is actually called), stampin up! more merry messages &distressed dots
inks: memento (tuxedo black), archival ink (vermillion &jet black), promarkers in various colours
cardstock: craftwork cards digi cardstock & 5x7 card blank
extra: cosmic shimmer iridescent watercolour paint (yellow sun)

 
so it's that time of year... meaning another Christmas card from me!! again, I kept this one simple, using just the red with a touch of brown for the  sack. the image and dots add a sense of fun and keep things cute and girly. the background was stamped in two stages, even though the stamp is a large one for backgrounds, the 5X7 card was just too big!! the girl was stamped onto the sack to give her a base to sit on. this meant using a masking technique as I used two stamps to create the look . I then cut her out and layered her up using various depths of foam pads for a 3D effect (this could also be done using silicone, but remember this makes it heavier to posting!!) i also added pearlescent paint to the bells. I think its these little touches that just create a more professional finish, which, for me, is especially important when keeping things simple.
 

http://abcchristmaschallenge.blogspot.co.uk/
'v' is for vixen
 
http://www.ribbongirls.blogspot.co.uk/
Magnolia- 'spots and dots'
 
Mx

Friday, 1 November 2013

a get well gift ..


stamp: magnolia nurse tilde, stampin up! express yourself (hostess)
card: kraft card, twitterpated designer papers from stampin up!
inks: tim holtz distress ink (aged mahogany ), archival ink pad(coffee), memento (tuxedo black), promarkers (various).
 
instead of sending just a get well soon card for someone feeling under the weather this season, I thought I would share a nice little alternative with you... I have made a tissue holder gift card, which I think would be perfect for someone who is unwell, (especially if they are in hospital, as you are no longer allowed to send food or flowers!!)
 
 cut a piece of kraft card to 12x16.5cm and score at 6.5 and 10cm
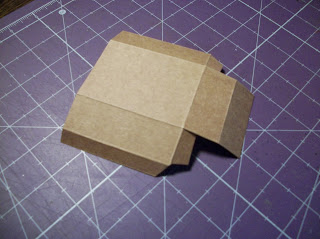
using a 12.5cm x12cm piece of kraft card score along the longest length at 1,3.5,9 and 11.5cm. turn to score the base of the holder, which needs to be scored at 7.5 and 10cm. remove all necessary card to form the box shape, as seen above.
 line the card with paper sections, I did the outside of the card in 3 pieces, and a single sheet on the inside for a neater finish. don't forget to edge your paper in a matching colour ink (I used aged mahogany)!!
 
I added paper in a co-ordinating pattern in sections, to the box piece and applied red tape where needed ready to stick it in
 
I stamped and coloured the nurse image for the front. I also cut out a matt in the same paper as used on the box inside. you are then ready to assemble.

inside view with tissues
first, fix the box compartment inside using more tape, as seen above


 next, stamp your sentiment on the front,(you might want to do this before you glue the box compartment into the centre). then layer up  your die cut shape using flat adhesive (double sided tape) and add your character with a dimensional adhesive (I used silicone to give it more shape but you could use foam pads)
 
... and its ready to send to a friend in need of cheering up!!
Mx